QuickBooks Error PS038

QuickBooks is a man’s creation, and therefore it is very common for it crashes at times. The software has a lot of error codes that its users come across. One from the lot is QuickBooks Error PS038. People who use the software to manage payroll encounter this error.
When someone tries to update QuickBooks payroll, upgrade tax tables, or wishes to send online paychecks, they receive the error message pop-up.
With its many features and functionalities, QuickBooks is a software with a user base of millions of billions across the world. People operate this app for their personal finance management as well, as large-scale business manages their budget and payrolls here.
At times, they have to put a pause on their operations because of payroll errors, such as PS038. If you are also irked with this error and need to overcome it as soon as possible, further in this blog are some simple solutions. You will not require any technician’s help in order to follow them.

Possible Explanations Behind QuickBooks Error PS038

Prior to solving any issue, it is necessary that you know what triggered it in the first place. When you are aware of that, you know what exactly you need to fix. Here are some possible explanations for why QuickBooks Error PS038 is creating a problem for you:

  • Working on an outdated QuickBooks version
  • Have paychecks stuck during an online transaction and have “Online to send” status.
  • Using an older version of payroll
  • Violating the latest subscription of payroll after the latest update

Also Read: QuickBooks Error 103

Troubleshoot QuickBooks Error PS038

However, the reasons can be a few; we have a bunch of resolves for you to try until you have QuickBooks payroll up and running again.

Resolve 1: Get the Latest Versions of QuickBooks Desktop and Payroll Tax Table

QuickBooks Desktop and Payroll Tax Table

This method involves two steps: a) checking for QuickBooks update, and b) getting payroll tax table update

A) Check for QuickBooks Update

QuickBooks Update

  • First, you need to close your QuickBooks Desktop application entirely.
  • Thereafter, look for the QuickBooks icon on your PC and right-click on the same.
  • Here, from the list, select Run as Administrator, and this will run the software with admin rights.
  • After that, locate the Help tab from the menu bar and hit that.
  • Furthermore, go to Update QuickBooks Desktop.

B) Get Payroll Tax Tables Update

  • Run QuickBooks Desktop on your desktop.
  • After that, go to the Employees tab. You will find it on the menu bar of the application.
  • From there, choose Get Payroll Updates and then move ahead with Download Entire Update.
  • Lastly, to get the updating process over, hit Download Latest Update and give it a few minutes.
  • Once all that is done, go back to the Employees options and, this time, choose My Payroll Service.
  • Furthermore, click on Send Usage Data and eventually select Send Payroll Data.

If you successfully share the data, this means the resolve worked for you.

Also Read: QuickBooks Error H202

Resolve 2: Verify andRebuild Data

For users still troubled with QuickBooks Error PS038, here is yet another chance for you to fix it yourself.

Verify Data

  • Go to the QuickBooks Desktop application home screen first.
  • There, head to the File option and then select Utilities.
  • After that, hit Verify Data from the second scroll-down list.
  • Finally, hit OK, and this will work for you.

Rebuild Data

  • Once you have verified the data, it is time for you to rebuild it.
  • Go back to the Utilities tab under File and this time choose Rebuild.
  • Furthermore, you will have a prompt window where you can generate a backup wizard.
  • This is important because you need to have a backup of your files before you go ahead with the rebuilding process.
  • After that, start Rebuilding and give it a few minutes. This will display any issue on your screen.

Resolve 3: Repair Payroll Blocked Paychecks

If, after the first two resolves, you still get “Online to Send” status in front of your paychecks, then try following these steps:

  • Initially, run QuickBooks Desktop on your system and click on the Edit option from the menu bar.
  • After that, from the drop-down list, go to Find and then select the Advanced option.
  • Furthermore, go to Choose Filter and locate the Filter List.
  • Next, click on Detail Level and go ahead with Summary Only.
  • Go back to the Filter List and change the online status.
  • You need to select Online to Send from the lot.
  • Moving ahead, select Find, and you will get all the pending paychecks listed before you.

Finally, hit Run a Verify Data, and it will display the stuck paychecks.

Resolve 4: Verify Stuck Paychecks Information

In order to make this step work, you will first have to access the stuck paychecks with the same step as mentioned in Resolve 3.

  • Once you have those on your screen, go to the very first one in the list and select Paycheck Details.
  • This will lead you to the Review Paycheck tab, where you need to locate Earnings and click on that.
  • Here, scroll down to the last item present in the list, copy the same, and generate it as a new item again.
  • Eventually, you will land on the Net Pay Locked tab. Decline the action here by hitting No and going back to the newly added item.
  • Next, select Rate Field and ensure that you have the same Net Pay and Taxes. If so, then click on OK.
  • Now, if you get a pop-up with the Past Transactions message, then select Yes.
  • Thereafter, save the changes and hit Yes if you get Recording Transactions on a prompt window.
  • Next, you need to go back to the paycheck and open Details.
  • You now need to delete the new entry that you created a while ago.
  • Again, make sure there are no alterations to the Net Pay and taxes and hit OK.
  • Hit Save & Close to save all the edits.

Remember, you need to follow the aforementioned steps with each paycheck entry that is under “Online to Send.”

Summing Up

There are millions of people who work on QuickBooks on an everyday basis and face issues similar to QuickBooks Error PS038. This is where we come into the picture. This blog holds all the solutions that you can go ahead with and eliminate this issue from your software.

All the steps are DIY (Do It Yourself), so you won’t need any external help. However, if you are unable to fix the problem with these, our team of experts will introduce you to some other technical solutions for the same.

Reach out to us via email, over a call, or through the live chat option available on our online website. Someone will connect with you as soon as possible and help you out.

Also Read: 8 Easy Solutions to Fix QuickBooks Error 80029c4a


Upgrade QuickBooks Desktop Pro Plus, Premier Plus, or Enterprise 

QuickBooks is one of the most favored accounting applications for its excellent features and functions. When using QuickBooks products (Pro, Premier, or Enterprise), you may receive the message to update or upgrade the program. It may sound intimidating; however, when you know these terms, it becomes easy for you to take the desired action when you are prompted to do so. Here, we will discuss the procedure to upgrade QuickBooks Desktop Pro Plus, Premier Plus, or Enterprise and cover other important aspects related to upgrading QuickBooks.

Also Read: How can I locate a missing QuickBooks transaction

What Is The Difference Between QuickBooks Updates and Upgrades?

QuickBooks Updates

QuickBooks releases new updates on a regular basis to resolve the known issues in the program and also improves the existing features for the users. The users can utilize the improved features after downloading the new updates. Using the latest updated version of the program depicts that you are using the most error-free version. Besides, updates are free.

QuickBooks Upgrades

On the other hand, Intuit launches a whole new version of the program each year. These versions are labeled differently. For instance, when the 2015 version of QuickBooks falls, Intuit releases QuickBooks Pro 2016. Even if you already have an older version of the program, you will need to pay full price for the newer version of the program. If you don’t want to upgrade, you may continue with an older version of the program. Besides, when upgrading, you may choose to keep the old version of your machine.

Why Is It Crucial To Upgrade QuickBooks?

Upgrading QuickBooks lets you harvest your accounting software to its maximum potential. Besides, you can utilize the newly added features with a newer version of the QuickBooks application. Contrarily, using an older version of the program can make you prone to a multitude of technical glitches. The below-given points highlight the importance of upgrading QuickBooks:

Also Read: Resolve QuickBooks Error H101

1: You Get The Best of QuickBooks

Upgrading QuickBooks to a new version will help you and your team of accountants to utilize the newly added features. Implementing the newly added features to your business accounting can makes its processes more efficient and less time-consuming. This time can be invested in streamlining other important competencies of your business.

2: Upgrading Will Safeguard You From Various Vulnerabilities

There are many businesses that are still using older versions of the QuickBooks application from the early 2000s. However, when you want the program delivers the best results for you, upgrading is not optional. With an upgraded version comes updated security, privacy, and ease of access. Besides, new security fixes also roll out with an upgraded version of the program. Your financial data is the backbone of your business. You may not afford to lose any.

3: Keep Compatibility Issues At Bay

When updating your operating system, you need to ensure that the software is also updated. If not, it will evoke compatibility issues between QuickBooks and your operating system. New operating systems and newer versions of the programs are devised compatible so that they can work best with each other.

4: Facilitates Your Business Growth

When growing your business, you also need your accounting application to grow with you. However, it is not possible just by adding maintenance releases and add-ons. It needs you to upgrade your accounting software to a newer version.

5: Smooth Operations And More Efficiency

When you work with the most error-free version of the program having the most advanced features, you can definitely handle your complex accounting operations with the utmost ease. Besides, the improved security features keep your crucial data secured. Moreover, with enhanced privacy and accessibility, you can do well in your business and achieve the desired growth.

Also Read:  8 Easy Solutions to Fix QuickBooks Error 80029c4a

Procedure To Upgrade QuickBooks Desktop Pro Plus, Premier Plus, or Enterprise

Upgrading QuickBooks can bestow your business with a multitude of advantages. However, you can perform the procedures to upgrade QuickBooks when you feel it’s necessary. Below are some helpful procedures that can help you upgrade QuickBooks Desktop Pro Plus, Premier Plus, or Enterprise. Check below:

1: Upgrade The Subscription of Your QuickBooks Desktop

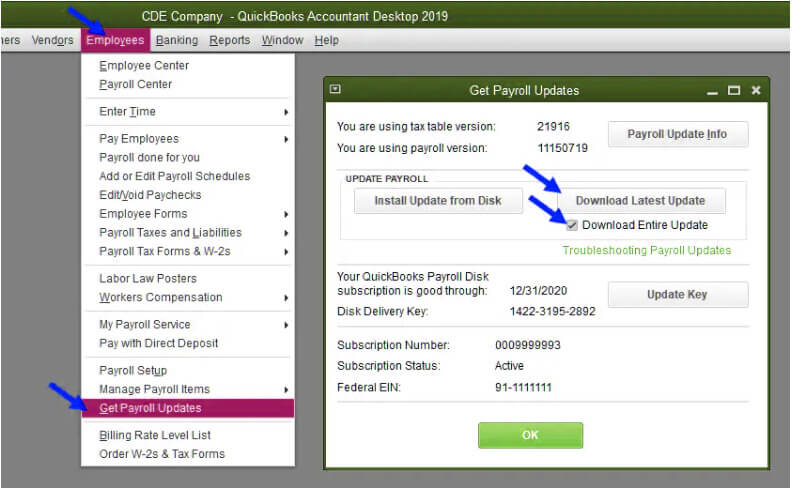
When Intuit rolls out a new version of QuickBooks, it notifies you about the same with a message. You can simply upgrade your QuickBooks Desktop subscription by following the below-given steps:

  • When you see the notification about the upgrade, select Upgrade Now option.
  • If you want to keep the older version of your QuickBooks Desktop with the new version, select Keep the old version on your computer.
  • Thereafter, you need to click on the Let’s Go button. It will make QuickBooks download, install, and activate the new version on your machine. Furthermore, your company file will also be updated.
  • After the completion of the upgrade process, select Open QuickBooks.

Note: The upgrade time may vary based on the speed of your Internet and the size of your QuickBooks company file.

2: Perform the Upgrade Process Without Subscription

If QuickBooks doesn’t prompt you to upgrade your QuickBooks, it means that you have a one-time purchase of the QuickBooks. In such a case, you can utilize the easy upgrade tool to get the job done. Below are your steps:

  • Select Help in the first place, and thereafter, select Upgrade QuickBooks.
  • Moving ahead, you need to select the version you want to upgrade to and hit Upgrade Now option.
  • If you want, you can keep the older version of the program on your computer. Select Keep the old version on my computer and then click on Let’s Go.

Your previous action will make QuickBooks download, install and activate the new version of QuickBooks on your PC.

3: Utilize Discovery Hub To Upgrade QuickBooks

To upgrade QuickBooks using Discovery Hub, follow the below-given steps:

  • Launch the Discovery Hub and then select Upgrade to QuickBooks 2022.
  • Thereafter, select Proceed to upgrade and hit the Upgrade option to proceed further.
  • In case you want to keep the older version with the new one, select Keep the old version on my computer. If not, leave this section blank.
  • Once the upgrade process is completed, select Open QuickBooks to use the upgraded version of the program.

What If Upgrade Tool Fails In Finding My QuickBooks Desktop Purchase?

If you don’t get a prompt to choose a new version of QuickBooks, you will require to find and enter your QuickBooks license info. It happens when you purchase QuickBooks using a different email that you are not using for your QuickBooks account. Here, you need to:

  • Find an email from QuickBooks that confirms your product purchase.
  • Enter the Product number and License number and click the Continue button to finish the upgrade process.

You may find your license number by signing into the customer account maintenance portal (CAMPs). After that, you can get the latest version of your QuickBooks application from QuickBooks Desktop Manager.

4: Upgrade QuickBooks Within Right Network Hosting Environment

Standard users can only install QuickBooks for themselves; however, an account owner or admin can install QuickBooks for you or other users.

QuickBooks Installation Steps For Right Network Account Owners and Admins

Follow the below-given steps with full attention to accomplishing them:

  • Log in to Right Networks My account using the relevant and accurate login credentials.
  • Once logged in, you have to select Users.
  • Here, you have to select that particular user to whom you want to apply for the license.
  • From within the user detail page, you need to select Apps you can install, and it will show all QuickBooks versions available for you.
  • You may also use the search bar to find your QuickBooks version promptly.
  • After selecting the right version of QuickBooks, select the Install option.
  • Wait for the installation process to finish, and you will see a shortcut on your computer’s Desktop.

Note: if you upgrade your company file to a newer version, you may not be able to open it in an earlier version of the program. Besides, the admin user name and password are also required in order to upgrade the program.

Upgrade To QuickBooks Enterprise From Pro or Premier Versions

QuickBooks Enterprise is one of the most advanced versions of the QuickBooks software. For small to mid-sized businesses, QuickBooks Pro or premier versions can work wonders. They can handle your business accounting tasks with the utmost efficiency. However, when your business grows, you want your accounting software to grow with the pace of your business. If you are a QuickBooks Pro or Premier user, you can upgrade to QuickBooks Enterprise based on your emerging accounting management needs.

There is no fixed time when you have to upgrade to QuickBooks Enterprise. However, when the features in your QuickBooks Pro or Premier fails to fulfill your requirement, you may discuss with your accountant if this upgrade is required. Once ensured, you may follow the below-given procedure to get the task accomplished:

1: Prepare Your Device and Test Your Network

If the first place, you need to ensure that all the system requirements for QuickBooks Enterprise are fulfilled. Also, prepare and test your network before proceeding any further with the procedure. Check your network bandwidth, and thereafter, move to the next step.

2: Install QuickBooks Enterprise On Server

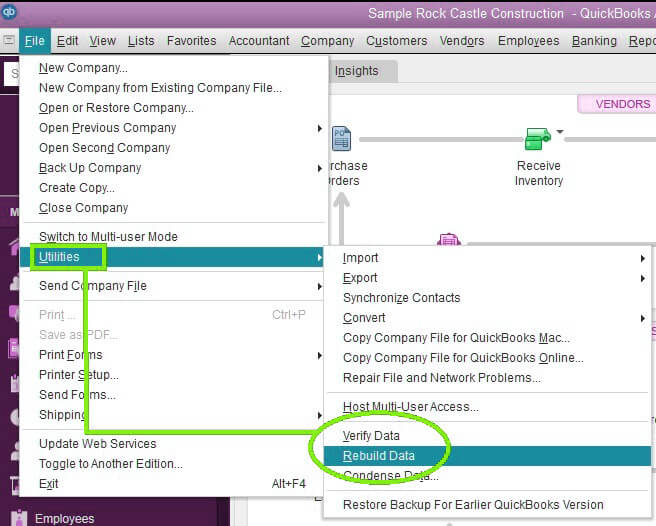
To do so, you need to download the latest version of the QuickBooks Enterprise in the first place. If you are downloading it on multiple workstations, make sure that all of them have the same version of the program. After that, you have to run the executable file to start the installation of QuickBooks Enterprise on the server. Thereon, configure the Database Server Manager, which will help you in the smooth operations of QuickBooks in a network.

Moving ahead, scan your company file to ensure that its data is intact and no damage or corruption exists in it. Check your hard drives then, then move to the next step of the procedure.

3: Enable Sharing

Here, you have to share access to the company file on different workstations. It enables multiple users to access your company file simultaneously. In QuickBooks Enterprise, 30 simultaneous users can access the QuickBooks company file. You have to provide the access permissions to the workstations with an admin account. Install QuickBooks Enterprise on all the workstations in the network. Thereafter, set up multi-user hosting so that users can access the company file simultaneously without getting errors.

4: Convert Your Data To QuickBooks Enterprise

After enabling the sharing of the company file with the workstations, you need to convert your data to QuickBooks Enterprise. Data conversion is one of the most crucial tasks of this procedure that needs to be done with the utmost care and attention. Before you transfer your data, make sure to create a backup of your company file. It will save you from any kind of data loss or damage. Thereafter, convert your data and update your company file. Keep in mind that you may not be able to open your company file in QuickBooks Pro or Premier after this procedure.

5: Configure Network & Server Settings

QuickBooks Enterprise has the same look and feel, and you will feel like working in a similar environment. In the end, you can configure lists and user permissions. Here, you can grant users with different levels of access permissions to view, edit or work on the QuickBooks company file. Finally, register your QuickBooks software and start working with the upgraded version of your QuickBooks application.

FAQs
1: Do I need to uninstall QuickBooks before upgrading it?

It is good to install the latest upgrade in a new location rather than overwriting the current version of the QuickBooks application. Before upgrading QuickBooks, you are advised to clean your system. The cleaning procedure may include the removal of the undesired files and caches, which also prevents data corruption.

2: How much time does the QuickBooks upgrade take?

A smooth upgrade process of the QuickBooks application can take up to 25-30 minutes. Smooth means there are no technical hindrances or malfunctioning in the upgrade process. Make sure that your device is connected to a strong Internet connection.

3: How often should I upgrade QuickBooks?

There is no specific rule when you need to upgrade QuickBooks. QuickBooks releases a new version every year, so you may upgrade QuickBooks every year. Besides, if you want to upgrade to the QuickBooks Enterprise from QuickBooks Pro or Premier, make sure that you are ready for it. You may talk with your accountant and discuss if you need to scale up the features you are using in QuickBooks Desktop Pro or Premier.

Related Blogs:

How to Fix QuickBooks Error H101
How Can I Fix the “QuickBooks Won’t Open” Error
Where is the Gear Icon in QuickBooks
Fix QuickBooks POS Database Server not Found Issue
How to Reset QuickBooks Administrator Password

How can I locate a missing QuickBooks transaction?

It might have happened to you while working on QuickBooks that you found yourself in a situation where while working with the company file, you noticed that you are not able to find the transactions that you had entered previously. This issue is called the “How to find missing transactions in QuickBooks?” problem. QuickBooks users usually face such issues while working on QuickBooks Desktop. These bunch of steps will guide you in finding a missing transaction in QuickBooks Desktop.

How can I find a missing transaction in QuickBooks Desktop?

You might wonder, at times, how to find about the missing transactions in Quickbooks Desktop. To do this, you have to follow a series of steps. These steps are as follows:

Also Read –  QuickBooks Error H101

Step 1: Check the audit trail report.

Checking the audit trail report is the first thing that you would want to do in order to find the missing transaction in QuickBooks. The audit trail report will list each and every transaction in the company file. This also includes the deleted ones. Any earlier modifications made to QuickBooks transactions are also included in the Audit Trail Report. To view the Audit Trail Report, you need to open the Reports menu; after that , select the Accountants and Taxes and then pick the Audit Trail to view the Audit Trail Report.

QuickBooks gives you a platform where the user can manipulate product details, payroll system, and majorly the company information. The audit trail report has some advanced features for displaying the deleted values of the recorded transactions. It is also able to highlight them. Any modification or change in the system gets reflected for specific sections. For instance, in the company file of an organization, the product value can be changed by replacing the old with the new products. These values are highlighted in bold format and, therefore, can be easily made out.

The audit trail report can be accessed in the Reports menu by choosing the accounts and taxes option and then locating the audit trail option. You can also customize the report with the help of the transaction date, type of transaction, and name of the transaction. It allows you to manipulate the data in the format of your choosing. Also, it helps you to modify that easily.

Step 2: Check the company file

You need to check the company file. A company file would have ample amounts of data. In such a scenario, a single transaction is hard to find sometimes. However, the correct information and approach can let us find it. A person who owns different businesses will have multiple company files.

The correct file location can be found by pressing the F2 key. Doing this shows the entire information of the file along with the product information and the software version of the company file that you are using. Once you select the correct company file, you can very easily find and trace the deleted or changed transaction in QuickBooks.

Step 3: Run Condense Information

Condense is a QuickBooks function that helps in deleting data before a cut-off date. When you want to make your company file smaller or for other purposes, you use the Condense option. Pressing F2 returns you to the Product Information window. There, you can check if the condense function has been run or not. You can see a condense information section on the right-hand side.

Condense is known as one of the major and significant features which can help us remove the information from an existing file and decrease the size of the file along with unnecessary financial transactions to a specific date. It eases the process of selecting a specific date range to keep or delete certain data from the file. It is only to make sure that the transaction has been removed during the data condense process. Here, you might want to take the help of experts who can help retrieve the information for you.

Also Read – QuickBooks Error 103

You may find the Condense Information screen on the Product Information screen.

If there is a date of the transaction that is later than the date of the transaction that you are looking for, then there is a high possibility that the transaction was deleted as a result of the condense process. Before going forward, you would want to inquire with your accountant about the condense function and also the reason behind running the condense function.

Step 4: Re-enter Missing Transactions

If the above-mentioned steps have not helped, you might want to re-enter the missing or deleted transaction. This might be your best gamble at this point. If, after looking through the company files, searching the Audit Trail Report, and checking to see if the condense has been run, you have not been able to find the missing transaction, then the only thing you are left with is the re-entering the missing or deleted transaction. The solutions you have employed are all great and can help much in the resolution of the problem. But, if, after following these steps, one is not able to discover the missing transaction in QuickBooks Desktop, then it is very safe to say that the transaction probably was not added to your company file. Because, if that would have been the case, then you must have been able to find it or locate it.

Also Read – QuickBooks Error H202

Conclusion

Following the above-mentioned steps carefully, you can very easily navigate through the “missing transaction in QuickBooks Desktop” problem. However, if you see that you are unable to resolve the issue by yourself, then you should contact our team of QuickBooks professionals who are adept at resolving such issues. They are trained and proficient in analyzing and resolving QuickBooks issues.

After you have exhausted all the available set of options, you can leave the worrying part and let our experts take charge into their own hands. They will carefully look into your problem and find an easy, quick, and reliable solution for you in minutes. They will also suggest alternatives to you should you not be ready to apply those solutions. So, feel free to contact with us. For more, kindly visit our website–> Accountingwhizz or chat with us or send us a mail.
Read Also – QuickBooks Error 15106