Fix QuickBooks Error 7149 in 4 Easy Solutions

QuickBooks error 7149 is a common run-time error arising from windows registry errors or corrupted program files. With the impact of this error, PC may crash down, and users may face issues while launching the QuickBooks desktop application.

QuickBooks error code 7149 will appear with a pop-up display message as;

QuickBooks error 7149

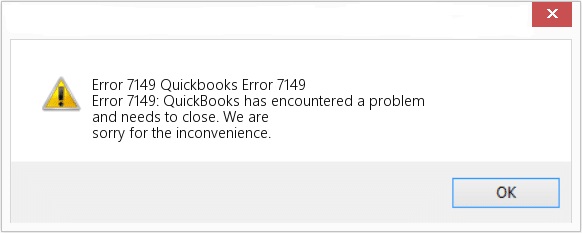
“Get immediate help in dealing with QuickBooks error 7149 by speaking live with our trained and experienced QuickBooks expert via call at +1 855 706 0905.”

Why Does QuickBooks Error 7149 Arises?

Some of the common reasons why a user may end up with this error while working on the QuickBooks software are as follows;

  • If the QuickBooks company’s file has been deleted accidentally from the workstation.
  • QuickBooks installation files are not downloaded completely on your device.
  • Corrupted windows registry issues can also lead to QuickBooks error 7149.
  • If your PC has been affected by viruses or malware.
  • Poor internet connection or outdated windows version can be the primary reasons behind QuickBooks error .

Ways to Identify QuickBooks Error Code 7149

  • A pop-up window reflecting QuickBooks error 7149 appears on your PC screen.
  • QuickBooks desktop application is not opening or freezing rapidly.
  • The keyboard and mouse are unable to process the user’s command.
  • PC’s window is working slowly or hanging constantly.

Quick Solutions to Fix QuickBooks Error 7149

Let’s take a look at some of the effective solutions that you can implement to uproot QuickBooks error ;

Solution 1. Repair/ Reinstall the QuickBooks Desktop Application
  • Firstly, go to the control panel settings on your device.
  • After that, choose the “Programs & Features” option, followed by clicking on the “Add or Remove Programs” option.
  • Moving ahead, you have to search there for the QuickBooks desktop application and right-click on it.
  • After that, click on the “Repair” option and follow the on-screen instructions to repair the application.
  • Once you are done repairing the application, restart your device deeply, and then try to launch the QuickBooks desktop application.

Now, check if the steps mentioned above have helped you eliminate QuickBooks error code 7149 or not.

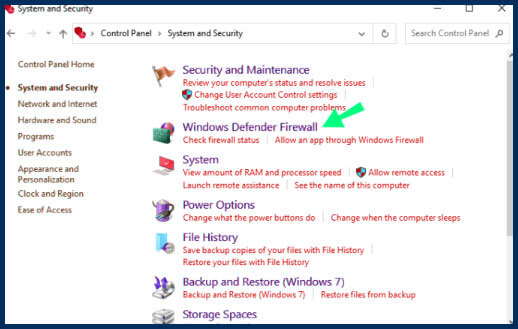
Solution 2. Turn off Antivirus Settings
  • At first, you have to search for an antivirus icon on the taskbar.
  • Thereon, right-click on it, and then a small pop-up window will open on your PC screen.
  • At last, you have to end the process by clicking on the “Disable” option.

Now, restart your device deeply, and run the system safely. Thereon, verify whether the QuickBooks error code 7149 has been eliminated.

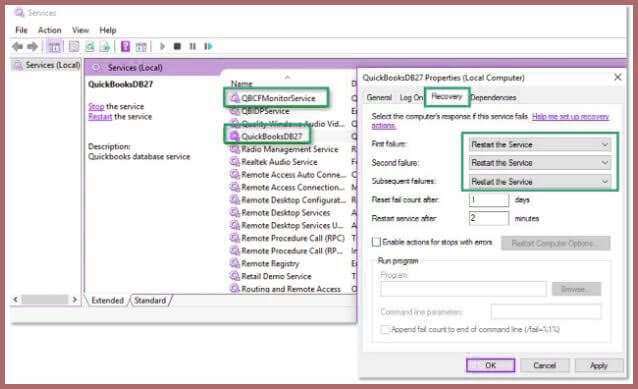
Solution 3. Delete the QuickBooks Pending Processes

If there are already some pending processes of QuickBooks software in your device, it can also lead to various technical glitches on your PC, and QuickBooks error can be among them. In this scenario, you must delete the pending process of QuickBooks software.

Given below are the steps that you can follow to delete the QuickBooks pending processes on your workstation;

  • First, launch your device’s windows task manager by pressing the “Ctrl + Alt + Del” keys together.
  • Now, a list of all the running programs will be open on your screen.
  • Move to the “Processes” tab and search for the pending QuickBooks processes.
  • After that, right-click on the QuickBooks pending processes, then click on the “End Process” tab.
  • Repeat the above step for all the pending processes in QuickBooks.

Once you are done with the above steps, verify if the QuickBooks error 7149 has been eliminated.

Solution 4. Fix Windows Registry Issues

The next solution that you can follow to fix QuickBooks error code 7149 is repairing the windows registry issues on your device. Below listed are the steps that you can follow to resolve windows registry issues;

  • First, launch the windows run command and type “Regedit” in the search bar.
  • Hit the enter button, then take a look at the installed programs, and remove their corresponding keys.
  • Now, select the “HKEY_CURRENT_USER” and select the software.
  • Thereon, you must find and delete the keys related to the names of uninstalled applications.
  • Duplicate keys of the uninstalled programs have to be deleted.
  • Press the “Ctrl + F” keys on your device, enter the application’s name in the search bar, and press the enter button.
  • Now, you have to delete this key from your device.
  • Apart from these keys, you must also delete unwanted startup components.
  • Within the registry editor, you have to move towards “This PC> HKEY_LOCAL_ MACHINE> Software> Microsoft> Windows> Current Version.”
  • By clicking on the “Run,” you can see a list of all executable files used during the startup.
  • Now, delete all the applications per your preference and requirement based on the precedence in the startup menu.
  • Thereon, you have to perform the same procedure again for the below paths;
  • HKLM\SOFTWARE\Wow6432Node\Microsoft\Windows\ CurrentVersion\Run
  • HKLM\SOFTWARE\Microsoft\Active Setup\Installed Components
  • HKLM\SOFTWARE\Wow6432Node\Microsoft\Active Setup\Installed Components

Once you finish the above steps, re-launch the QB desktop application on your device to check whether the error code 7149 has been rectified.

Ending Note

As demonstrated above, we have covered the complete procedure about how to fix QuickBooks error 7149. You can easily conduct the steps mentioned above to complete the process. If you cannot resolve the error, then you can contact our QuickBooks experts via Phone at +1 855 706 0905. Our trained technicians are available 24*7 around the clock to attend to your query and assist you with the best feasible solution.

QuickBooks Error 12038: Causes and How To Resolve It?

QuickBooks is one of the most common accounting software, which has gained popularity among small and medium business enterprises, especially new startups. The reason for its extensive user base is the fact that it is easy and convenient to use. However, the user may sometime have to deal with some issues while running the software. QuickBooks error 12038 is one of the common issues in the program that can occur while updating the software. Here, we will discuss various possible causes for this error and how to resolve QuickBooks error code 12038.

Getting QuickBooks error 12038 when updating the program? Talk to an expert by dialing our helpdesk number +1 855 706 0905

What is Error 12038 in QuickBooks?

When downloading the program update, you may get an error message on your screen with the warning text –

QuickBooks Error 12038: Failed to download the update.

The error message shows an error with the download process of the latest QuickBooks update. There are multiple factors responsible for the arrival of the error. Some of the main reasons behind the error code 12038 in QuickBooks are explained in the next section.

Why Am I Seeing QuickBooks Update Error?

In order to deal with QuickBooks error 12038, we first have to know the root cause of it. Here, we have discussed various possible reasons that can lead to QuickBooks update errors, which are listed below:

  • Inaccurate Date and Time: While installing the latest update of QuickBooks, there might be a slight possibility that your system has an incorrect date and time. This inaccuracy can create hindrances while updating the software.
  • Internet Connectivity: Another possible reason that can cause QuickBooks error 12038 is the issue with the internet connectivity. Thus you need to make sure that you have a stable high-speed connection.
  • Blocked by firewall security: Sometimes, while trying to access the QuickBooks website, there might be possible that the services are blocked from the user side by the Firewall.
  • More than one version of the software: The user sometimes downloads multiple copies of the QuickBooks software, because of which you will be unable to update the software.

Symptoms of QuickBooks Desktop Update Error 12038

To determine error code 12038, you can keep an eye on the following symptoms:

  • The update process will be obstructed in the middle.
  • QuickBooks error message 12038 will show up on your screen.
  • Windows will become sluggish and respond slowly to the mouse or keyboard inputs.
  • Several issues related to the program’s performance can also be experienced.

Precautions to be taken Before Solving QuickBooks Error 12038:

With various possible causes for error 12038 in mind, we can easily find possible ways to resolve the issue. But before that, we need to take some precautions while solving the error:

  • Make a backup of your company data: Before you make any changes to the QuickBooks software in your system, make sure that you have a backup of your files cause there might be a chance that the data will be deleted while updating the software.
  • Grant permission to the software to make changes to your system: Whenever you update QuickBooks in your system, make sure that you have switched off safety controls, as they might also block QuickBooks.
  • High-Speed Connection: While downloading the software, make sure you do have a good connection, or in technical terms, your internet speed should not be below 30kbps.
  • Remove additional download booster: While updating QuickBooks, make sure you uninstall any download accelerator.

Solutions To Fix QuickBooks Error 12038

Now that you know all the precautions and causes that can lead to QuickBooks error, here are various solutions for each and every cause listed below:

1: Adjust the Date and Time

Make sure that your system has the correct date and time setting. If not, you need to follow the below-given steps:

  • Click the window button and write “date and time” in the search box and click on the tab for “Date and time setting.”
  • Click on the option for changing the date and time and make the required changes.
  • After changing the date and time, close every window, refresh the system and reopen QuickBooks and start updating it.
2: Fix Your Internet Connection

To download the latest updates, you need to ensure that your computer is connected to a strong network connection. To check:

  • For this issue, you need to open QuickBooks and click on the help icon.
  • In the help menu, you need to click the tab for an internet connection.
  • There will be a tab marked “Use my computer internet connection setting to establish a connection when this application access the internet”. Click on this tab.
  • Click on the advance setting, “restore advance setting,” and “OK.”

Managing Firewall Setting

While dealing with QuickBooks error 12038, you need to open firewall settings. If the erroneous configuration of the Windows Firewall is preventing QuickBooks from connecting to the Internet, you need to configure the settings correctly to allow the update process. After setting up the Firewall, try to update QuickBooks again. Check if the error 12038 is resolved or not.

Ending Words!

This post elaborates on how to fix QuickBooks error code 12038 by implementing the relevant solutions. However, if you are facing any kind of technical unease in resolving the issue, our fast technical assistance is available around the clock. You can connect with our helpdesk by chatting with one of our experts to get the error resolved.

How To Deal With QuickBooks Error 6000 77?

QuickBooks error 6000 77 is a company file-related error in the program that mainly occurs when opening the program. QuickBooks offers many incredible features to users and let them store their financial data in the company file. You can share it with a server computer and enable simultaneous access to it to multiple workstations.

However, QuickBooks error code 6000 77 can prevent users from accessing their financial data. There are multiple reasons that can result in the arrival of the company file access error. While covering the possible reasons behind the issue, we will discuss some of the best solutions to eliminate the QuickBooks error 6000 77.

Unable to access your company file to perform a crucial task? Contact a professional for the error resolution by dialing +1 855 706 0905.

More About QuickBooks Error Message 6000 77

While opening your company file in QuickBooks, you may get an error message on your screen with the text – “We’re sorry. QuickBooks encountered a problem. Error codes: (-6000, -77).” The error message shows up abruptly, and the process of opening the file will be obstructed. In addition, the error message will also showcase the suggested approach for the error resolution. There are multi-pronged reasons that can promote this error. Damage in the QuickBooks company file or network data file is some of the main reasons.

What Promotes Error Code 6000 77 in QuickBooks?

If you want to understand more about the error code 6000 77, listing the possible reasons behind it will ease your quest. Below is the list:

  • Avoid clicking the QuickBooks Desktop icon constantly, as it can cause the application to function improperly.
  • When the data file is stored on an external device or a cloud server.
  • Erroneous hosting configuration settings in multi-user mode.
  • Insufficient access permissions for the company file folder are also one of the possible reasons behind the error.
  • Damaged QuickBooks company or other essential files such as network data or transaction log files.
  • The firewall is not properly configured, therefore obstructing access to the QuickBooks company file.

Also Read: How to Resolve QuickBooks Error H202

Symptoms of QuickBooks Error 6000 77

To determine the error code 6000 77, you can take the help of the following symptoms:

  • Hardships in accessing the QuickBooks company file.
  • The error message, including the error code 6000 77, will show up on your screen.
  • Sluggish performance of Windows OS or QuickBooks software can also be experienced on the arrival of the error.

How To Eliminate QuickBooks Desktop Error 6000 77?

After collecting all the required information, let’s proceed further and apply the relevant solutions for the error resolution.

Solution 1: Utilize QuickBooks Tool Hub To Run File Doctor

QuickBooks File Doctor is an efficient tool that can repair a damaged company file. You can access it via QuickBooks Tool Hub, a tool launcher service by Intuit. To do so, you need to download the Tool Hub in the first place:

  • Go to Intuit’s official website and download the QuickBooks Tool Hub executable file.
  • Next, run QuickBooksToolHub.exe to install it using the given instructions.
  • After that, agree to the terms and conditions, and the tool hub is ready to use.
  • Open Tool Hub and navigate through the list of the issues and select Company File Issues.
  • Here, you can run QuickBooks File Doctor to scan for potential issues and run a file repair.
  • The process may take up to 20 minutes, based on the size of the company file.

After running the scan, if it doesn’t fix QuickBooks error 6000 77, try the next method.

Solution 2: Rename QuickBooks .ND & .TLG Files To Remove Error Code 6000 77

In the next solution, you need to rename .ND and .TLG files using the below-given steps:

  • Go to the folder containing the QuickBooks company file and open it.
  • Next, locate the file with .ND extension – Network Data File.
  • Once located, right-click on it and select Rename from the drop-down menu.
  • Now using the rename option, you will have to add .OLD at the end of the file name.
  • The file will look like Filename.nd.old.
  • After finishing it, you need to perform the same procedure for the QuickBooks Transaction Log File you may locate with .TLG extension.

After finishing, check if the QuickBooks error 6000 77 is fixed or not. If the error continues, move to the next solution.

Solution 3: Make Sure That The File Name Is Correct

The name of the company file shouldn’t include any space or special characters. To check and remove, follow the below-given steps:

  • Log out of the QuickBooks Desktop Software on your device.
  • Now go to the QuickBooks company file and open it.
  • Next, go to the company file and right-click on it to select the Rename option.
  • Here, you have to check and ensure that there are no any space or special characters used in the name of the company file.
  • If so, remove or change it and check if this solution can troubleshoot the problem.

All in All!

This post explained some tried and tested solutions on how to fix QuickBooks error 6000 77. However, if this post is not sufficient and you need additional help, reach out to our expert by using our QuickBooks Help Desk. You can get help by chatting with one of the professionals or talking to a real perform using our helpline number.

How To Fix QuickBooks Error Code 7300?

While working on the QuickBooks accounting software, users often bump into QuickBooks error code 7300. The error mainly occurs when the program is set up or during the Windows startup or shutdown. Besides, it may also come into sight during the installation of the Windows Operating system. Such an error code restricts the users from opening any company data files or working on the software. QuickBooks error 7300 can take place due to multiple reasons. Stay tuned with us if you want to know more about the same.

Need immediate resolution for QuickBooks company file access error 7300? Get in touch with trained experts by dialing our helpline number  +1 855 706 0905.

What Does QuickBooks Error Message 7300 Indicate?

QuickBooks error code 7300 is also referred to as the runtime error. When accessing the company file, you may get an error message on your screen having the error code in it. The error box has the option to click the OK button to Continue. Contrarily, you can click the Cancel button to quit the Window. Furthermore, it prompts you to report the error. However, to get rid of the error code 7300, you will have to list all its possible reasons and implement relevant solutions to fix it.

What Causes QuickBooks Error Code 7300 To Show Up On Your Screen?

There are multiple factors that can give birth to error 7300 in QuickBooks, a few of them are enumerated below:

  • The error often takes place when the user opens up the company file, and it is corrupted or damaged, unfortunately.
  • Besides, if there is an issue with the Intuit sync manager and QuickBooks stops working suddenly, you may encounter such an error code.
  • The error can also take place if the QuickBooks Sync Manager is not working.

Also Read: QuickBooks Desktop 2023 System Requirements

Symptoms Of QuickBooks Error 7300

To identify the QuickBooks error 7300, you can keep an eye on the following symptoms:

  • An error message will show up having the error code 7300.
  • You will not be able to perform an ongoing task due to the error code.
  • Performance issues related to the Windows program can also be experienced due to the arrival of the error.

Advanced Troubleshooting Methods to strike out QuickBooks Error Code 7300!

Once you are done exploring the reasons for the same, now it is time to choose the most suitable solution, which is inclined below. Let’s carry out each one in a given sequence:

METHOD 1: Manual Troubleshooting Steps For Error Code 7300

For Windows 7 and Vista

If you are a Windows 7 or Vista user, the below-given steps can help you:

  1. To begin with, tap on the Start tab and then select Programs and Features.
  2. Now, hit the Control Panel tab.
  3. You need to choose Programs and also browse the QuickBooks error associated program under the Name column.
  4. Afterward, click on the Entry tab and select Uninstall from the top menu.
  5. Finally, follow the on-screen prompts to complete the uninstallation process.

For Windows 8 

Windows 8 users can rely on the below-listed steps to eliminate the QuickBooks error 7300:

  1. In the inception, locate the Start menu and hit a right click on the same.
  2. Next, choose the Programs and Features.
  3. You need to browse the QuickBooks Error-associated program under the name column.
  4. Also, tap on the Entry tab and select the Uninstall/change option from the top menu.
  5. At last, follow the instructions displayed on the screen.

For Windows XP 

If you are performing the error resolution in Windows XP, perform the following steps with the utmost care and attention:

  1. The initial step is to click on the Start tab and then choose to Open programs and features.
  2. Now, tap on the Control Panel, and you need to select Add or remove programs.
  3. The next step is to go for the QuickBooks error-associated program under the currently installed programs list.
  4. Hit the Entry tab and then click right on the Remove icon.
  5. In the end, carry out the on-screen prompts, and you’re good to go.

If the QuickBooks error 7300 continues after the manual troubleshooting, you can move to the next solution and implement the listed steps.

METHOD 2: Back Up The QuickBooks Related Registry Entry

The next method to fix the error is backing up the QuickBooks-related registry file. Below are the steps:

  1. At first, hit the Start tab and then type Command into the search box.
  2. Once done, hold down the Ctrl + Shift keys and then press Enter.
  3. This will pop up the permission dialog box where the users are required to tap on Yes.
  4. After this, the black box starts appearing with a blinking cursor; you need to enter Regedit and then click the Enter key.
  5. Under the Registry Editor, select the QuickBooks error 7300 related key you want to backup.
  6. Now, choose Export from the file menu.
  7. Also, opt for the folder to save in the list where you wish to save the backup key.
  8. Furthermore, make sure that the selected branch is chosen under the Export Range box.
  9. Click Save with the .reg file extension.
  10. To end the process, you must back up the QuickBooks-related registry entry.

Closure!

Are you still struggling with the QuickBooks Error Code 7300? Don’t panic; here’s the solution to all your problems. It’s so common to experience such kinds of issues while installing the Windows Operating system or opening company files. However, if you’re looking for professional assistance, then feel free to contact our QuickBooks helpdesk support team to get your problem resolved in one go.

How to Fix QuickBooks Error Code 1926 With 3 Easy Solutions

QuickBooks keeps the user’s data safe and secure, and that’s the reason why every user doesn’t have permission to access the specific folders. Admin rights are necessary to access the business’s important files. If you are accessing the QuickBooks important files or folders without admin rights, then it can lead to QuickBooks error 1926.

QuickBooks Error Code 1926In this 10 minutes read guide, we will provide you with complete information about why a user may encounter QuickBooks error code 1926 and the possible solutions to resolve the error.

“Need a QuickBooks expert to carry out the troubleshooting methods for you? Don’t worry; we have got you covered. Contact our QuickBooks experts at +1 855 706 0905, and get the best instant help.”

Factors Triggering QuickBooks Error 1926

Let’s filter out some of the most common reasons due to why a user may encounter QuickBooks error code 1926 while working on the software;

  • If you have stored the QuickBooks files in a secured location on your device, it may be as the program files or core of the C drive on your PC.
  • QuickBooks folder storing the important data and files is damaged or corrupted.
  • If the permissions to access the folder need to be corrected, it can also lead to QuickBooks error 1926.
  • If a login password secures the company’s file, it can lead to QuickBooks error 1926.

How to Fix QuickBooks Error Code 1926?

After having a clear knowledge of the possible reasons due to the error arises, let’s take a look at the troubleshooting methods that you can execute to fix QuickBooks error 1926;

Solution 1. Run QuickBooks in Administrative Mode

If you are using the QuickBooks accounting software without administrative rights, then it can disrupt the users from performing certain actions and may even disallow access to important files. Therefore, running the QuickBooks accounting software in the administrative mode is highly suggested.

  • Firstly, close the QuickBooks desktop application on your device, and then do a right on the software icon.
  • As the menu list opens on your screen, you must click on the “Properties” option.
  • Now, the properties window will open on your device, and switch to the “Compatibility” tab option.
  • Once you are done with the above steps, then you have to click on the “Run this Software as Administrator” option.
  • Click on the “Apply” and “OK” options to save the updated changes.
Solution 2. Save QuickBooks Company File in New Folder

Another method to fix QuickBooks error code 1926 is creating an entirely new folder and allowing sufficient permissions to the folder. Even if you have stored the corporate data in a lost or damaged folder, this method can help you to fix that issue.

  • First, you must create a new folder by hitting a right click on display and selecting the “New Folder” option.
  • Thereon, ensure the folder is saved within the same directory as other folders.
  • Copy the company files and documents, and paste them into the newly created folder.
  • Here, you must ensure you have set the correct permissions to the folder to permit sharing the files.
  • Launch the QuickBooks desktop software on your workstation, and move to the “File” menu settings.
  • Moving ahead, you have to select the “Open and Restore an Enterprise” option.
  • As the drop-down menu list appears on the screen, you must select the “Open an Enterprise File” option.
  • Moving ahead, click on the “Next” option, create a folder in the new location, and choose the file for your company.
  • Followed by the above steps, click on the “Open” option.
Solution 3. Move QuickBooks Company File to Default Location

If you have saved the QuickBooks company file in a different or restricted location, it can also lead to error code 1926 in QuickBooks.

 To do that, given below are the steps that you can follow;

  • Close all the active background applications on your PC.
  • Thereon, open the file manager, and navigate to the location where you have saved the QuickBooks company’s file on your device.
  • Now, right-click on the company file, and ensure that the file extension name ends as “QBW.”
  • Select the “Copy” option, and then navigate to the default location of the QuickBooks company file, i.e., C:/ Users/ Public/ Public Documents/ Intuit/ QuickBooks/ Company Files.
    • You have to right-click and then select the “Paste” option.

You have successfully moved the QuickBooks company file to the default location. Thereon, launch the QuickBooks desktop application on your device, and check whether you can access the company file.

Still, Need Guidance?

As demonstrated above, we have covered three solutions that you can follow step-by-step to eliminate QuickBooks error code 1926. If you are facing any issues while performing the procedure, or if you need any personal assistance in dealing with any of the QuickBooks error codes, you can contact our team via Phone @ +1 855 706 0905. Our experts are available 24*7 at the help desk to understand your query and provide the best feasible solution.

Easy Ways to Fix “Your Activation Key for Sage 50 has Expired” Issue. 

The activation key plays a crucial role as it is required to activate your accounting software. But at times, users might come across the “Your activation key for Sage 50 has expired” issue while using an inactive service key.

In this explanatory guide, you will obtain all the essential facts required to resolve the Sage 50 activation key expired error.

Looking for a quick way to handle the Sage 50 Activation key expired issue? Ring us at +1 855 706 0905 and obtain the best possible solutions to overcome the issue right away. 

Also Read: Sage 50 Update Will Not Install

Reasons Why You End Up With Sage 50 Activation Key Expired Issue

To better understand the “Your activation key for Sage 50 has expired”, it is necessary to know the probable causes behind the issue. Read the below-given pointers attentively and get a clear vision of all the factors responsible for the issue.

1. Sometimes, it may happen due to the damage in the Sage 50 files.
2. In other instances, it may appear when the antivirus software expires.
3. There might be the possibility that Windows Firewall was blocked.
4. You might encounter the “Your activation keyhas expired” issue when the Domain Name System (DNS) is not working appropriately.
5. At times, it may happen when some files in the data path get damaged.
6. Also, it may occur when the pervasive license key expires.

Verified Solutions to Fix Your Activation Key For Sage 50 Has Expired Issue

Now that you have acquired all the information regarding the Sage 50 Activation Key expired issue, let’s now look at the solutions to resolve it.

Fixation Method 1: Resolve Temporary Pervasive Key Has Expired issue

If you encounter the temporary pervasive key has expired then go through the following steps to fix the error.

1. Initially, exit from the Sage 50 application if it is already open on your device.
2. After that, move to Computer and then browse to the Program path.
3. Following this, hover your cursor over the status key and run the extension SageReg.exe.
4. Next, look for the Key State and navigate for the Permanent Key within the License column.
5. Afterwards, move to the Sage 50 Activation and select the Active tab.
6. Exit from the Activation window once you receive all the instructions.
7. Finally, launch the Sage 50 application to wind up the Activation process.

Fixation Method 2: Remove certain files that gets damaged

Sometimes the damage in certain files might trigger Sage 50 activation key expired issue. Therefore, to resolve the issue, wipe out all those damaged files.

1. Before initiating the process, ensure that the Sage 50 application is closed.
2. After this, sign into your computer again using the correct login details.
3. Move to the File Manager and search the data path for related resources.
4. Now, you must remove the files with the file extensions .dat, dat.bak, .da and .xml.
5. Launch the Sage 50 application again on your device and verify that your Software gets activated accurately.

Fixation Method 3: Antivirus application is interrupting the activation process

As discussed above, usually, the users might result in “Your Activation key has expired” when antivirus software blocks the activation process. Therefore, to figure out the issue apply the steps in the same manner as given below.

1. Firstly, you must look at whether your antivirus program is expired.
2. If it is expired, then you have to uninstall or remove the antivirus program again.
3. Afterwards, you are required to upgrade the plan of your antivirus software.
4. Once done, launch the Sage 50 application on your device.
5. Finally, verify whether the Sage 50 program is successfully activated.

Fixation Method 4: Configure the Damaged Pervasive Installation:-

Here, we have mentioned all the instructions to resolve the damaged pervasive installation easily.

1. Ensure you have closed the Sage 50 application if it’s running on your device.
2. Before you relaunch your pervasive, try to uninstall it entirely.
3. Now, you have to wipe out all the versions of pervasive.
4. Afterwards, launch the Sage 50 application and test whether your Software is activated properly or not.

Wrapping It Up!!

Now, you can easily fix the “Your Activation key for Sage 50 has expired” issue by applying the above-mentioned troubleshooting methods. If you are still encountering any problems while fixing the issue, contact our professionals via the live chat facility.

How to Fix QuickBooks Error 15101? Golden Steps 

QuickBooks error 15101 is an update error in the program that can take place while updating the payroll service or QuickBooks software itself. While using the QuickBooks application, it is crucial to ensure that the latest maintenance release is running on the program. If not, the application is prone to a wide array of technical issues. QuickBooks error code 15101 mainly occurs if the digital signature certificate is outdated or missing. However, this error can take place due to a myriad of other possible factors. To get rid of the error, you need to list them all and troubleshoot one after the other. To get more details, read this post until the end.

Unable to update QuickBooks Desktop payroll service due to error code 15101? Get help by dialing our helpline number +1 855 706 0905

What Does QuickBooks Error Message 15101 Mean?

When updating the QuickBooks Desktop Payroll service, the process gets hindered, and you may not be able to proceed any further with the update process. This error can take place if the digital signature certificate is outdated or missing. Also, you need to make sure that all the services are stated when updating the program. If not, the error message can crop up on your screen. There are many other factors that can give birth to the QuickBooks error code 15101. We will cover them all in the next sections.

Possible Reasons Behind The Arrival of QuickBooks Update Error 15101

Now that you are aware of the error code 15101 in QuickBooks, below are some of the main reasons that can evoke the issue during the update process:

  • Missing or damaged digital signature certificate.
  • All essential QuickBooks services are not running on Windows.
  • Internet Explorer is not configured as the default browser for QuickBooks.
  • Windows Firewall is preventing QuickBooks from connecting to the Internet to ensure security.
  • It can be some third-party applications blocking QuickBooks, thereby promoting QuickBooks error 15101.

Symptoms of QuickBooks Error 15101

If you want to identify the arrival of the QuickBooks error code 15101, keep an eye on the below-given symptoms:

  • The error code 15101 will show up on your screen with an additional text explaining the persisting issue.
  • You may not be able to install the latest updates for the QuickBooks Desktop Payroll service.
  • Some other abnormalities in the performance of the program or Windows operating system can also be experienced with the error.

When observing these signs, you can follow the troubleshooting solutions explained in the next section and get rid of the error.

How to Fix QuickBooks Error 15101? Explained

Now that we have gathered ample information on the QuickBooks payroll error 15101, let’s discuss its troubleshooting solutions:

Solution 1: Run QuickBooks Reboot.bat File To Fix Error Code 15101

In the first place, you need to run the QuickBooks Reboot.bat file the troubleshooting the payroll update error. Below are the steps:

  • Quit QuickBooks, go to the Desktop, and right-click on the QuickBooks Desktop icon.
  • Next, select Properties from the drop-down list and select Open File Location.
  • Thereafter, locate and right-click on the Reboot.bat file and select Run as Administrator.
  • You will now see a command prompt on your screen, which is scrolling through the QuickBooks files.
  • Here, you should avoid manually exiting the command prompt Window.
  • When the QuickBooks services are repaired, the command prompt window will be closed directly.
  • Again, go back to QuickBooks and try to install the latest QuickBooks payroll updates. If QuickBooks error 15101 again flashes on your screen, move to the next solution.
Solution 2: Ensure That IE (Internet Explorer) Is Your Default Browser

Internet Explorer is Intuit’s most preferred Internet browser. To get the update done smoothly, you need to make sure that Internet Explorer is your default browser to perform the process. Below are the steps:

  • When on Internet Explorer, click the Tools or Gear icon located in the top-right corner of your web browser.
  • Next, select Internet Options and move to the Programs tab.
  • Moving ahead, click on the Make Default button and hit OK to get the desired task done.
  • If you are a Windows 10 user, you can refer to this link.

If this solution fails to resolve QuickBooks error 15101, follow the next solution.

Solution 3: Reinstall QuickBooks In Safe Mode Devoid Of The Interferences

If third-party applications are interfering with the update process, reinstall the program in Safe Mode by following the below-given steps:

  • Reboot your Windows in the first place and then repeatedly press the F8 key.
  • Here, you will see the Safe Boot options on your screen.
  • Select Safe Mode using the navigation keys and click Enter button.
  • Windows will now boot in Sage Mode.
  • Now activate the Run window (Windows + R) and type “appwiz.cpl” in the run box.
  • Click Enter and when a list of the installed programs appears on your screen, double-click the QuickBooks Desktop.
  • Now follow the instructions to remove QuickBooks completely from Windows.
  • Moving ahead, make a visit to the QuickBooks Product Download page and download the QuickBooks setup file.
  • Double-click the downloaded executable file and follow the on-screen prompts to finish the download.
  • Complete the registration process and download the QuickBooks Payroll update again.

Altogether!

The solutions described in this post can help you troubleshoot the error code 15101. Following these solutions to resolve the QuickBooks error 15101 can help you update the QuickBooks Desktop application. For further assistance, you can contact our experts by using the chat option. You can also send us an email and get a callback based on your time of availability.

An Easy Guide to Resolve QuickBooks Error Code 1722

In this 10 minutes read guide, we, as accounting experts, are going to enlist the complete information about what is QuickBooks error 1722 and its possible causes. Along with that, we will also cover some of the tested solutions that you can perform at your end to get the issue resolved. If you also want to learn how to resolve QuickBooks error 1722, stay tuned and read this informative article until the end.

“Need instant solution in fixing QuickBooks error 1722? Get in touch with our QuickBooks experts by placing a call at +1 855 706 0905, and get the best solution to diminish the error within no time.”

What is QuickBooks Error Code 1722?

QuickBooks error 1722 is one of the common technical snags that is also known as system error code or installer error that mainly arises due to the limitation of accessing the server. In this case, the software may fail to connect to the server and stops responding.

Error code 1722 QuickBooks arises with a pop-up display message as;

QuickBooks Error 1722

This error commonly occurs when the Microsoft.net framework or an internal windows component is damaged or corrupted. But, there can be other possible reasons as well due to why a user may encounter this issue, which we will reveal in the next section.

Major Reasons Behind QuickBooks Error 1722

Below, we have filtered out some of the most common reasons and factors due to why a user may encounter the QuickBooks error code 1722 while working on the software;

  • QuickBooks installation files need to be downloaded properly on the device.
  • A corrupted windows registry file can also be a factor that may lead to various technical snags in QuickBooks software.
  • If the QuickBooks-related important program files have been deleted accidentally from your PC.
  • If your workstation is infected with malware.
  • Microsoft MSXML and C++ files are damaged or corrupted.
  • Microsoft .NET framework is damaged.

How to Fix QuickBooks Error 1722?

After clearly knowing the possible reasons why the error arises, let’s look at the list of solutions that can help you terminate the issue.

Solution 1. Run QuickBooks Install Diagnostic Tool

Install diagnostic tool is a great and easiest way to resolve technical glitches with the QuickBooks desktop application. It scans all the installation issues with the software and automatically carries out the repair process.

Given below are the steps that you can follow to run QuickBooks install diagnostic tool on your PC;

  • You must download and install the QuickBooks tool hub on your device to use the QuickBooks install diagnostic tool.
  • Users can easily download the QuickBooks tool hub from the official website of Intuit products.
  • Thereon, launch the QuickBooks tool hub on your workstation.
  • After that, you must select the “Installation Issues” option on the screen’s left panel.
  • Moving ahead, you must click on the “QuickBooks Install Diagnostic Tool” option, available in the green color box.
  • Now, the repair process will start on your device. This process will take around 20-25 minutes, depending on the file size and system performance speed.

Once the repairing process ends, verify if the QuickBooks error 1722 has been eliminated.

Solution 2. Run QuickBooks Repair Tool

  • Search for the QuickBooks file location, and click the “File” tab.
  • Thereon, click on the “Search Files” option, and then you have to choose the scan file option to scan the selected file, followed by a click on the “Company” tab option.
  • Next, click on the “Customer” tab option to view the customer-related information.
  • Once you finish the above steps, click on the “Vendor” tab option, and select the “Employees” tab.
  • Now, click on the “Repair” tab option, and a dialog box will open on your screen.
  • Here, you have to click on the “Start” tab option.
  • As you see, a message reflecting the process completed successfully appears on your screen, then click on the “OK” option.
  • At last, you have close all the pending processes and tabs on your device.

Solution 3. Update Windows OS Version to Latest Release

Sometimes, an outdated version of the Windows operating system can slow down the speed performance and act as a compatibility issue with the software. Therefore, it’s highly recommended to keep updating your device’s windows operating system to the latest updates regularly.

You can navigate to the windows settings on your PC to update the OS version to the latest release. Once you have updated the Windows OS version, perform a deep restart of your device, and check whether the QuickBooks error code 1722 has been eliminated.

If you are still facing the QuickBooks error 1722 while working on the software, then there is no need to panic; try the next solution.

Solution 4. Use Windows File Checker

Given below are the steps that you can follow to run windows file checker on your device to deal with QuickBooks error 1722;

  • Launch the windows run command on your device by hitting “Windows + R” keys together.
  • Thereon, type “command” in the search bar.
  • Press the “Ctrl + Shift” keys on your device, then hit the enter button.
  • With that effect, a permission dialog box will appear on your screen.
  • You have to click on the “Yes” option, and then a black box with a blinking cursor will open on your screen.
  • Moving ahead, you have to type “sfc/ scannow” and then press the enter button.
  • Now, the system file checker will start scanning for QuickBooks error 1722 and other file problems too.
  • Thereon, keep following the on-screen instructions to complete the process.

Ending Note

Through this article, we have tried our best to provide you with authentic and relevant information about how you can eliminate QuickBooks error 1722. Above, we have covered five easy-to-do solutions you can perform step-by-step to resolve the error. As always, if you need any help related to any issue in QuickBooks software, you can contact our team via Phone @ +1 855 706 0905. Our accounting experts are available 24*7 around the clock to attend your call and assist you with the best possible solution.

4 ways to Rectify QuickBooks Error 9999

QuickBooks Error code 9999 is a Script Error that occurs while creating a bank connection after an update. It can create problems for your screen as well, making the screen stop responding to your command. This error will not let you download your Transaction from online banking websites.

However, if you want to rectify this error, you can go through this guide and look for all the relevant ways to fix the issues immediately.

“Need instant help with QuickBooks Error 9999? Call on @+1 855 706 0905, and get help from experienced experts.”

QuickBooks Error 9999: Explained

Whenever a user encounters QuickBooks Error Code 9999, they can see a message alert on their screen saying:

“Sorry, we can’t update your Account. Please try updating again later. (9999)”
Or
“Error code 9999 – Can’t update.”

It takes place when a browser declines to execute a script from one website to another third-party domain. This happens simply to protect the user’s details and credentials from Cross-Site-Request Forgery attacks. This attack can create a malicious infection to your Account, which may lead to unwanted fund transfers as well.

Why do Users Encounter QuickBooks Error 9999?

Let’s look at a few reasons that cause QuickBooks Banking Error code 9999:

  1. The Internet connection you are using is unstable or slow.
  2. Your financial institution is having some Server issues.
  3. The presence of a Window Firewall can also create obstacles while working on QuickBooks.
  4. Intuit’s server is down.
  5. Antivirus or Anti-Malware software can block the connections.
  6. The cookies present in the Browser can stop you from using your QuickBooks software in a better way

How to Identify QuickBooks Error 9999?

If you are not sure about the error, you can identify the QuickBooks Banking Error 9999 by keeping an eye on the below-given symptoms:

  1. You can connect your Bank using QuickBooks online.
  2. Your Browser freezes and stops responding to your command.
  3. The error message will appear on your screen.
  4. Windows slow down and start behaving sluggish.

What Should you do to Fix QuickBooks Error Code 9999?

Now that you have collected enough information about QuickBooks Banking Error 9999 let’s now understand the ways to fix it.

First Way: Update your Financial Institution

The error can be fixed by updating the Bank Account 3 to 4 times. Follow the mentioned steps to do so:

  1. Open QuickBooks online.
  2. Now, navigate to Banking.
  3. Select the Update option.
  4. Now, repeat the same 3 to 4 times, and you’re done.

Second Way: Delete the Cache’s Files present in your Browser

If the first method is not helpful for you, then try to resolve the issue by removing the Browser’s Cache.
Steps for Chrome Users

  1. Open Chrome and move to the Settings option.
  2. Next, go to Clear Browsing Data.
  3. Now review the Cached Images & Files tab.
  4. Now hit the Clear Data option.
  5. Choose Cache from the given list and select the Clear now option.

For Safari Users

1. Initiate the Process by Pressing Develop option present at the top of the screen.
2. Then select the Empty Caches option.

Internet Explorer

1. Firstly Press the Ctrl+Shift+Delete keys from your keyboard.
2. Now, review the Delete Browsing History page, and click on the Temporary Internet Files and Website files.
3. At last, select the Delete option.

Third Way: Try to Access your Bank’s Website using a Web Browser

At times, your Bank asks you for extra verification steps for security purposes. So for verification,

  1. Open your Web Browser
  2. Navigate to the Banking website.
  3. Now login to your Bank Account using login credentials.
  4. Next, Answer the security Questions by the Bank or opt for OTP verification.
  5. Enter the OTP, and you are done with the verification
  6. Now, after login in, try to refresh your Bank Feeds again in QuickBooks.

Fourth Way: Remove and Re-Add your Bank Account

To Remove the Bank Account from QuickBooks Online, check the following steps:

  1. Begin the process by hitting the Banking option.
  2. After that, Hit on the Edit tab of the Account you want to remove.
  3. Next, navigate to the Account Windows and click on the Disconnect this Account tab.
  4. Last, Select Save and then close the window.

Steps to Re-Add the Bank Account to QuickBooks Online:

  1. Initially, Move to the Bank tab and then select the Add Account tab.
  2. Next, provide the login credential of your Bank account in the required field, and click on the Continue button.
  3. Choose Securely Connect and select the bank icon.
  4. Now, from the given Account type drop-down menu, select your Account.
  5. Next, select a Bank Account or Credit Card Account.
  6. However, if you don’t have a bank account, hit on the +Add new tab.
  7. End the process by hitting the Connect button.

Ending Note!

We have made all the efforts to provide you with all the best possible solutions to resolve QuickBooks Error 9999. But, still, if you are searching for any expert’s help, consult with our professionals through live chat for immediate help. An Alternative way to get in touch with our professionals is by dropping an email and then explaining your query to get the perfect solution.

5 Simple Steps to Fix QuickBooks Error 15227

QuickBooks error code 15227 is an update error that generally arises when the user tries to download the new updates on the QuickBooks desktop. This error may also arise when your system suddenly shuts down due to power failure.

QuickBooks error 15227 appears with a pop-up display message as;

QuickBooks Error code 15227

“Place a call now at +1 855 706 0905 to speak live with a QuickBooks expert and get a quick remedy to fix QuickBooks error 15227 within a few minutes.”

Possible Reasons Behind QuickBooks Error 15227

Before we jump ahead directly to the solutions to get the error resolved, let’s take a look at the possible reasons due to why a user may encounter the QuickBooks error code 15227;

  • QuickBooks installation files are not downloaded properly on your device.
  • If your PC is affected by malware, then it can lead to various technical glitches on your PC.
  • QuickBooks important files are mistakenly deleted from your PC.
  • The damaged windows registry.
  • Excessive applications are running in the background.

Signs/ Symptoms of QuickBooks Error 15227

  • Unable to download new updates of QuickBooks desktop application.
  • Suddenly drop-down in the PC’s performance speed.
  • Unable to locate taskbar.
  • An error message appears on the screen showing QuickBooks error 15227.

Techniques to Fix QuickBooks Error 15227

Let’s take a look at the different solutions that can help you to resolve QuickBooks error 15227;

Solution 1. Download New Updates on QuickBooks Desktop

The first solution you should follow is to download new updates on your QuickBooks desktop software. To do that, given below are the steps that you can perform;

  • On your QuickBooks desktop account, click on the “Help” menu option.
  • As the drop-down list appears, then you have to click on the “Update QuickBooks” option.
  • Thereon, click on the “Get Updates” option, and then the updating process will start on your device.
  • Once the updating process ends, you have to perform a deep restart of your device and launch the QuickBooks software on your PC.

Now, launch the QuickBooks desktop application on your device, and check whether the QuickBooks error 15227 has been eliminated.

Solution 2. Fix the Windows Registry

A corrupted windows registry on your PC can lead to various technical glitches on your PC, and it may even affect you in using the software smoothly. Fixing the windows registry can be the solution to resolve QuickBooks error 15227.

  • Open the windows run command on your PC, and type “Regedit” in the search bar.
  • Hit the “OK” option, and then the registry editor will appear on your PC screen.
  • After that, you must select the key associated with QuickBooks error code 15227.
  • Click on the “Registry Editor” option, and then click on the “File” tab option.
  • Now, click on the “Enlist” option, and select the folder for which you want to create a backup file.
  • Provide a name to the file, and then check the highlighted field in the export range tab.
  • At last, you have to save this key with a .REG extension.

Solution 3. Delete Temporary Files & Cache

Here are the steps that you can execute to delete temporary files and cache from your device;

  • Launch the windows run command, and enter “Cleanmgr” in the search bar.
  • Hit the “OK” option, and then the disk clean-up window will be open on your screen.
  • Here, you must select all the files you want to delete and then click on the “OK” option.
  • Once you finish the above steps, re-launch the windows run command and move toward the “%temp%” folder.
  • Select all the files in the temp folder by pressing the “Ctrl + A” keys together.
  • After that, press the “Ctrl + Shift + Delete” keys together to delete the temporary files permanently from your device.

Solution 4. Run System File Checker

Let’s take a look at the steps that you can execute to run the system file checker on your device;

  • Move to the windows start menu, and type “Prompt” in the search bar.
  • Thereon, do a right click on the “Command Prompt” and then select the “Run as Administrator” option. ‘
  • Thereon, enter “SFC/ scannow” and hit the enter button.
  • Now, the scanning process will be start on your device.
  • As the process ends, launch the QuickBooks application to verify whether the QuickBooks error 15227 has been fixed.

Solution 5. Update System Drivers

Another solution you should follow is updating the windows system driver on your PC to the latest version, as an outdated system driver can also lead to the QuickBooks error code 15227.

Given below are the steps that you can execute to update system drivers;

  • First, go to the “Device Manager” on your device, then click on the “Adapters” section to extend it.
  • Thereon, right-click on the “Device” option and select the “Update Driver” option.
  • With that effect, the updating process will be start on your device.
  • After that, you have to carry out the restart procedure of your PC.

If your device cannot search for the driver, you must locate the driver’s official website and download the compatible drivers.

Concluding Note

That’s all with some quick solutions you can follow to resolve QuickBooks error 15227. If these methods do not work for you, or if you are facing any other issue while working on the QuickBooks software, you can contact our team via Phone @ +1 855 706 0905. Our experts are available 24/7 at the help desk to understand your query and deliver the best solution.

How To Deal With QuickBooks Error 6073 99001?

QuickBooks error 6073 99001 occurs when a user tries to access their business accounting data. It is possible that the company file you are trying to access is already being used by a different user. Improper hosting configuration settings can be one of the possible reasons behind the arrival of the error. This error in QuickBooks is one of the multi-user mode errors wherein the data file is not shared properly. To get rid of the error, you need to list the possible factors behind the error and fix them to eliminate the error. Follow this post until the end to learn how to fix QuickBooks error 6073 99001.

Wondering how to fix QuickBooks Error 6073 99001? All you need is to dial our helpline number +1 855 706 0905, and it will connect you with an expert professional. 

QuickBooks Error Code 6073 99001: Description

Error QuickBooks error 6073 99001 is related to the company file access and gives an error message on your screen on its arrival:

QuickBooks is unable to open this company file. It may have been opened by another user.

Error codes: (-6073, -99001)

Additionally, it also explains the possible reason behind the arrival of the error and recommends possible solutions to get rid of it. However, for detailed troubleshooting, you need to consider the possible factors that can give rise to the QuickBooks error message 6073 99001 on your screen.

What Are The Possible Reasons For Error Code 6073 99001 in QuickBooks?

Getting insights into the QuickBooks error 6073 99001 can make the troubleshooting easier for you. So, here is the list of possible factors:

  • The file is already opened on another computer, and that too in single-user mode.
  • If the file is located in a read-only network folder, you may not be able to access it.
  • When the file is hosted on a Linux server and uses more than one set of login credentials to log into the shared folder.
  • The file is being accessed using a remote application while the server detects that you are still logged on to the system.

Symptoms of Error 6073 99001 in QuickBooks

Now that you know the possible reason behind the arrival of the error, below are some common signs and symptoms that can help you identify the issue:

  • You will see an error message on your screen with the arrival of the error 6073 99001.
  • Trouble in accessing the QuickBooks data file due to improper hosting configuration settings.
  • Improper functioning of the QuickBooks Desktop software or your Windows OS.
  • The system hangs/freezes or responds sluggishly toward the mouse or keyboard inputs.

When experiencing these signs on your screen, you need to move ahead and perform the relevant solutions to eliminate the error.

Best Ways To Resolve QuickBooks Error 6073 99001

Now that much has been discussed about the error, below are the solutions that can help you with troubleshooting of the persisting issue:

Solution 1: Run QuickBooks File Doctor Tool From Within The Tool Hub

QuickBooks Tool Hub enables users to access the tools required to troubleshoot a particular issue. You can run QuickBooks File Doctor to repair the damaged company file, which can be one of the possible reasons behind QB error Code 6073. Check the below-explained steps:

  • Go to Intuit’s official website and download the latest version of the QuickBooks Tool Hub.
  • Once downloaded, run the executable file and follow the on-screen instructions carefully to install it.
  • Agree to the terms and conditions, and it is now ready to use.
  • When in QuickBooks Tool Hub, navigate through the categories of the errors and select Company File Issues.
  • Here, you can run the QuickBooks File Doctor to repair the damaged company file.
  • The repair process may take up to 20 minutes, based on the size of the company file.
  • Once repaired, check if the QuickBooks error 6073 99001 is fixed.

If the error message flashes again on your screen, try the next solution.

Solution 2: Resolve The Issue Manually Based On Various Instances Of The Error

Improperly configured hosting settings can give rise to the QuickBooks error 6073 99001. In such a case, you can perform the following solutions:

2.1: Switch To The Single User Mode On the Server Computer

  • In the first place, close the QuickBooks application on all workstations.
  • Next, open your Company file located on the Host computer.
  • Now move to the File menu and choose Switch to Multi-User mode option.
  • Reboot your workstation and try to access the company file. If you are still getting the error message, try the next solution.

2.2: Open The Company File In Multi-User Mode

  • First things first, open the company file on the host computer.
  • Now, from under the File tab, you need to click the Close Company option.
  • Thereafter, open the company file once again.
  • Now click Open or Restore Company, located underneath the File tab.
  • Moving ahead, click Open a company file and then hit the Next button.
  • Again, click Open file in multi-user mode and click Open.

Ending Words!

This post explains the best troubleshooting solutions implementing which you can resolve QuickBooks Error Code 6073 99001. However, if you are experiencing an issue with error resolution by implementing the steps, a chat with the experts can help with the error resolution. Besides, you can also schedule a call back by emailing us your time of availability.


How to Fix Sage 50 Not Responding or Has Stopped Working Error?

Are you facing Sage 50 not responding error? Is your Sage 50 not working? Fret not! You’ve come to the right place. In this blog, we will tell you all about how to fix Sage 50 not responding error. Sage has, for time immemorial, been the first and the foremost choice of accountants and businessmen all over the world. So much so that in the UK, it has become the numero uno choice of all the tax filers.

Apart from offering world-level tools and accounting tributes, it essentially has carved a niche of its own in the industry. But, since the time it came into existence, it has been riddled with errors and discrepancies, here and there. Some sage errors can be fixed consequently, some proficiently and some need physical effort. The Sage 50 not responding or Sage 50 stopped working is one such problem that a lot of Sage users tend to face. In this blog, we will talk about the various reasons and causes that lead to Sage 50 stop working error. Apart from that, we will also tell you how to fix Sage 50 not working problem. So, read this article till the end to know all about fixing of Sage 50 not responding error.

What Exactly is Sage 50 Not Responding Error?

A lot of errors in the Sage software lead it to the program becoming frozen, thereby blocking most of its functions. Therefore, while working on the Sage software, you get the hint that you are not receiving any response to your commands, you might have encountered the said error. Another indication could be that a forced windows pops up. All these signs mean one thing. That what you are experiencing is the Sage 50 not responding error. Fixing software problems take time and effort. At the same time, it can cost you money. If you want an easy and effective resolution, you can reach out to us.

How would I know if I have encountered Sage 50 stop working error?

Above, we have talked about identifying this error. Taking this forward, let’s talk of some signs and symptoms that occur when you encounter this error. When you get these signs and symptoms, you can be assured that you indeed are facing the Sage 50 not working error. Following are some of the signs;

  1. When your Sage 50 software suddenly freezes while you are working on it, you can know that you have encountered the error.
  2. If your Windows Task Manager shows an unresponsive error message while you are working on Sage, it is a clear indication.
  3. Your Sage 50 not responding while installation is a clear message that it indeed is the case. In this case, a non-responsive message would appear on your computer screen.
  4. If while you are creating the data backup from the network drive, your Sage 50 software shows an unresponsive status, this is a clear hint that your Sage 50 stopped working.

Reasons that cause Sage 50 not working error?

There could be numerous reasons behind the Sage 50 not working error. When you know these reasons, the process of troubleshooting becomes easier. When you know the problem, it becomes easy to fix the issue. Some of the causes of Sage 50 not working error are listed below;

  1. One of the most significant causes of the Sage 50 not working error is enabling the Compatibility of Windows XP. When you enable the Windows XP compatibility, the Sage 50 fails to establish the connection with Windows and hence the problem occurs.
  2. Thereafter, the second reason could be that your computer RAM has no or little space to install the Sage 50 software.
  3. Running the program on a slow server or network could be another reason. When you do that, the Sage program might not work or respond improperly.
  4. Whenever you try to do two tasks simultaneously, this problem can occur. Suppose if you are taking backup from the network and running the program at the same time, then the Windows receives a hindered response from the programs and displays a “not responding” message on the computer screen, you can face this issue.
  5. One more reason could be that the anti-virus, anti-spyware or the user account control is interfering with the system.
  6.  Windows Update not being installed could cause the issue.
  7. Damaged data folder files or a damaged standard report file could cause the problem.
  8. A damaged Microsoft.net framework could also be behind this.
  9. An incorrect version of the program when installed on the workstation causes the issue.

Troubleshooting Methods that Help Fix Sage 50 Not Responding error

There are certain methods using which you can fix Sage 50 not working error. Some of these have been listed below;

Solution 1: Reboot the system and then start it again

This is the first and foremost troubleshooting step in the resolution of the Sage 50 not responding error. Try logging out of the system and then logging in back again, Restarting the system is considered to resolve the issues by itself.

Solution 2: Disable the compatibility Windows XP mode

Disabling the compatibility mode in Windows XP can prove to be effective in the resolution of this problem. To do this, you need to perform the following steps;

  1. Firstly, go to the Desktop and then click on the Sage 50 icon.
  2. Thereafter, in the menu, click on the Properties option.
  3. Furthermore, select the compatibility mode available in the Window.
  4. Tap on the option “Run this program in the Compatibility mode” and deselect it.
  5. Lastly, as you submit it, you would have disabled the compatibility windows XP mode.
Solution 3: Force the Sage 50 to open

Using the following steps, you should force open the Sage 50 software;

  1. Firstly, right-click on the Sage 50 program icon.
  2. Secondly, left-click on the Properties option.
  3. Thereafter, highlight and then copy the contents of the target line.
  4. Furthermore, open the Run option by pressing the Windows Key and R together on the keyboard.
  5. Paste the copied content from the target line into the Run box.
  6. Consequently, after the quotation marks, add the space and then type abc at the end. After this, verify that the program opens up.
Solution 4: Run the Sage 50 as an Administrator

Running the Sage 50 as an administrator solves the problem sometimes. To do this, you need to follow the below-given steps;

  1. Run the Sage 50 as an Administrator by right-clicking on the Sage 50 icon.
  2. Secondly, you need to ensure that the Sage 50 software is opening and/or installing update without any error.
  3. If the error still persists, you will have to move on to the next section.
  4. Next, shut down the Sage software and then right-click on it again.
  5. Furthermore, click on the Properties option.
  6. Thereafter, click on the Compatibility tab.
  7. From the given options, choose Run this program as an Administrator.
  8. Click on the OK option.
  9. Lastly, check again if the Sage is running without any error.
Solution 5: Save file on the computer drive and then reboot the system again

Follow the below-given steps to do this;

  1. Firstly, if you are facing a network error, then you would have to first save the file and take its backup and then copy and paste it in a drive.
  2. If the backup fails to download the file due to a slow network, then confirm its file size.
  3. After you have logged out of the computer system, then reboot the server to get the complete network.
  4. If the network is causing the problem then you need to reboot the router.
Solution 6: Initiate the Connection Service Management once again

Starting the connection service management helps to fix Sage 50 not working problem. This is a welcome step as it almost immediately resolves the problem. Following are the steps that can help resolve the issue;

  1. Firstly, go to the Desktop and then tap on the Windows button again.
  2. Secondly, on the search bar of the Start menu, you need to look for the MSC.
  3. MSC will immediately appear on your screen. Access the name column, look for the Sage 50 connection manager, and then tap it with a right-click.
  4. Lastly, choose the option restart from the dialog box.

Conclusion

Sage 50 crashes when it lacks the admin rights to perform certain tasks. Further, missing dependencies or a lack of system resources can also cause the accounting software to crash. The program stops responding if it cannot connect to the data file because of network issues.  Should you find that even after following these steps, you are unable to fix the problem, then you can directly contact us. We are available on chat, email as well as call. Our email address is info@accountingwhizz.com.

How to Change TurboTax Online User ID and Password?

If you are willing to change TurboTax password but not sure how to get the task accomplished, then here is a friendly post for you. TurboTax is an excellent tool for taxation that enables users to file their taxes smoothly. You can access a free version of the program for simple tax filing.

There are various instances when you may need to change your TurboTax password and keep your account secure. For instance, when you forget your old password or feel that your account is compromised, change your password immediately. Here, we will discuss some easy ways to change TurboTax user ID and password for you. Let’s start!

Need help with TurboTax password change? Dial  +1 855 706 0905 to get instant help. 

Instances When You May Need To Change Your TurboTax Password

There are many instances when you may need to change your current/lost password. Check the below-given list:

  • Where there is a security breach, you need to change your password immediately.
  • If you suspect an undesired intrusion into your account, change your password.
  • On discovering the malware or other phishing software.
  • When the account is logged into someone else’s device.
  • If you have forgotten your existing password, reset it as soon as possible.
  • It is wise to change your password on a regular basis to keep your account safe against people with nefarious intentions.

How Can I Change The Username On My TurboTax account?

If you are wondering how to change your user name on your TurboTax account, then following the below-given steps can help you with your quest. In the first place, you need to log into your TurboTax online account. Once done, perform the below-given steps with full attention:

  • Navigate to your Intuit Account and then log in to your account using the accurate credentials.
  • Next, you need to click on Intuit Account, located at the lower left corner of your system’s screen.
  • When on the Account Settings screen, click either Profile or Security, depending on which options you wish to change.
  • If you want to change your User ID, go to the Profile tab and hit the Edit option.
  • Thereafter, perform the on-screen instructions to proceed further.
  • These steps will help you to change your username on your TurboTax account.

Also Read: How to Fix TurboTax Error 190

What Is The Procedure To Change TurboTax Email Address?

While using the TurboTax account, if you want to change/update your email address, follow the below-given steps:

  • Sign into your Intuit account in the first place.
  • Once done, locate and click on the Sign in & security option.
  • Here, you need to select the Email address.
  • Thereafter, enter a new email address and select the Save option.

Once saved, your TurboTax email has changed successfully, and you can now use it with your account.

How To Change TurboTax Password?

If you are using an online account, it is wise to change your password on a regular basis. It keeps your account safe against multifaceted security risks. Sometimes, you have the option to change your password, whereas sometimes, you are forced to complete this task. Nevertheless, below are the steps you can follow for a TurboTax password change:

1: Change Old TurboTax

If you need to change your old TurboTax password, the below-given steps can help:

  • Log into your TurboTax account using the current login credentials.
  • Now select the Update option located next to the passcode section.
  • Here, you will need to enter your current password in the given box.
  • Next, choose a new password and re-enter the next box to confirm it.
  • Finally, click on the Save button to finish the task.

Your password has been changed now.

2: Reset Your TurboTax Password

If you forgot change TurboTax Password, then perform the below-given steps:

  • When on the TurboTax account page, click on having trouble logging in option.
  • Next, enter your email address and hit the Next button.
  • After that, you need to verify the phone number linked to your account.
  • You may now create a new password and save it after confirming.

The password reset process is completed successfully.

How To Receive Verification Code When Email Address Is Wrong?

If you no longer have access to your email account, then you can receive the verification code to your mobile number. Below is how you receive the confirmation code via mobile:

  • When you are asked if you want to receive the code via text message, select the Continue option.
  • While waiting for the code, don’t close your TurboTax window. It may take a few minutes to receive the code, so you need to wait patiently.
  • Once the code is received, enter it in the field “Enter 6 digit code” and avoid entering the code in the password field.
  • After that, you can simply click on the Verify button in the email, and it will direct you to the TurboTax verification page.
  • In the end, click the Continue option to sign into your account.

Important: When you request a new code, the old code will be rendered invalid. You have to enter the most recent code for your account verification.

Alternative Way To Confirm Your TurboTax Accountant

If you are unable to get the code, there is an alternative way to get the job done. Below are the steps:

  • Select the “Confirm my account in a different way” option when you are prompted to do so and then select the Continue button.
  • Next, enter information from the last year’s return. Also, make sure to enter the information of the primary taxpayer and click Continue again.
  • Now enter the TurboTax-generated security questions when you are asked. In case none of your answers apply, select the “None of the above” option.
  • After answering all the questions correctly, you will see the “Welcome Back!” screen.
  • Here, you need to enter your email address and phone number. It will make your account verification easy in the future.

After confirming your identity, you will be redirected to the TurboTax account, where you can use the application without any problem.

Things To Consider When Changing Your TurboTax Password

If you are willing to change your TurboTax password, you need to keep a few important considerations in your mind.

  • Avoid using the same password for multiple accounts. In such a case, if one account is compromised, all other online accounts will be at risk.
  • Avoid using your personal information in the password, such as your mobile number, father’s name, vehicle number, etc.
  • Also, don’t use your debit/credit card pin as your password.
  • Choose a strong password made by combining letters, numbers, and special characters.
  • Don’t reuse old passwords, as most platforms don’t accept them.
  • Avoid saving your password on public devices as they can put your account at a safety risk.

Final Words!

Now that you are here, I hope you have read this post on how to change TurboTax user ID and password. If you are having a kind of technical unease or need to speak to an expert, our TurboTax HelpDesk is always open for you. Explain your issues, and they will guide you with the best assistance.

FAQs

1: How do I update TurboTax account information?

If you want to update your TurboTax account info, such as email, phone number, password, or mailing address, follow the below-explained steps:

  • Sign into your Intuit account in the first place to start the procedure.
  • After that, select the “Sign in & security” option if you want to change your user ID, password, or email address.
  • If you want to update your name, address, DOB, or other information, select the “Personal info” option.

2: How to create a new TurboTax account? 

To create a new TurboTax account, you can follow a few simple steps that are explained below:

  • First of all, you need to make sure that your device is connected to a stable Internet connection.
  • After that, open your web browser and go to the TurboTax website.
  • Now click on the ‘create a new account’ option.
  • Follow the instructions given on your screen and provide the required information, such as your email address, user ID, phone number, and password.

3: Can’t sign into TurboTax account. What should I do? 

If you are unable to sign into your TurboTax account, you need to look for the multiple factors that can give rise to this error. For instance, when your Internet connection is not stable, or the browser has a heap of cookies and cache. To get rid of this error, you can uninstall and reinstall the TurboTax installation in the first place to make sure that the program is running optimally. If the error persists thereafter, clear the browser’s cookies and cache. If the error continues, you may also get professional assistance for the error resolution.

4: How to get help with your TurboTax account/password issues? 

If you want to change TurboTax user ID and password or need additional assistance related to any TurboTax issue, our professionals are ready to help you around the clock. You may use our chat or email services to get help or request a callback during the available hours.

How to Resolve QuickBooks Error H101

QuickBooks is software that can make your life super simple and too difficult within just a matter of time. It is a place for everyone to administer their accounts and finances. However, this software does face a lot of glitches at the same time. Here you can take care of your payrolls but might also need to take care of the company file error, such as QuickBooks Error H101.

Although it can get a bit difficult at times, this is exactly what we are here for. We proffer complete guides on QuickBooks errors and are experts who are also available for your assistance. Today, we have chosen to talk about QuickBooks Error H101. We are on a journey where you will encounter its symptoms, causes, and fixes that can help you in the long run.

QuickBooks Error H101

Error code H101 alert means the host computer needs another configuration. It usually appears when a user tries to change the application from single to multi-user mode. It is a member of the H series error family of QuickBooks. The other members of this family are H202, H303, H505, H606, and H707.

However, the issue is not too big; therefore, it does not really affect your company data files. But it is always advised that you make a backup of such documents before you go ahead with the various methods to overcome the problem.

Signs of QuickBooks Error H101

This error code shows its symptoms while operating the application as well as when you are working on your PC. Here are some symptoms of QuickBooks Error H101 to look out for:

  • The first and foremost sign is the alert window popping up on your screen.
  • When the page you try to open is expelled, the URL is still the same.
  • Also, if your computer screen shows a glitch and stops taking command from output devices, such as keyboard and mouse
  • Your PC shuts down as soon as the alert prompt window appears.
  • When the window you attempt to open is unavailable on the server

Reasons Behind QuickBooks Error H101

Let us take a look at the core reasons responsible for the QuickBooks problem now:

  • When the software is not able to read your IP address from the host system
  • In case the host settings of QuickBooks are not configured properly
  • Also, if you are working with a corrupt company file
  • An antivirus or firewall attack can lead to this error
  • Also, if the server is unable to communicate with the company file

Solutions For QuickBooks Error H101

Finally, that you have understood what irks QuickBooks Error H101here is how you can tame it.

Fix 1: Go Through QuickBooks Services Settings

Check if there is an issue with QuickBooks services settings.

QuickBooks Services Settings

  • On the home screen of your system, hit Windows+R to pull up the Run command window.
  • After that, jot in services.msc in the space and click on OK.
  • Once the Services tab is up, you now need to locate the QuickBooksDBXX file (XX is the software version).
  • Thereafter, in the following window, go to Startup Status and look at its current status. If it is Running, then leave it untouched; otherwise, hit the Start button.
  • Furthermore, see for the Startup Type and switch it to Automatic.
  • Moving forward, head to the Recovery window and run the First, Second, and Subsequent Failure by changing them to Restart.
  • To finish it off, hit the Apply button from the bottom right.
  • After that, remember to repeat the same steps with the QBFCMonitorService file.

Fix 2: Make a New Company File Folder

If the issue exists in the company file folder, then creating a new one might help you overcome QuickBooks error H101.

New Company File Folde

  • First of all, open your system, and head to the Start menu.
  • Thereafter, go to File Explorer and look for the company file folder from the search bar.
  • Once you have the folder on your screen, open it and cut the docs from there by hitting Ctrl+X.
  • After that, right-click on the same screen and go to New and then Folder.
  • Finally, paste the files that you have cut and rename the folder.
  • Try and run QuickBooks Desktop again.

Fix 3: Check Hosting on QuickBooks

In case neither of the above two solutions works, check the hosting settings in the application.

Check Hosting on QuickBooks

  • First of all, go to the homepage of QuickBooks Desktop on the workstations.
  • Next, from the menu bar, click on the File option and go through the scroll-down list.
  • After that, hit the Utilities option and see the hosting settings here.
  • If it is set to Multi-user mode, then change it to single-user mode.
  • Remember to make the changes in all the other computers connected to the same company file.
  • Also, make sure you do not make this change on your host PC.

Fix 4: Use QuickBooks File Doctor

In order to use QuickBooks file doctor, you first need to download and install QuickBooks Tool Hub.

Step 1: Get QuickBooks Tool Hub Running

  • Go to the official website of QuickBooks Tool Hub.
  • Thereafter, locate the Download button and hit that.
  • The downloading process can take a few minutes, depending on the speed of your internet connection.
  • After that, go to the Downloads folder in File Explorer, and you will find the same at the top.
  • Furthermore, double-click on the same, and a new prompt window will come before you.
  • Go through the steps to install the tool hub.
  • Also, say Yes to agree to the terms and conditions.
  • Finally, click on Run, and the application is all set to use.

Step 2: Run QuickBooks File Doctor

  • Firstly, select Company File Issues and open that tab.
  • Next, you will find the Run QuickBooks File Doctor button; hit that.
  • Subsequently, follow the instructions on your screen and let the scanning begin.
  • The fix tool will automatically fix the problems it finds.

Fix 5: Make Use of QuickBooks Database Server Manager

To resolve QuickBooks Error H101, run QuickBooks Database Server Manager if nothing else works.

  • Initially, to use Database Server Manager, you need QuickBooks Tool Hub in your system.
  • If you have it on your screen, then go to the Start menu and search for it. Otherwise, get it from QuickBooks Tool Hub’s official site.
  • After that, on this window, find the Network Issues window from the list on the left side.
  • Here, the QuickBooks Database Server Manager option will appear before you.
  • This will locate your company files automatically. In case it doesn’t, click on Browse and select Start Scan.
  • Thereafter, the tool will change the firewall permission settings for you.

Fix 6: Change Firewall Settings

Configure firewall settings in your system to try fixing the problem again.

Change Firewall Settings

  • Open the Run dialog window by pressing Windows+R or from the start menu on your system.
  • Put in Control Panel and hit OK to browse the tab.
  • Next, go to the System and Security tab and move to the subsequent window.
  • Thereafter, look for Windows Defender Firewall and click on Allow an app through Windows Firewall available as a subheading.
  • Lastly, add QuickBooks from the list of available options, and you are good to go.

Summing Up

QuickBooks users rely on this software on an everyday basis. However, this application does have its issues that can create a hindrance to your task. One such problem is QuickBooks Error H101. This code of the H series is a very common problem that multi-user mode users face. There can be ‘n; number of causes behind the same. It can happen due to misconfiguration, communication issues, firewall restrictions, company file folder problems, and more. In order to fix the same, there are a few troubleshoots that you can try by yourself. We have mentioned them in this blog for your reference.

If you need any more assistance or are troubled with any other QuickBooks Desktop problem, then you can connect with our QuickBooks experts. Follow the steps provided above and they will help you thoroughly in the right direction. If you feel stuck at any part of the blog, We are at your service over a call, live chat, as well as email. Send in your query, and we will reach out to you with the appropriate solution soon.

6 ways to Resolve QuickBooks Error 15243

Are you stuck with QuickBooks Error 15243 and want to learn the simplest steps to handle it? If this is the case, then you are on the correct page. The user might encounter QuickBooks error code 15243 while updating QuickBooks payroll. This error happens when QuickBooks File Copy stops working properly in QuickBooks due to any reason.

Whenever you encounter this error, a message will appear on your screen:

“Error 15243 – The update of payroll is not able to complete successfully. The QuickBooks FCS service is damaged.” 

Continue reading this entire blog to acquire more knowledge about the main causes behind Error 15243 and its troubleshooting steps.

Get Quick assistance in eliminating QuickBooks error 15243 from our experts by calling at @ +1 855 706 0905

What Promotes QuickBooks Error code 15243?

You may receive QuickBooks Error 15243 in QuickBooks because of the a few reasons that are explained in the below-given list:

  • QuickBooks Payroll doesn’t have the latest tax table update.
  • QuickBooks File Copy Service is not Responding properly.
  • Your Windows registry is corrupted.
  • Presence of Virus or Malware in your System.
  • The file Copy service is corrupted or damaged.
  • Your Payroll subscription is expired.

How to identify QuickBooks Error 15243?

Before going further with the techniques to troubleshoot QuickBooks Error Code 15243, let’s first understand the symptoms that help you identify the error.

  • An error alert will display on your screen.
  • The System freezes Frequently.
  • Windows is not working properly.
  • The System is not accepting your command.

Step-by-Step Solutions to Rectify QuickBooks Error 15243

After learning all the possible reasons and the symptoms of QuickBooks error 15243, it’s time to go for the troubleshooting ways.

1st Way: Review the Payroll Subscription

In case your Payroll subscription is expired, you may face QuickBooks Error Code 15243 in QuickBooks. So, we will advise you to check your Payroll subscription first before going further with any other fixes.

1. Launch the QuickBooks Application dashboard and hit My Payroll Service present in the Employees option.
2. Thereafter click on the Account and Billing Information.
3. Next, you have to Close the Maintenance Page available on your window.
4. Now QuickBooks software requires you to re-validate the payroll subscription.
5. Once the validation process is finished, payroll will update automatically.
6. After installing the updates, run the payroll again and verify if the QuickBooks error code 15243 is still persistent.

2nd Way: Configure QuickBooks File Copy Services

If the previous method doesn’t work for you, try to fix Error 15243 by repairing the File Copy Services, as damaged FCS is one of the major reasons behind this error.
1. Launch the Run window using the Windows+R key.
2. Now, in the Enter services.msc in the Run Window, and hit enter.
3. Next, double-click on Intuit QuickBooks FCS service.
4. Here you have to choose the manual startup type from the Intuit QuickBooks FCS Properties window.
5. Select Ok, and then launch the QuickBooks Payroll

3rd Way: Make Changes in the Internet Explorer Settings

The steps to follow for resolving error 15243 in QuickBooks by changing the Internet Explorer Settings are mentioned below;
1. Turn on your Desktop.
2. Launch Internet Explorer.
3. Now, you have to select the Gear icon and hit on the internet option.
4. Select the Security tab.
5. Then to proceed forward, select the Trusted Web Page options.
6. Now move to the Address bar and enter the Website URL.
7. Write Intuit.com along with *.quickbooks.com.
8. In case you are from Canada, enter *.quickbooks.ca & *.intuit.ca.
9. Now select the Close button, and hit Apply.
10. At last, click on Ok.

4th Way: Download the QuickBooks Desktop Updates Manually in your System

In case you are still stuck with issues related to installing payroll updates, then you can go with manual installation of the updates as a short-term solution.
1. Initiate the process by navigating to the QuickBooks Product Updates page.
2. Next, from the drop-down option, you have to choose your country, product,& version.
3. Now hit on the Get Updates tab.
4. Thereafter Save this file to some easily reachable folder.
5. To complete the QuickBooks Desktop Applications updates, run the Updates File and follow the prompt available on your screen.
6. Restating your Windows.
7. End the process by rerunning the payroll updates.

5th Way: Go for Full Malware Scan

Alternatively, you can also perform a full malware scan in your System to fix the error. At times, a user might face major problems due to the presence of malware in the System. This malware or virus can attack the files and folders present in your device and corrupt it completely. Thus, go for a proper malware scan and check if your issue is fixed now.

6th way: Shut down all Interrupting programs, if QuickBooks FCS service is corrupted

If none of the above-mentioned methods works for you, then close all the interrupting programs and check if the issue is fixed.
1. Shut down the QuickBooks Application.
2. Thereafter you have to right-click on the taskbar to select the Task Manager tab.
3. Next, You have to highlight the below-mentioned background process and hit the End task option for each process option.

  • QBW32.exe or QBW.exe
  • QBCFMonitorService.exe
  • qbupdate.exe
  • QBDBMgr.exe or QBDBMgrN.exe
  • QBMapi32.exe

4.  Go to the desktop screen and right–click on the QuickBooks software.
5. At last, choose the Run as Administrator tab.

Winding it Up!

As mentioned above, these are a few best solutions using which you can use to easily fix the QuickBooks Error Code 15243. However, if you still encounter any problems while resolving the error, then get in contact with our QuickBooks experts to get quick assistance. Our experts are available 24/7 all around the globe to listen to the user’s queries. Get in touch via email or live chat, and ask about all your problems.