All posts by admin

QuickBooks 1099 E-file Service

What is 1099 NEC form in QuickBooks Desktop ?

Today, in this article, we are going you to give all the information about the QuickBooks 1099 and how to track payments in that.
So, let’s stay tuned till the end of the article.

1099s is a tax form that is supported by QuickBooks and helps employers to calculate the wages and taxes of the workers. Workers under the QuickBooks 1099 form are also known as self-employed workers or independent workers, or even freelancers.

What is the QuickBooks 1099 Form?

In layman language, Form 1099 is used to keep the details of the workers i.e. their per hour wages, time spent on work, time duration for completing that specific project.

Click Print 1099s

The payer fills out the 1099 form and sends copies to the workers and the Internal Revenue Service (IRS). The purpose of this form is to calculate your annual income during that year and to track what kind of income it was. Based on the form, you will report that income on different stages on the time of paying of income tax.

Also Read: QuickBooks Error 103

Who Needs the QuickBooks 1099 Form?

Form 1099 helps to keep the record of the income to pay income tax. Each Form 1099 has a special and unique Social security number or the taxpayer identification number, through which IRS will get information whenever you received the money and it will take action if you don’t show that income while calculating the Income Tax.

Those workers who get their work from the company based on the hourly wages needed to fill the 1099 Form. These can be Freelancers, Individual contractors, or self-employed.

Track Payments to QuickBooks 1099 Contractors?

QuickBooks 1099 Contractors

You have probably got several maybe even hundreds or thousands of contractors set up in QuickBooks. So, to track payments to QuickBooks 1099 contractors, here are the steps, which you can follow.

1. On the Desktop screen, click on the expenses section showing on the left side of the screen.
2. Then you will see two options on the screen “Expenses” and “Vendors”.
3. Here, in the vendor’s section, you will see all the names and lists of your vendors and contractors.
4. You can select any of the vendors, for which you want to see their payment history.
5. After clicking on a vendor’s name, it will bring you to a new page. Here, select the vendor details and then you will see all the details of the vendor such as mobile number, email id, billing address, and company details.
6. Once you scroll down on that page, it will show you an attachment by the name Blank W-9. Click on that.
7. After that, a form of unique identification and certification will open.
8. With the unique identification number, IRS can easily track the payments.

Also Read: How to Fix QuickBooks Error Code 3371

With the above-mentioned steps, you can easily check out and track the payment of the 1099 Form.

We hope, this article has helped to get all the necessary information regarding the Tracking payments of QuickBooks 1099 contractors. In case, if you have any queries7, then you can easily connect with us by sending your contact details and your message through the “Chat with us” option. Our experienced customer care team will be happy to solve your query.
Also Read: 8 Easy Solutions to Fix QuickBooks Error 80029c4a

Hurry Up QuickBooks 2019 No Longer Supported

Here, is what you need to know about the discontinuation of QuickBooks Desktop Services. Intuit will stop its QuickBooks 2019 desktop service from 1st June 2022 onwards. QuickBooks 2019 comes in three versions, which are Pro, premier, and enterprise Solutions. With effect from 10th August 2022, access to all the add-on-services on QuickBooks 2019 will be stopped.

After 31st May 2022, you will not be able to use the QuickBooks Desktop Payroll Services, live support, online banking, online backup, and other services.

Also Read: How can I locate a missing QuickBooks transaction

QuickBooks Desktop 2019

QuickBooks is accounting software for small and medium-sized businesses which is developed and marketed by Intuit. It helps businesses to keep a record of their daily ongoing activities in the business, such as tracking sales and inventory, generating and sending invoices, managing and paying wages & expenses, keeping a track of employees’ lists, and a lot more.

Each year, one version of QuickBooks is stopped by Intuit, and later on, they released a new updated version with advanced technologies. On the upcoming 1st of June, Intuit will terminate the QuickBooks Desktop Discontinued QuickBooks 2019 version. It implies that users without the updated software of the QuickBooks will not be able to access its features. Apart from that, you will also not be able to receive new software updates.

Which Services Will Be Discontinued QuickBooks Desktop 2019

From 1st June 2022, you will not be able to use or access the services or products like QuickBooks Desktop Payroll Services, online backup, or live support through the QuickBooks version of 2019. It applies to both PC and Mac versions of the software.
In case, if you are not using add-on services, your application will continue to operate for you, even after 1st June 2022. But you will not be able to subscribe to any live solutions.

If you want to continue managing your accounts and bookkeeping, then you have to switch to a newer version of the software, so that you can gain complete access to more advanced features like receiving the latest security updates.

Also Read: Troubleshoot the QuickBooks Error 16026

Those products which the users will not be able to use after 1st June 2022 are mentioned below.

  • QuickBooks Desktop Pro 2019
  • QuickBooks Desktop Premier 2019 (Contractor, General Business, Manufacturing & Wholesale, Professional Services, Non-profit, and Retail)
  • QuickBooks Premier Accountant Edition 2019
  • QuickBooks Enterprise Solutions 19

In Short, if you want to continue the use of QuickBooks add-on services, then you have to update your software to the latest version.

Products that will not be affected and will remain the same are as follows:

  • QuickBooks Desktop Pro and Premier 2020, 2021, 2022
  • QuickBooks Desktop Accountant 2020, 2021, 2022
  • QuickBooks Enterprise Solutions 2019, 2020, 2021, 2022

How to Move QuickBooks Desktop File?

In case, if you wish to migrate your company files, then these are the steps that you can follow to do the same.
1. Ready your desktop file: At first, make sure your QuickBooks is up to date and try to keep the file size less to make it export easily.
2. Moving QuickBooks Desktop file to QuickBooks Online: Now, to transfer your desktop files online, use the QuickBooks Desktop file restoration file to upgrade your files. After that, you can transfer the files by clicking on the export option.
3. Use QuickBooks Online: After exporting the files online, your account is all ready to use the QuickBooks online. After doing so, you will be able to connect your bank or credit card account, generate or send invoices to the customer, or track or pay the bills.

Summary:

Intuit annually discontinues one version. So, there is no need to take panic. You can easily transfer your files and documents from the older version to the latest one, by following the above methods. In case, if you have any specific queries regarding QuickBooks 2019, then feel free to connect with accountingwhizz.com by sharing your contact details and message through the help section. Our customer care team will be happy to solve your query.
Also Read: Upgrade QuickBooks Desktop Pro Plus, Premier Plus, or Enterprise

QuickBooks 2019 Desktop Services Discontinuation Policy May 31st, 2022

When a QuickBooks Desktop Edition is Discontinued, you may not be able to get live chat support, online banking, and some other crucial services. It can be a perplexing subject for many users. The schedule for the QuickBooks Desktop 2019 is already out. If you are navigating through the Internet to get more information on QuickBooks Desktop Service Discontinuation Policy May 31st, 2022, this friendly post has got you covered.

What Does QuickBooks Desktop Discontinuation Policy Mean?

QuickBooks Desktop Discontinuation takes place from time to time. According to this Intuit policy, some add-on services become inaccessible to the users after the discontinuation of a QuickBooks product. These services may include, payroll service in QuickBooks, live for varied issues in the program, online banking and backup of the program. However, access to the discontinued version of the program will not be hindered and you may still use it for managing your day-to-day business accounting.

Furthermore, you won’t be able to Download the security patches or updates. These updates are crucial for secure business accounting. Besides, you may not be able to get assisted with some annoying issues in the program. For instance, if you have lost your password and want help in retrieving it, there is no assurance that you will get help in the hours of the need. To ensure a secure and efficient accounting with QuickBooks Desktop 2019, you can switch to a newer version of the program.

Also Read: 8 Easy Solutions to Fix QuickBooks Error 80029c4a

Services That Will Be Affected by The Discontinuation of QuickBooks Desktop 2019

Now that you know what is QuickBooks Desktop 2019 Discontinuation Policy, below are the services that will be affected by it:

Accountant Copy Transfer Service :- Accountant copy of your data file lets accountants make changes in the file without interrupting your work in QuickBooks Desktop 2019. Accountant copy transfer service helps you share an accountant copy of your company file through Intuit’s secure servers. After the discontinuation of a QuickBooks product, you may not be able to utilize this service for your file sharing.

Contributed Reports :- QuickBooks offers a visual Report Centre that summarizes all the reports in the program. In this Report Centre, there is a Contributed tab, which enables users to access several custom-defined reports created by other QuickBooks users. If you will use a QuickBooks Desktop 2019 product after its discontinuation, the contributed reports section will become inaccessible.

Inbuilt Data Protect :- Intuit Data Protect is a subscription-based service that helps QuickBooks users protect their data from any kind of loss or disruption caused due to a virus attack, theft, fire corruption and various other reasons. This service keeps a backup of your accounting data once a day, every single day. The backup process is fully automated that keeps a backup of your company file to an offsite location daily.

Multi-currency/Exchange Rate  :-In QuickBooks, you can turn on multicurrency, which enables you to use exchange rates from IHS Markit or your own exchange rates for foreign currency transactions. Furthermore, you can also set up your own rates and use them for one or more transactions. After the discontinuation of QuickBooks Desktop 2019, you may not be able to use this feature from within the software.

Online Banking  :- Online banking in your QuickBooks Desktop enables you to manage your bank feeds and reconcile accounts. You can add and edit your bank deposits. Also, you can add, categorize, and manage your bank transactions. Furthermore, using this feature lets you sync your bank account and reconcile it with QuickBooks. This add-on service will also be discontinued the discontinuation of the product.

QuickBooks Time  :- QuickBooks time is a time tracking utility in the program that helps users to share their location data when they are on the clock. It does not save GPS Points for users when they are off the clock.

QuickBooks Payroll Services :- In QuickBooks desktop software, you can set up payroll to run automatically and manage your day-to-day payroll efficiently. Besides, you can get your payroll tax filing and payment done using this service and save yourself from the tax penalties. Additionally, with the direct deposit feature in QuickBooks, you can pay your employees with the utmost ease.

What Is the Intuit’s Motive Behind Discontinuing A Product?

Discontinuing a product helps Intuit to improve its services to the newer versions of the QuickBooks 2019 Desktop software. Besides, you can continue working with a discontinued version of the QuickBooks Desktop if you want. However, access to the add-on features will also be discontinued along according to the QuickBooks 2019 Desktop Discontinuation Policy.

Are QuickBooks Upgrades Free?

In QuickBooks, there are updates and upgrades. QuickBooks releases updates 2022 on a regular basis to resolve the existing issues in the program and improves the program features. QuickBooks updates are free to download. On the other hand, QuickBooks 2019 Desktop upgrades your old version to new QuickBooks Latest Version 2022 have whole new features made accessible to the users. Upgrades need to be purchased you have a monthly or annual subscription with QuickBooks 2019 Desktop.

Do I Need to Upgrade My Company File After Upgrading QuickBooks?

On upgrading QuickBooks 2019 to a newer version, you also need to upgrade your company file. You need to do it once. However, on switching to a different edition of the QuickBooks 2019 Desktop, such as Pro, Premier or Enterprise, you don’t need to upgrade your company file. Upgrading QuickBooks helps after the product discontinuation according to the QuickBooks Desktop 2019 Discontinuation Policy. For more information visit :- accountingwhizz.com

Also Read: QuickBooks Error H202

Sage 50 2022 Download

Read the blog till the end to know everything about the newly added features and improvements. With the help of this blog, you can explore these features in order to handle your finances and also to grow your business and widespread the client base.

Have a look at the pre-requisites to consider before you start

Downloading the Sage 50 2022 Edition:

  • Make sure that you have enough permission to access the downloaded location, whether it is on your computer system or on a distant server. Just ensure to have access to that particular location.
  • Make sure to check nicely if the User Account Control (UAC) is set to minimal or maximum. If it is on maximum, then turn it down to a minimum.
  • In order to get the Sage 50 2022 download, it is vital to have a good and sound internet connection. In case your computer system is linked to the internet with the help of Wifi, then make sure to verify the signals and speech prior to downloading the software.
  • Yet another thing to keep in mind is that make sure your antivirus and firewall are turned off. You can also add the extension known as sage.exe file that will allow you to download.
  • Check thoroughly if you are logged in as the system administrator.
  • Check properly that you are logged in as the system administrator.
  • Once check if the disc has read and write permissions.
  • Make sure to thoroughly give a read to Sage 50 2022’s system requirements and compare them to your current system configuration.
  • It is advised to get hold of a computer system that meets the current Sage 50 hardware and software specifications and requirements.
  • If you wish to use an existing computer or a computer with certain hardware upgrades such as RAM or SSD, Examine your system’s and server’s compatibility.
  • During downloads, it is preferable to avoid using a mobile hotspot wifi connection with a low-speed broadband connection.
  • Procedure Download Sage 50 2022 U.S Edition
  • You can download Sage 50 2022 on one single computer. By downloading the latest version, Sage 50 can take care of all the accounting needs. With the help of the official website, you download the latest version.

Downloading Sage 50 2022 Edition on Single User

In case you are willing to download the Sage 50 2022 Edition on a single computer, then all you have to do is follow the below-mentioned steps:

  • First of all, start the server program.
  • The next step is to open the Sage software.
  • Then select the Services option from the drop-down menu.
  • Once you open services, then go to the Check for Updates option.
  • After that, select the “Check Now” option.
  • Now go to the Sage 50 Upgrade option from the drop-down menu.
  • Then click the Download option, and the Download will start.
  • Now just wait for the Download to end prior to closing the software.
  • Finally, in order to complete the installation, follow the prompt messages.

Downloading Sage 50 2022 U.S. Edition using an Official Website

If you are willing to Download the Sage 50 2022 edition, then follow these steps to download the version from the official website.

  • First of all, open your preferred browser, such as Chrome, Firefox, Safari, or any other. (It is recommended that you only use trusted browser programs).
  • If you have a pop-up blocker plugin installed in your browser, it adds an exception to the firewall and disables antivirus and malware protection.
  • Now go to Sage’s official website by typing https://support.na.sage.com into your browser address bar.
  • When done, type Download Sage 50 2022 into the search box that is located at the top of the page.
  • Then the first link opens with the title Download Sage 50—U.S. Edition 2022 Full Product will appear in the search results; simply click on it.
  • After following some instructions, go down the page to locate the “Download Now” option and also find the information on system requirements and new features.
  • You can either hit the green Download Now button or right-click the button.
  • Finally, select Save Link As from the menu to save the file to your specified location.

Final Words!

Sage 50 2022 Download is a must to get all the updates and get your business upgraded. All you have to do is carefully follow all the mentioned steps and instructions provided above. However, if you still get stuck or you are unable to resolve the issue, then make sure to connect with the Sage service provider.

They are fully trained and experienced experts who are available 24/7 to provide you with assistance for any Sage Errors and downloads. Our highly professional Sage 50 experts are there to assist you with every issue no matter what time.

Troubleshoot the QuickBooks Error 16026

Have a look at the procedure to Troubleshoot the QuickBooks error 16026:

QuickBooks is considered to be one of the most popular accounting software used by every business. No matter big or small business, everyone uses this impeccable accounting software. This accounting software has changed the face of accounting and bookkeeping. With the help of QuickBooks, accounting has become less complicated, resulting in saving a lot of time, effort, and money.

Every year, Intuit, the creator of QuickBooks, launches new updates packed with new and amazing features. This efficient software ensures seamless business operations. QuickBooks is packed with numerous features, but users sometimes face errors or glitches. One such glitch is QuickBooks error 16026. We have curated a stepwise guide to resolving this particular error. By following the stepwise guide, you can resolve this error on your own. If you are unable to resolve the error on your own, then you can always seek assistance from the support service providers.

Also Read: Resolve QuickBooks Error H101

What are the Common Causes for QuickBooks Error 16026?

The QuickBooks Error Code 16026 generally mostly occurs when you are trying to download or install the updates.

This type of error generally comes up when the company file is corrupted. Sometimes using an older version of the application can also lead to some potential issues.
Have a look at some of the possible reasons as to why QuickBooks error 16026 occurs:
• This error can occur because of an incomplete or incorrect software installation.
• The unsupported QuickBooks version can also cause this error to occur.
• If you use an outdated version of Internet Explorer, this error occurs frequently.
• The poor or slow internet connection can also lead to the QuickBooks Error 16026.

What are the Possible Methods to Troubleshoot QuickBooks Error 16026?

Go through the following methods in order to fix the QuickBooks desktop update error code 16026:

  1. Firstly, you have to launch the QuickBooks software.
  2. Next, you can go to the Financial Institutions catalog, and then you must apply the given steps below:
    • First of all, you have to choose Banking and then Online Banking.
    • Now go to the Available Financial Institutions.
    • When the Financial Institution Directory is displayed on the screen, it means that QuickBooks is able to access one of Intuit’s online services.
  3. If you are able to access the Internet from a Web browser or QuickBooks, try to get all the updates done in your programs.
  4. Now you must check for your Internet Explorer version by following the below-mentioned steps:
    • First of all, you ought to launch Internet Explorer.
    • The next step is to check out the Help menu and select Internet Explorer.
    • Now you must install the current version of Internet Explorer in case you are still stuck on the 6.0 version.
    • After it is done, install the recent encryption pack of Internet Explorer if you use the version of IE later than 6.0, but make sure that the cipher strength is lower than 128-bit.
  5. Finally, when all the steps are fully covered, you have to make sure to install QuickBooks again as well as the latest updates.

Final Words!

The rectifying of QuickBooks Update Error 16026 is not that complicated, and all you must do is carefully follow the instructions provided below. However, if you still get stuck or you are unable to resolve the issue, then make sure to connect with the QuickBooks service provider. They are fully trained and experienced QuickBooks Experts who are available 24/7 to provide you with assistance for any QuickBooks errors.

Also Read: Upgrade QuickBooks Desktop Pro Plus, Premier Plus, or Enterprise

How to Troubleshoot Sage 50 Error: “New Periods Could Not be Assigned

The Sage 50 Accounts software solution is profoundly flexible and configurable and can be utilized online by means of the Cloud or installed on your own server as On-premise. Sage 50 can be further improved by adding additional modules from the Sage 50 products suite or adding applications from the Sage Store.

One of the significant qualities of Sage 50 is that it incorporates consistently with different modules in the Sage 50 range, for example, Payroll, HR, Sage 50 P11D, Manufacturing, Forecasting, and CRM!, This presents to you every one of the upsides of a smoothed out and completely co-ordinated business.

As soon as your business starts developing and growing you can easily upgrade your Sage software and can also add various modules from the Sage 50 range to give a total and flexible business management solutions.

Being one of the best accounting software with a wide customer base, we can’t say that it is impossible to not face some major or minor issue in a while. Sage 50 often reports a few issues and out of all, “New Periods Could Not be Assigned” is one of the common issues reported by multiple users. Are you also facing any such error or issue with Sage 50? If yes, then drop all your worries now as here we are to resolve all your issues and concerns with our professional guidance.

In this post, we are going to share a step-by-step guide to easily troubleshoot Sage 50 Error: “New Periods Could Not be Assigned” so that users like you can resolve this issue on their own as well. So, let’s get started!

Related Article: Sage 50 Crashing After Windows 10 Update

Common Cause Behind “New Periods Could Not be Assigned” Error

The most common cause behind this error reported is the year-end process which is often encountered while assigning the new periods numbers to each and every transaction in the user’s system.

Solution 1: Data Verification

Verify the data of the Sage 50 service update. Follow the listed below steps to successfully verify data!

  • Go to the File Menu.
  • Choose the Data Verification option from the list.
  • In the Next Step, Select “Both Tests” and then click Start Button.
  • By Clicking on Save, you will be asked to create a Backup.
  • In the end, close the fiscal year again once the test process is finished.

Solution 2: Journal Synchronization/Charts of Accounts

  • Go to the Windows icon, click on Start and select Run.
  • Input the path, “C:\Program Files\Sage Software\Peachtree\Peachw.exe” -i
  • Open Sage 50 Software on your device.
  • Once verify the integrity check is available on the File Menu.
  • Now, Open the Company file.
  • Create a backup of your complete data.
  • Create a change in your accounting period to period 1.
  • Go to the File Menu and select the integrity checks option.
  • Click Next to proceed further.
  • Select Reindex Files Box.
  • Select Jrnl Header from the dame list and click OK.
  • Before accessing the integrity check, click continue.
  • Choose journal box/charts of account option available within Data Synchronization Tests.
  • Click on OK Button.

Solution 3: Restore the Backup and Close the Year Again

  • Restore the Backup of Sage 50 before you choose to clock the fiscal year.
  • Navigate to the Company Information and then click maintain.
  • Keep a note of the company directory.
  • Close Sage 50 Software on your device.
  • After this, go to the company folder.
  • Secure the files with extension .DAT, .FRM, .CAX, .PTR, .DDF, .MKD, .FRM, .PWP, .PTB, .RPT.
  • Also, keep the files ~PVSW~.LOC, KMSKeys.xml, DETAILS.INI, and Crystal Reports.udl
  • If there is something that you are unable to end in the file extension, then delete or transfer the same.
  • The file names that include dash and underscore, delete all of them.
  • Delete all the files that include:
    DAT
    DAT
    DAT
    DAT
    LOC
    DAT
    DAT
    DAT
  • After the completion of the process, open Sage 50 software on your device and try to close the fiscal year once again.

Final Words!

In this post, we have shared the major cause of Sage 50 Error: “New Periods Could Not be Assigned” and a step by step guide to troubleshoot this issue so that you can save your productive hours from getting wasted. Even after following the all above mentioned solutions if you are still troubled with the Sage 50 Error: “New Periods Could Not be Assigned”, then we will recommend you to get in touch with Sage 50 Customer who can help you to resolve this issue of yours in real-time. They will assist you with their professional guidance so that you will not have to suffer longer. Sage 50 Customer is available round the clock to its users with all their help and . Dial Sage 50 Customer Helpline Number Now!

Strategies to Setup a New Company in Sage 50?

A company’s file is an important component of any accounting software. The company file is used to keep detailed information related to your company’s employees, suppliers, clients, products, & other business transactions. The accounting software uses the company’s file to store all the details.

Setting up a new company in Sage 50 can help you to deal with various issues, such as a damaged file, a company file not opening, data loss, and much more. If you are using the Sage 50 accounting software and searching online for the procedure you can follow to set up a new company in Sage 50; then you are at the right place. In this write-up, we are going to enlist the complete procedure about how to setup a new company in Sage 50.

Related Article : How to Tackle Sage 50 Not Responding Error?

After replying to all the questions and mentioning all essential details on a screen, tap the Next> button to carry on. Always press the <Back button to come back to a previous screen of details if needed. If you require assistance to enter details into a screen, tap the Help button to access a Help window explaining the essential information required for each screen.

After mentioning details on all screens, then tap the Finish button. Sage 50 will make a new company file in Sage 50. If you face any problem in creating a new company file in Sage 50, call the Sage helpline number to get some accurate tips.

A list of the major sections of the New Company wizard with details entered in each section

  • Posting Method – It allows you to choose between Real-Time or Batch posting. With Real-Time, your transactions are quickly published to General Ledger and Sage 50 always highlight the latest financial information. Modify your posting method at any time once your company file is created.
  • Accounting Periods – This allows you to decide which accounting period structure must be used for your company. Mention the number of accounting periods and their starting and ending times.
  • Accounting Method – This screen allows you to decide whether the company file utilizes Accrual Accounting or Cash. Kindly check with your accountant if you are not sure about accounting periods recently used by your company.
  • Fiscal Year – It allows you to choose the year and month of the first period within your company Fiscal calendar.
  • Company Information – It allows to mention company details. It involves the company’s address, name and state and federal identification numbers.
  • Setup – It allows to choose how to prepare the company file. Use the sample business type that highlights your company and then customize it. Copy settings from another Sage 50 company file and convert a file prepared by another program or make your chart of accounts from scratch.
  • Business Type – It appears if you select to prepare a company file from a sample business type within the Setup section. Business type allows you to choose a type of business that closely highlights on your own. It allows you to customize a standard chart of accounts for your industry type.
  • Finish – This screen allows you to use the Setup Guide for customizing the defaults used in the company file and type new data records.

Also Read: Sage Chat Support

Steps to Setup New Company File in Sage 50

  • Select File or New Company from the menu bar to make a new company file in Sage 50
  • Press the Next > button at the bottom of the window in the New Company Setup Wizard
  • Reply to any questions asked for each of the given screens and carry on pressing the Next > button to move ahead from screen to screen
  • Tap the Finish button to make your company file on the final screen.

Once you move through the above methods, you can easily establish a new company file Sage 50 accounting software. If you face any trouble in setting up a new company file, call Sage 50 customer number to get some accurate tips.

Sage Canada vs QuickBooks Canada: Which Accounting Software is Better?

QuickBooks and Sage are certainly the most used accounting applications, thanks to the incredible features that they offer to users. However, when it comes to Sage Canada vs QuickBooks Canada, we will require further discussion to find out which one is better. Both programs offer different versions based on the user’s specific requirements.

QuickBooks Canada is suitable for small to mid-sized businesses. On the other hand, Sage 50 Canada can cater to the requirements of larger Enterprises. When making the comparison between the two, there are several aspects that need to be considered. We will learn more about them by reading this post until the end.

Also Read: Sage Chat Support

Sage Canada Overview & QuickBooks Canada Overview

To compare the two applications, we will describe the two programs along with their features and advantages. Let’s start with QuickBooks Canadian editions:

About QuickBooks Canada

QuickBooks is cutting-edge accounting software best suitable for small to mid-sized businesses. QuickBooks Canada can help these businesses to streamline the core competencies of their accounting management. It offers many powerful features and functions to manage your accounting data in a comprehensive manner. Besides, the QuickBooks Canadian edition can be integrated with third-party applications to boost its efficiency. You can choose different editions of the program based on your specific requirements. To get an in-depth idea about the application, let’s discuss the important features and advantages of the QuickBooks Canadian editions.

Features of QuickBooks Canadian Edition

  • Manage all your accounting and payroll data in one place.
  • Intuitive reports to get helpful business insights.
  • Keep eyes on income and expenses and manage your business efficiently.
  • Efficient inventory management.
  • Create and send customized invoices.
  • Help your customers pay using different methods.
  • Access mileage tracking feature.
  • Run automated payroll to make the process stress-free.
  • Click and upload receipts using your phone.
  • Support multi-user mode to boost productivity.

Also Read: How do I Talk to Someone at QuickBooks

Advantages of QuickBooks Canadian Editions

  • Spread the tentacles of your business with this powerful accounting tool.
  • Easy and effective management of your accounting data.
  • Make well-informed decisions with comprehensive insights.
  • Know what’s selling and what’s not with inventory data at your fingertips.
  • Stop chasing after payments endlessly with customized invoices and seamless payments methods.
  • More efficiency in reduced time and effort.
  • 365 days customer assistance.

Now that we have seen some important features and advantages of the QuickBooks Canada editions, let’s discuss Sage Canada to conclude the comparison.

Also Read: Sage 50 Not Responding

About Sage Canada

Sage is an accounting software best suitable for medium to large-sized businesses that have big inventories. It can simplify your day-to-day accounting management tasks and improve productivity at the workplace. This full-fledged accounting software can help you in creating reports, managing records, and overcoming the major shortcomings of your business accounting. Moreover, you can choose from its different products to harvest its different features and advantages. Regardless of the business size, you can deploy this application for efficient accounting management.

Features of Sage Canada

Sage Canada offers several features to make complicated accounting tasks easy to perform and manage.

  • Up to 5 users can work in multi-user mode simultaneously.
  • Easy modifications of reports and financial statements.
  • Effective cash flow management.
  • Inventory management so that you know what’s in hand and what to order.
  • Online bill settlement with the utmost ease.
  • Users can open multiple companies simultaneously.
  • Centres for inventory, vendor and services management.
  • Users can easily do broadcast invoicing.

Also Read: QuickBooks Desktop 2023 Summary

Advantages of Sage Canada Editions

Below are some of the main advantages of Sage Canada:

  • It presents the data in an Excel spreadsheet so that you can comprehend it in a better manner.
  • You can scale up the application as your business grows.
  • It is flexible and secure.
  • Access crucial information to make better decisions.
  • It has a user-friendly interface.
  • Easy support for the investment or resource.
  • Customer assistance, anytime you need it.
  • Reduces your time and effort by eliminating manual report writing.

Demerits of Sage Canada and QuickBooks Canada

Now that you are aware of the merits of the applications, let’s compare the two based on their demerits:

Sage Demerits

  • The Interface of the application is not user-friendly when compared to the other applications.
  • The setting up of the application can be a perplexing task as compared to the other accounting programs.
  • QuickBooks Demerits
  • It can be personalized to a limited extent.
  • Limited users are allowed in the application.
  • File size-related issues now and then.
  • Industry-specific features are missing.

Final Words!
This post makes an intelligible comparison between Sage Canadian editions vs QuickBooks Canadian editions so that you can judge which one is better. However, you can choose the best for your specific needs. Besides, you can also contact an expert to choose the best for your business accounting. Sage not Responding

Quick & Effective Solutions To Fix Sage 50 Error 1406?

Sage 50 error code 1406 is a faulty situation in the program that can take place when installing the application on your device. When the error occurs, you will get a warning message for the same depicting the error. The error message text reads:

Error 1406: Could not write Instance Index to key.

Sage 50 error 1406 can take place due to insufficient access permissions required to access the crucial areas during the installation process. The partial or damaged installation of the program can prevent you from a smooth utilization of the Sage 50 application. Therefore, troubleshooting for the error code 1406 in Sage becomes the highest priority task. Read until the end to find stress-free troubleshooting procedures.

Also Read: Sage Chat Support

Possible Reasons behind Sage Error Code 1406

Below is the list of the most apparent reasons that can make you see error code 1406 on your screen when working with the Sage software:

  • Erroneous File Manager’s settings can also promote the error.
  • When you shut down your system in an improper manner.
  • Corrupt download or partial installation of the McAfee antivirus program.
  • Installation/uninstallation of a corrupt Windows registry from the updated version of McAfee antivirus.
  • Malicious attacks from a virus or malware to your McAfee antivirus program and the related programs.

Also Read – How to Tackle Sage 50 Not Responding Error?

How to Fix Error 1406 in Sage 50 Software?

Below are the step-by-step solutions explained that can help you in troubleshooting the Sage 50 error 1406:

Solution 1: Run the program as an administrator

The application running process is important for all the programs. To resolve the issue caused due to these reasons, perform the below-given steps:

  • Click the .exe file on the application.
  • Next, click on the option Run as administrator.

If this simple solution doesn’t resolve the issue, try the next one.

Solution 2: Perform a clean boot

Re-installing the software after a clean boot can also resolve the issue. The below-given instructions can help you to get the task accomplished:

Steps for Windows XP, Vista, and 7 users

  • Open your system using the Administrator rights.
  • Now click Start and enter msconfig.exe in the Search Box.
  • Click Enter to proceed further.
  • Next, click the General tab and go to the Selective startup option.
  • Hit the option to clear the Load startup items.
  • Again, hit the Services tab and then click the Hide all Microsoft services option.
  • Click Disable > OK > Restart to finish the task.

Steps for Windows 8 and 8.1 users

  • In the Windows Search bar, enter msconfig and then click on msconfig.
  • Now click the General tab and then on the Selective startup option.
  • Moving ahead, click on delete the Load startup items options.
  • Next, you have to click the Services tab and then hit on the Hide all Microsoft services option.
  • Again, click on Disable all.
  • After that, click on the Startup tab in task manager and then Each Startup item.
  • Click Disable.
  • Once done, close Task Manager in the System Configuration dialog box.
  • Click OK > Restart to conclude the task and then re-install the software.

These steps can make the program work smoothly. If not, you have to perform an additional solution to it.

Read Also – How to Fix Sage 50 Crashing After Windows 10 Update?

Solution 3: Give full permission to the software

If you are still struggling with the Sage 50 error 1406, then enable full permission to your accounting software. In the absence of full permission, it is not able to complete the configuration. Follow the below-given steps to provide the full permission:

  • Open the Windows Search bar, type Regedit in the box, and then click enter.
  • Now open the Registry Editor and find the location in the error status bar.
  • When the error location is determined, click on the open folder from the left pane and again click on Permission.
  • Next, you have to choose the Administrators group and mark the Allow Checkbox located against Full Control.
  • Moving ahead, choose the System group and make sure that Full Control is considered under the Allow column.
  • Now in the permission dialogue box, hit Advanced.
  • After that, click on the Owner tab and choose the Administrators group.
  • Again, choose the Replace Owner on Sub Containers and Objects and hit OK.
  • Now move to click the Permission tab.
  • Choose the option Replace all child object permission with inheritable permissions from this object and click OK.
  • Terminate all the active Windows and re-install the application.
  • If the Sage error code 1406 is not fixed, perform a system reboot and re-install the application.

Try the next method if the error still hinders your business accounting process.

Solution 4: Try out Fix it trouble-shooter

Fix it is an effective troubleshooting application designed by Microsoft. It resolved many common issues automatically that can make the system prone to a software error. In the first place, you need to download the tool from a legit source. Once installed, click the Run now option and it will automatically resolve the issues promoting Sage 50 error 1406. After that, you can install the application without error. If you need any assistance for sage, give us a call on our helpline number.

Read Also – Sage Canadian Edition vs QuickBooks Canadian Edition: Which is better?

Upcoming Changes: 2022 QuickBooks Desktop Update

QuickBooks is an accounting tool used for small and medium businesses to manage their accounts, bank transactions, bills, taxes, etc. This tool has undergone several modifications year by year, and Intuit has made it more hassle-free and easy for users across the globe. Intuit has promoted QuickBooks Desktop 2022, including a few new features like data configuration, money control, and speed modifications that will assist your small businessmen to finish up their jobs more rapidly.

Subscription Offering of QuickBooks Desktop 2022

QuickBooks Desktop 2022 is changing to QuickBooks Pro and Premier and QuickBooks Desktop Mac 2022, which is now offered for sale. They have moved to QuickBooks Desktop Enterprise, a subscription offering for sale—moving to subscription model outcomes in different advantages for small businesses, including changes listed below.

  • Permission for the latest version, with extensive updated features, security patches, assistance for third-party operating system modifications
  • Efficient QuickBooks computation power up to 38 % quicker
  • Limitless customer service and data backup at no extra charge
  • Exclusive money control and time-saving processes
  • Augmented productivity with the QuickBooks Desktop mobile application.

Also Read: How can I locate a missing QuickBooks transaction

  1. Money Control

QuickBooks Desktop 2022 arises with new management capacities accessing businesses to more efficient and effective cash management.

  • Pay Vendor Bills Digitally

Pay and schedule quicker within QuickBooks. Utilize the funding source you wish, and the payment your vendors want in digital or physical form. Learn much to pay vendors online.

  • Transfer Bills

Secure time by QuickBooks automated bill entries from the QuickBooks desktop mobile application or email address. Then, import and review.

  • Modify and Pay Vendors Bills Through Email

Maintain professional and continuous communications by emailing customizable bills payment to your vendors.

  • Accounts Payable Approval Procedure

Maintain cash flow by accessing a customizable approval to all vendor bills obtained. Confidently authorize accounts payable jobs; you must have an approval process before the vendor’s next bill.

  • Bill Workflow Approvals

Authorize with confidence, boost transparency with customizable orders and maintain cash flow and bills continuation approvals in QuickBooks Enterprise. Examine to know how to configure Work Flow approvals.

  • Payment Users Utilizing Payment Links

Collect payments for items quickly that don’t require an invoice by sending a payment link.

  • Payment Users Making Instant Deposit

Receive your money immediately when customers pay you, even on holidays, late nights, and weekends.

  • Assisted Payroll Users for Next Day Direct Deposit

Obtain an extra day to activate payroll and put funds for long-term at your bank accounts with the next-day direct deposit feature.

  • Modified and Helped Payroll Activation

Configure assisted payroll products and activate your first payroll quicker with a smooth and efficient process.

  1. Augmented Rapidity

QuickBooks Desktop 2022 is 38% quicker with excessive speed. QuickBooks Desktop 2022 is powered by enhanced computing power that allows business customers to accomplish accounting jobs speedier.

These are some new features and updates which will be seen in QuickBooks Desktop 2022. However, you may face several errors while using QuickBooks Desktop 2022; then, you must dial the QuickBooks helpline number to resolve them immediately.

Also ReadQuickBooks Desktop 2022 Release Date | New Features

  1. Data Configuration

Information within QuickBooks Desktop 2022 syncs automatically, manipulating advanced technologies, business saving owners through it different features that include

  • Integration of E-commerce

Control your online sales and inventory at one platform by integrating your E-commerce channels with QuickBooks.

  • Upload Documents to Transactions

Modify document attachments by uploading directly through QuickBooks Desktop mobile app.

  • Select from Different Email Contacts

Send emails rapidly by selecting recipients from a list of customers or vendor contacts, declining miscommunication resulting from the offline entry of email addresses.

  • Cloud Access

Increase productivity, inflate relationships, make your team free to work from anywhere with cloud access to QB Enterprise.

Conclusion

These are some new features and updates which will be seen in QuickBooks Desktop 2022. However, you may face several errors while using QuickBooks Desktop 2022; then, you must dial the QuickBooks helpline number to resolve them immediately. Technical experts will provide you with appropriate tips to fix any error in QuickBooks.
Also Read: Resolve QuickBooks Error H101

QuickBooks Desktop 2022 Release Date | New Features

QuickBooks is one of the trustworthy and premier accounting software for small and mid-sized businesses. The year 2021 has come up with new strategies and thoughts to minimize business challenges across the world. Few editions of QuickBooks are already brought up for users, and a few are still in wait, looking for their turn to come. QuickBooks Desktop 2022 was released on September 28, 2021. In the update, you get some new features and the latest version of QuickBooks Desktop 2022.

Are you interested in tracking your business invoices and expenses? QuickBooks Desktop is a tool through which you can handle your business accounts smartly. Update your QuickBook’s version with the latest version to benefit from new features.

No need to depend on hectic physical work to prepare your bookkeeping and payslips. Various QuickBooks software versions are already available in the market, and the desktop versions can be the favorite ones for the industries looking to establish offices.

QuickBooks 2021 has some new and extraordinary features to streamline the process of bookkeeping and accounting. Users expect in 2022 that QuickBooks will be more primed to provide a seamless experience.

Users can remotely access their QuickBooks from any location to run their businesses smoothly. There are seemed more effective opportunities in accounting and bookkeeping tasks via QuickBooks after every year. QuickBooks features in online and desktop versions looked more compatible for users to access for accounting tasks.

Small and mid-sized businesses prefer QuickBooks Desktop because it is simple to access remotely. QuickBooks 2022 version may have a few issues, but you can eliminate them through QuickBooks technical support team.

Prospects from QuickBooks Desktop 2021-22

You will get several amazing features after each update of QuickBooks. This year will be similar to previous ones, but a few changes can be seen in bank transactions, invoices, billing, payslips, etc.

New updates in QuickBooks 2021 will work quicker and better than the outdated version because it is changed to resolve last year’s users’ queries received at Intuit.

QuickBooks 2021 provide various new and amazing features with updates dedicated to time management and production. Users may expect to have

  • Amendments in Bank Transaction
  • Auto-generated payslips
  • Customized invoices
  • Customer data collection and filtration
  • Modifications in Retail availability
  • 24×7 Customer Support engaged in subscription plans
  • Auto Data Recovery
  • Automatic expenditure tracing
  • Cloud access add-on through QuickBooks Desktop

Also Read: QuickBooks Error 103

Let’s go through a few expected features that Intuit has detailed so far.

1. Amended Bank Transactions

Users can download their bank transaction history from financial institutions through QuickBooks Desktop. This procedure is made flawless after increasing QuickBooks compatibility with financial institutions. Although several users have encountered issues in bank transactions, these problems are eradicated by intuit by considering them seriously.

Intuit premier and pro software can download their financial information from participating banks through 2024.

2. Potential to Send Statements Systematically

Intuit has automated the features of attaching purchasing orders with invoices. So, it is known as the Auto-Generated Invoice process. This feature is also designed in the same way by sending the latest customer statements automatically. It saves users with several customers’ data which can be time-consuming and engage less effort. They should work manually to prepare and send statements to individual customers per month.

3. Customized Payment Receipts

QuickBooks 2020 has allowed users to send several invoices and receipt attachments with a single email to anyone. Users can experience the customization of these changes in 2021. This feature will provide users with a clear picture of their payable and receivable accounts.

Updates of QuickBooks 2022

Now you need not visit the office to access your accounting or bookkeeping data because QuickBooks 2022 is coming with a remote access feature.

When accounting details or files are required urgently, you will be able to access your QuickBooks from anywhere and anytime.

Now, business entrepreneurs are accessing Quickbooks online to handle and maintain their accounts remotely. It will become more interactive and compatible with remote access features in 2022.

Intuit is working on adding remote access features in QuickBooks 2022.

Also Read: 8 Easy Solutions to Fix QuickBooks Error 80029c4a

Few ways are given to access Quickbooks separately.

• Host QuickBooks On Interested Server

Intuit is promoting the installation and configuration of QuickBooks on third-party servers. You can access QuickBooks using the authorized user details and an operative internet connection.

• Access QuickBooks Online

It is a cloud-based update added by Intuit in QuickBooks 2022. Access it anytime from any location via any device. The subscription plan will bring millions of users to experience this significant feature.

Also Read – QuickBooks Desktop Pro Plus 2022 with Enhanced Payroll

Conclusion

In QuickBooks 2022, you will experience some great modifications related to remote access, QuickBooks Desktop Mac subscription, preparing the QuickBooks 2021 purchase only one-time till 10 December 2021 for all users and improved ProAdvisors. However, the exact release date QuickBook desktop 2022 is not announced till now, but it can be available tentatively the second week of January 2022. You can take expert suggestions by calling the QuickBooks helpline number for the confirmed release date of QuickBooks 2022.

QuickBooks Desktop Pro Plus 2022 with Enhanced Payroll

QuickBooks is accounting software that helps you manage your accounting data on the cloud, create and send invoices, you can track sales, and also keep a track of how your business s doing at all times. This accounting software is user-friendly and you don’t have to be a financial or accounting expert to use QuickBooks.

The QuickBooks developers keep on improving and enhancing its accounting features. The software incorporates impressive invoicing features such as payment reminders, invoice tracking, managing expenses, and accessing dozens of reports. All these features are at your fingertips.
QuickBooks Accounting Software comes with its own mobile app as well so that you can manage your accounts on the go.

Also Read: Upgrade QuickBooks Desktop Pro Plus, Premier Plus, or Enterprise

Launch of QuickBooks Pro Plus Advisors in 2021

The launch of QuickBooks Pro Plus will come with new and exciting features. You will have access to the brand new features including QuickBooks Accountant Desktop Plus, Desktop Mac Plus, and Desktop Enterprise Accountant. Through the Pro Advisor Membership portal within the QuickBooks Online Accountant, you can access all these amazing features.

On October 12, 2021, the launch of the new QuickBooks Pro Plus is scheduled to get released. The subscription of QuickBooks desktop provides customers with the best value and the best in class product experience.

How to get Pro Plus and Premier Plus subscriptions?

Since QuickBooks Desktop for Windows is updating its product line, we have limited the range of products to sell. With the commencement of our Pro Plus launch, now we will only be selling our Pro and Premier products. In place of a one-time purchase license, we are selling subscriptions of Pro and Premium products subscriptions separately. Our objective is to deliver higher value and more impactful features for you and your esteemed patrons.

The QuickBooks Desktop 2021, being a top-selling product, has generated higher demand and excellent sales over the past few months. Looking at the stats, the purchase of this one-time version will get extended until December 2021. This transition will boost the customer base as well.

Also Read: How can I locate a missing QuickBooks transaction

What are the additional benefits of the 2022 subscription version?

  • You will have access to the latest version with the most up-to-date features, security patches, and support for changes in 3rd party operating systems.
  • Faster and reliable QuickBooks computing power with up to 38%.
  • Without any additional cost, you can attain customer support and data recovery.
  • By installing QuickBooks Desktop mobile app, you can generate increased productivity.

It is important to keep in account that the clients with older computers having 32-bit compatibility, won’t be able to use the 2022 version. This version requires a 64 bit compatible Windows operating system. For further information, you can check the website.

How to get a New Mac Plus subscription?

The latest 2022 version of QuickBooks will incorporate Desktop Mac Plus subscription. An annual subscription-based license for small businesses will be deducted. In place of a one-time purchase license, we are selling subscription of Mac products subscriptions individually. The Pro Advisor Enterprise Software Bundle will get incorporated as a part of the QuickBooks Desktop Mac Plus as well.

What are the system requirements for a New Mac Plus subscription?

System and Browser Requirements

  • MacOS* v10.15 (Catalina) version is a must.
  • Free flow of internet connection is vital for downloading, installation, and product updates.
  • Product registration is required.

What are the requirements for integration with other software?

  • The Export Report Data needs a minimum of Apple Number v3.5.
  • The Microsoft Excel 2016 version or later including Microsoft 365 is a must for Windows.
  • One-way conversion to QuickBooks Online can be supported by its Desktop version for Mac 2021.

Also Read: Resolve QuickBooks Error H101

How to Fix QuickBooks Error Code 3371

QuickBooks is used for accounting tasks, bank transactions, payslips, bills, taxes, etc. In a recent technological world, everything is required in an uncomplicated and easy manner. Users can carry out their accounting tasks seamlessly because it has many advantages. QuickBooks comes in various versions that can be accessed offline as well as online. This software is prone to various errors which can occur during installation, upgradation or re-installation. You can troubleshoot these errors with the assistance of the experts if you can’t do so.

Few QuickBooks errors can frustrate users if they can’t work with this software. This software may lead to the loss of company files and other related business information. If you can’t resolve this error, you must dial the QuickBooks customer service number to fix QuickBooks Error Code 3371. You will also learn about this error code, its causes, and solutions in this write-up.

Why Does QuickBooks Error Code 3371 Take Place?

It has been understood that Intuit has given importance to license information saved on your hard drive. If the license, information, file or data is lost, damaged, or corrupted, you may face QuickBooks error code 3371. This process takes place due to the transferring of C: drive data to another hard disk. It has become essential to re-enter your license information to get this problem resolved in such a situation.

There are various causes behind this error, and it can be resolved with the help of experts. These reasons are listed below.

  • Lost or corrupted QuickBooks desktop file
  • Due to QBdat – This installation file contains your license details. QuickBooks won’t open if the file is not working appropriately or corrupted.
  • Corrupted MSXML component – MSXML is an essential component developed by Microsoft. It’s required by QuickBooks to run on your system. This tool assists QuickBooks desktop to fetch out Qbregistration.dat file details. If this file is damaged, it may restrict you from accessing the QuickBooks desktop.
  • Disturbance of Anti-virus – The expired antivirus program or windows operating system has quarantined few QuickBooks desktop files.
  • Proper Networks and QuickBooks Enterprises with Webconnect Users – Users may encounter this error by accessing this file without saving it first. They must save the file before fetching it out .QBO file.
  • It takes place when you try to access the file without saving it. It has been advised to store the .QBO file before you import it.

Also Read: QuickBooks Error H202

Remember some essential points

  1. QuickBooks installation doesn’t take place if windows are not updated in your system. Upgrade your windows operating system with the latest version.
  2. Suppose you encounter the same errors after implementing the same solutions, then you must consult with an IT professional to Fix QuickBooks Error 3371.

What Are the Rectifying Procedures to Troubleshoot QuickBooks Error 3371?

Some troubleshooting steps are given below to fix QuickBooks error 3371.

Method – 1 Upgrade Your Windows Operating System

QuickBooks installation can’t take place in your system if windows are not available with the latest upgrades. Few steps are given below to go through Windows updates.

  • Press on the Windows logo
  • Choose all program and press on Windows update option
  • Press ‘install QuickBooks’ after representing the updates.

In most cases, several errors can be fixed after following the first method given above. Suppose if this has not worked for you, then follow the next rectifying method to fix it.

Method – 2 Remove the ECML file and Rename the Entitlement file

Various symptoms occur when a user tries to access the company file in QuickBooks accounting software, and it fails due to a damaged file or inappropriate method. It normally asks for a mysterious HTML file.

  • Grasp Windows + R key to run the file on your keyboard. It will access a Run window
  • Copy C:\ProgramData\Intuit\Entitlement\Client\v8 in your window, and then mention it
  • Then, tap the Ok key button. It will open Windows Explorer at that specified location
  • A user will find the ecml file, then tap a right-click on it and now choose the delete option to fix the error 3371
  • Shut down this window and then reactivate your QuickBooks software
  • Register the item again if failed to do so.

Various solutions are available on your website, but you must perform with a reliable one. Take advice from experts and allot the work to them.

Suppose you are a Windows XP user, then few methods are given below to fix this error.

  • Press start and select the run option
  • Fill the following command into the open field
  • Choose “C:// documents and Settings all users” application DataIntuitEntitlementClientv2
  • Now, press on Ok button
  • Then, remove the entitlement datastore .ecml file or rename it to fix the error.

After going through the above solutions, if you can’t resolve QuickBooks error code 3371, you must dial the QuickBooks helpline number to troubleshoot it immediately.

Also Read: QuickBooks Error 103

An Informative Guide on How to Reconcile in QuickBooks Online

Bank Reconciliation is an important feature of QuickBooks that lets the users compare their bank statements with one in QuickBooks. Also, you must verify that the difference between these accounts must be $0.00 to represent that the accounts are reconciled.

Moreover, QuickBooks reconciliation also helps users find discrepancies while preparing accounts. Thus, it would help them establish an accurate report to tally the accounts properly.

Read this illustrative guide thoroughly to get the complete knowledge to reconcile in QuickBooks Online.

Also Read: QuickBooks Desktop 2023 Summary

Wondering how to reconcile in QuickBooks Online and require instant help? Contact our Customer Care at +1 855 706 0905 and obtain immediate assistance as per your query. 

Importance of Bank Reconciliation in QuickBooks

Reconciling Bank accounts in QuickBooks gives you the surety that you have correctly listed all the transactions and amounts. Also, you can find the discrepancies between both accounts to get accurate results. However, there are plenty of other benefits of reconciling accounts which are as follows.

  1. By reconciling the bank account in QuickBooks gives you the surety that all the transactions are present in QuickBooks.
  2. Moreover, the bank reconciliation ensures that the transaction is available on both bank statements and QuickBooks. This is so that you can find the same amounts on both accounts while preparing the trial balance.
  3. Sometimes, a transaction is listed in QuickBooks mistakenly. If that transaction consists of a bank account, the transaction will quickly identify the wrong transaction entered.

Also Read: QuickBooks Error H101

Learn Easy Tips to Reconcile in QuickBooks Online

If you are searching for proper instructions to reconcile bank accounts in QuickBooks Online, follow the instructions below. Make sure you follow all the steps in the same manner as it is written below.

Stage 1: Verify Your Opening Balance

Before initiating the process, you must verify the opening balance that you have entered in your books of accounts in QuickBooks. You must check that your bank account balance matches the opening balance of your account. Once done, move further to the next step.

Stage 2: Begin the process of reconciliation

After matching the bank account balance and QuickBooks balance, initiate the reconciling process. For that, implement the steps given below.

  • For instance, if your accounts are linked with online banking, ensure that you tally and categorize all the downloaded transactions.
  • After this, go to the Settings option and click Reconcile. For reconciling for the first time, choose the highlighted “Get Started” option.
  • Now, you must pick the account you want to reconcile by tapping on the Account dropdown. Ensure that it is the same account that is on your statement.
  • Cross-check that your beginning balance must match the one in the statement.
  • You must add the Ending Date and Ending Balance on your statement. Note: Many financial institutions name the ending balance as a “new balance or closing balance”.
  • Once you review the Last statement ending date, then choose the Start Reconciling option.

Also Read: Query Processing Error QuickBooks

Stage 3: Match your statements with QuickBooks

Now, you have to match the transaction on the statement with the one in QuickBooks. You must look into the transactions one after the other. Also, you must verify that you have added the correct dates and transactions in QB to verify the accounts properly.

Steps to Reconcile the Accounts linked with Online Banking
Here, we have stated simple instructions to reconcile the accounts with Online Banking. Make sure to follow the steps chronologically to avoid further discrepancies.

  • Start the reconciling process from the very first transaction on your statement.
  • Now, look for the same transaction within the Reconciliation window of QuickBooks.
  • Afterwards, match both transactions. If you see the checkmark next to the amount in QB, it reflects as reconciled.
  • If you cannot locate the transaction on your statement, but it is visible in QuickBooks, don’t place a checkmark.
  • Now, tally each transaction on your statement with that to the one in QuickBooks.
  • Finally, you must see that the difference between your statement and QuickBooks must be represented as $0.00. If you find it as this, opt for the Finish Now option.

Stage 4: Verify the Past Reconciliations

Now, you have to run a reconciliation report to verify your work. For that, perform the steps listed below carefully.

  • In the initial phase, move to Bookkeeping or Accounting and then opt for the Reconcile option.
  • After this, head towards the History by Account option.
  • Next, you must utilize the drop-down menu to choose the account and date range.

Also Read: Change TurboTax Password

Stage 5: Print the Reconciled Transactions

QuickBooks Online eventually creates a reconciliation report for that session as soon as you finish reconciling. Then, you can get that report print or exported, if required to another person.

Wrapping It Up!!

In this way, the users can easily reconcile in QuickBooks Online and find any discrepancy between the bank account and that in QuickBooks. However, if you are still experiencing issues while reconciling the account, in that situation take help from our experts. You can communicate with them either through email or via a live chat facility. The professionals will look into your matter deeply and provide you with logical solutions to tackle the problem.

How to Void a Check in QuickBooks?

When you void a check in QuickBooks, it helps in keeping your bookkeeping records precise. This safeguards your business from fraud and makes sure that your financial statements are always correct and up to date. Although the meaning of voiding a check and deleting it is the same on some level, there is a certain difference.

Deleting a check compromises the record-keeping and is the gateway to potential errors. Deleting a check also makes it harder to detect any fraud in your account. It only makes sense to delete a check when a duplicate entry has been made by accident. The procedure to void a check in QuickBooks Online is quite simple and straightforward. The only time issue arises when you need to void a check written in a prior accounting year.

If you do not know how to void a check in QuickBooks written in a previous year by yourself, reach out to a QuickBooks advisor or a bookkeeper, or a professional who is well-versed with the QuickBooks application. They will help you to void your transaction and will ensure that your bookkeeping stays right.

Also Read: TurboTax Form 2210 Error

Stuck with the Void a Check in QuickBooks and don’t know how to get it? Ring us at +1 855 706 0905, and our experts will assist you with the simple ways to eliminate the error. 

What Does it Mean to Void a Check in QuickBooks?

When you void a check in QuickBooks, it means that it cannot be used for payment purposes anymore. This is true for both the physical check as well as the check number associated with the check. Just writing “VOID” across a check provides you some sort of protection against potential fraud.

However, there are still some sophisticated fraudsters who can use the information available on the check to either create a fake check or set up electronic payments and transfers. For this very reason, you must be careful about protecting checks that you have voided before.

The best way of protecting these checks is to either get rid of them or file them off securely. Correctly voiding and protecting the checks is only one part of the process, though. You would need to maintain a record of the voided check within the accounting system to help you secure yourself from any attempt to use that particular check number again.

Just remember, when you void a check in QuickBooks, the physical check itself and the check number that is associated with the check; both are rendered invalid. Whenever you void a check in QuickBooks Online, you can easily make out if that check is presented for payment again. The only way to protect your account from any fraudulent activity is quick detection.

Read Also: QuickBooks Error 103

When Should one Void a Check in QuickBooks Desktop?

You’ll require to void a check in QuickBooks Desktop when

  • The wrong person was issued the check
  • You have lost the check, or it has been stolen
  • Wrong details like the amount or the date were entered
  • Wrong work locations (tax jurisdiction) for paychecks were entered
  • Duplicate checks are there

You would want to void checks and then issue a corrected replacement. However, this might not be the case with duplicate checks. As mentioned above, performing this step can be straightforward for regular checks, but the tricky part is re-issuing the paychecks.

Read Also: QuickBooks Error H202

How can one void a Bill Payment Check in QuickBooks Desktop?

Step 1: Navigate the Check Register

The first step is accessing the check register. From the QuickBooks Desktop homepage, you need to click on the Banking menu and then choose Check Register. One can also click on the Banking menu, which is available at the top of the screen. Thereafter, select the Use Register from the drop-down menu.

Step 2: Select the Check to Void

Firstly, select the bank account from which the check that you want to void was issued. A window displaying all the checks created till now will open. Choose the check you want to void by clicking anywhere on the line.

Step 3: Void the Check

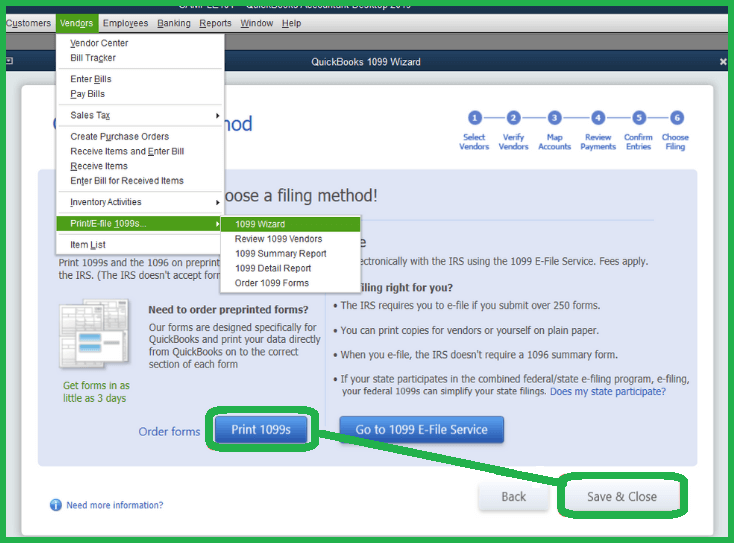
After you have selected the check from the list, your check will show. Thereafter, click on the small drop-down under the Delete button and then choose the Void option. As you click on Void, you will notice that the amount has turned to zero, which indicates that the bill was reverted to open. A Void in the memo field will be visible. Click on the Save and Close button to void the check. After you have clicked on Save and Close, you will be asked whether you want QuickBooks to record the changes. Click on Yes to proceed.

Voiding a Payroll Check in QuickBooks Desktop

Voiding a payroll check is a little more complicated than the process of voiding general checks, especially when all the payroll tax returns have been filed. This can have a major effect on your books and payroll records. The best way of re-issuing a payroll check is to not void it but reprint it with a new check number. One can then create a new check, assign it to the old check number, and void it, leaving a paper trail.

Step 1: Navigate to Check Register

Go to the Check Register as shown above for voiding a general check.

Step 2: Find the Payroll Check

Choose the payroll check that you want to avoid from the check register. In order to illustrate the next steps, let us void the paycheck.

Double-click anywhere on the entry line in order to display the paycheck. You need to take note of the existing check number of the check that you want to void.

Step 3: Reprint the Check with a New Check Number

In order to change the check number, you need to click on the Print menu present at the top of the payroll check window and then select the Check option from the drop-down list. Thereafter, QuickBooks Desktop will automatically generate a new check number.

You need to ensure to verify that this number matches the check in your printer, or you can change the number if needed, and then you need to print a new check. After the check with the new number is printed, it will be automatically recorded in the check register. You will be able to find the new check in the register, and then you won’t be able to see the old check.

Step 4: Void the Check by Assigning the Old Number to a New Check

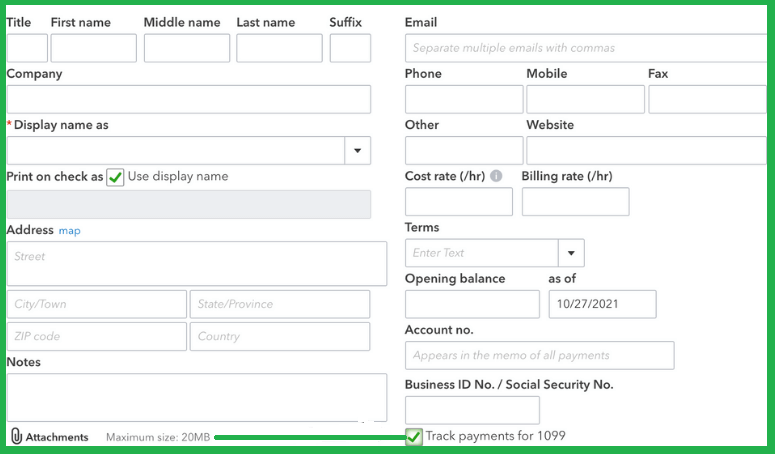
This step is not compulsory, but it is a good idea to show the old check number to be voided in your check register. In order to do this, you need to click on the bottommost line in the register, fill in the old check number, and then set the details. Finally, click on the Record option to save the changes.

Read Also: QuickBooks Error H101

How to void a check in QuickBooks Online?

There are generally two methods to void a check in QuickBooks Online, which is already recorded.

Voiding a Check from the Check Page

One can void a check from the check page, which then lets you review the details of the original transaction. The following steps can let you know how to void a check in QuickBooks Online.

  1. Firstly, go to the Bookkeeping option and then choose Transactions. Thereafter, select the Expenses option.
  2. Secondly, choose the Filter option.
  3. Choose to check in the Type field.
  4. Subsequently, choose the data range in which you have received the check and then select the Apply option.
  5. Furthermore, you need to choose the check that you want to void from the Expense transactions list in order to open it in the Check screen.
  6. Thereafter, choose the More option and select Void from the pop-up menu.
  7. When you are prompted, you need to choose Yes to confirm that you want to void the check.

Voiding a Check without Opening the Transaction

One can, without opening the transaction, void a check from the Expense Transactions list. The following steps will help you to void a check without opening the transaction.

  1. Firstly, access the Bookkeeping option, choose Transactions and then select Expenses.
  2. Thereafter, in the Expense transactions list, locate the check which you want to void.
  3. Furthermore, from the Action column, choose Void from the View/Edit drop-down menu.
  4. When you are prompted, you need to choose Yes to confirm that you want to void the check.

Wrapping Up

We would like to conclude with the hope that after reading this blog, you will learn how to void a check in QuickBooks by yourself. However, should you need any assistance with this, or if you need any professional help, you can always get in touch with us. We are a team of QuickBooks experts that have helped millions across the world resolve their QuickBooks issues.