All posts by admin

5 Simple Steps to Fix QuickBooks Error 15227

QuickBooks error code 15227 is an update error that generally arises when the user tries to download the new updates on the QuickBooks desktop. This error may also arise when your system suddenly shuts down due to power failure.

QuickBooks error 15227 appears with a pop-up display message as;

QuickBooks Error code 15227

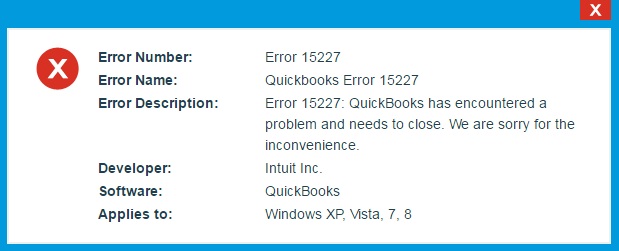
“Place a call now at +1 855 706 0905 to speak live with a QuickBooks expert and get a quick remedy to fix QuickBooks error 15227 within a few minutes.”

Possible Reasons Behind QuickBooks Error 15227

Before we jump ahead directly to the solutions to get the error resolved, let’s take a look at the possible reasons due to why a user may encounter the QuickBooks error code 15227;

  • QuickBooks installation files are not downloaded properly on your device.
  • If your PC is affected by malware, then it can lead to various technical glitches on your PC.
  • QuickBooks important files are mistakenly deleted from your PC.
  • The damaged windows registry.
  • Excessive applications are running in the background.

Signs/ Symptoms of QuickBooks Error 15227

  • Unable to download new updates of QuickBooks desktop application.
  • Suddenly drop-down in the PC’s performance speed.
  • Unable to locate taskbar.
  • An error message appears on the screen showing QuickBooks error 15227.

Techniques to Fix QuickBooks Error 15227

Let’s take a look at the different solutions that can help you to resolve QuickBooks error 15227;

Solution 1. Download New Updates on QuickBooks Desktop

The first solution you should follow is to download new updates on your QuickBooks desktop software. To do that, given below are the steps that you can perform;

  • On your QuickBooks desktop account, click on the “Help” menu option.
  • As the drop-down list appears, then you have to click on the “Update QuickBooks” option.
  • Thereon, click on the “Get Updates” option, and then the updating process will start on your device.
  • Once the updating process ends, you have to perform a deep restart of your device and launch the QuickBooks software on your PC.

Now, launch the QuickBooks desktop application on your device, and check whether the QuickBooks error 15227 has been eliminated.

Solution 2. Fix the Windows Registry

A corrupted windows registry on your PC can lead to various technical glitches on your PC, and it may even affect you in using the software smoothly. Fixing the windows registry can be the solution to resolve QuickBooks error 15227.

  • Open the windows run command on your PC, and type “Regedit” in the search bar.
  • Hit the “OK” option, and then the registry editor will appear on your PC screen.
  • After that, you must select the key associated with QuickBooks error code 15227.
  • Click on the “Registry Editor” option, and then click on the “File” tab option.
  • Now, click on the “Enlist” option, and select the folder for which you want to create a backup file.
  • Provide a name to the file, and then check the highlighted field in the export range tab.
  • At last, you have to save this key with a .REG extension.

Solution 3. Delete Temporary Files & Cache

Here are the steps that you can execute to delete temporary files and cache from your device;

  • Launch the windows run command, and enter “Cleanmgr” in the search bar.
  • Hit the “OK” option, and then the disk clean-up window will be open on your screen.
  • Here, you must select all the files you want to delete and then click on the “OK” option.
  • Once you finish the above steps, re-launch the windows run command and move toward the “%temp%” folder.
  • Select all the files in the temp folder by pressing the “Ctrl + A” keys together.
  • After that, press the “Ctrl + Shift + Delete” keys together to delete the temporary files permanently from your device.

Solution 4. Run System File Checker

Let’s take a look at the steps that you can execute to run the system file checker on your device;

  • Move to the windows start menu, and type “Prompt” in the search bar.
  • Thereon, do a right click on the “Command Prompt” and then select the “Run as Administrator” option. ‘
  • Thereon, enter “SFC/ scannow” and hit the enter button.
  • Now, the scanning process will be start on your device.
  • As the process ends, launch the QuickBooks application to verify whether the QuickBooks error 15227 has been fixed.

Solution 5. Update System Drivers

Another solution you should follow is updating the windows system driver on your PC to the latest version, as an outdated system driver can also lead to the QuickBooks error code 15227.

Given below are the steps that you can execute to update system drivers;

  • First, go to the “Device Manager” on your device, then click on the “Adapters” section to extend it.
  • Thereon, right-click on the “Device” option and select the “Update Driver” option.
  • With that effect, the updating process will be start on your device.
  • After that, you have to carry out the restart procedure of your PC.

If your device cannot search for the driver, you must locate the driver’s official website and download the compatible drivers.

Concluding Note

That’s all with some quick solutions you can follow to resolve QuickBooks error 15227. If these methods do not work for you, or if you are facing any other issue while working on the QuickBooks software, you can contact our team via Phone @ +1 855 706 0905. Our experts are available 24/7 at the help desk to understand your query and deliver the best solution.

How To Deal With QuickBooks Error 6073 99001?

QuickBooks error 6073 99001 occurs when a user tries to access their business accounting data. It is possible that the company file you are trying to access is already being used by a different user. Improper hosting configuration settings can be one of the possible reasons behind the arrival of the error. This error in QuickBooks is one of the multi-user mode errors wherein the data file is not shared properly. To get rid of the error, you need to list the possible factors behind the error and fix them to eliminate the error. Follow this post until the end to learn how to fix QuickBooks error 6073 99001.

Wondering how to fix QuickBooks Error 6073 99001? All you need is to dial our helpline number +1 855 706 0905, and it will connect you with an expert professional. 

QuickBooks Error Code 6073 99001: Description

Error QuickBooks error 6073 99001 is related to the company file access and gives an error message on your screen on its arrival:

QuickBooks is unable to open this company file. It may have been opened by another user.

Error codes: (-6073, -99001)

Additionally, it also explains the possible reason behind the arrival of the error and recommends possible solutions to get rid of it. However, for detailed troubleshooting, you need to consider the possible factors that can give rise to the QuickBooks error message 6073 99001 on your screen.

What Are The Possible Reasons For Error Code 6073 99001 in QuickBooks?

Getting insights into the QuickBooks error 6073 99001 can make the troubleshooting easier for you. So, here is the list of possible factors:

  • The file is already opened on another computer, and that too in single-user mode.
  • If the file is located in a read-only network folder, you may not be able to access it.
  • When the file is hosted on a Linux server and uses more than one set of login credentials to log into the shared folder.
  • The file is being accessed using a remote application while the server detects that you are still logged on to the system.

Symptoms of Error 6073 99001 in QuickBooks

Now that you know the possible reason behind the arrival of the error, below are some common signs and symptoms that can help you identify the issue:

  • You will see an error message on your screen with the arrival of the error 6073 99001.
  • Trouble in accessing the QuickBooks data file due to improper hosting configuration settings.
  • Improper functioning of the QuickBooks Desktop software or your Windows OS.
  • The system hangs/freezes or responds sluggishly toward the mouse or keyboard inputs.

When experiencing these signs on your screen, you need to move ahead and perform the relevant solutions to eliminate the error.

Best Ways To Resolve QuickBooks Error 6073 99001

Now that much has been discussed about the error, below are the solutions that can help you with troubleshooting of the persisting issue:

Solution 1: Run QuickBooks File Doctor Tool From Within The Tool Hub

QuickBooks Tool Hub enables users to access the tools required to troubleshoot a particular issue. You can run QuickBooks File Doctor to repair the damaged company file, which can be one of the possible reasons behind QB error Code 6073. Check the below-explained steps:

  • Go to Intuit’s official website and download the latest version of the QuickBooks Tool Hub.
  • Once downloaded, run the executable file and follow the on-screen instructions carefully to install it.
  • Agree to the terms and conditions, and it is now ready to use.
  • When in QuickBooks Tool Hub, navigate through the categories of the errors and select Company File Issues.
  • Here, you can run the QuickBooks File Doctor to repair the damaged company file.
  • The repair process may take up to 20 minutes, based on the size of the company file.
  • Once repaired, check if the QuickBooks error 6073 99001 is fixed.

If the error message flashes again on your screen, try the next solution.

Solution 2: Resolve The Issue Manually Based On Various Instances Of The Error

Improperly configured hosting settings can give rise to the QuickBooks error 6073 99001. In such a case, you can perform the following solutions:

2.1: Switch To The Single User Mode On the Server Computer

  • In the first place, close the QuickBooks application on all workstations.
  • Next, open your Company file located on the Host computer.
  • Now move to the File menu and choose Switch to Multi-User mode option.
  • Reboot your workstation and try to access the company file. If you are still getting the error message, try the next solution.

2.2: Open The Company File In Multi-User Mode

  • First things first, open the company file on the host computer.
  • Now, from under the File tab, you need to click the Close Company option.
  • Thereafter, open the company file once again.
  • Now click Open or Restore Company, located underneath the File tab.
  • Moving ahead, click Open a company file and then hit the Next button.
  • Again, click Open file in multi-user mode and click Open.

Ending Words!

This post explains the best troubleshooting solutions implementing which you can resolve QuickBooks Error Code 6073 99001. However, if you are experiencing an issue with error resolution by implementing the steps, a chat with the experts can help with the error resolution. Besides, you can also schedule a call back by emailing us your time of availability.


How to Fix Sage 50 Not Responding or Has Stopped Working Error?

Are you facing Sage 50 not responding error? Is your Sage 50 not working? Fret not! You’ve come to the right place. In this blog, we will tell you all about how to fix Sage 50 not responding error. Sage has, for time immemorial, been the first and the foremost choice of accountants and businessmen all over the world. So much so that in the UK, it has become the numero uno choice of all the tax filers.

Apart from offering world-level tools and accounting tributes, it essentially has carved a niche of its own in the industry. But, since the time it came into existence, it has been riddled with errors and discrepancies, here and there. Some sage errors can be fixed consequently, some proficiently and some need physical effort. The Sage 50 not responding or Sage 50 stopped working is one such problem that a lot of Sage users tend to face. In this blog, we will talk about the various reasons and causes that lead to Sage 50 stop working error. Apart from that, we will also tell you how to fix Sage 50 not working problem. So, read this article till the end to know all about fixing of Sage 50 not responding error.

What Exactly is Sage 50 Not Responding Error?

A lot of errors in the Sage software lead it to the program becoming frozen, thereby blocking most of its functions. Therefore, while working on the Sage software, you get the hint that you are not receiving any response to your commands, you might have encountered the said error. Another indication could be that a forced windows pops up. All these signs mean one thing. That what you are experiencing is the Sage 50 not responding error. Fixing software problems take time and effort. At the same time, it can cost you money. If you want an easy and effective resolution, you can reach out to us.

How would I know if I have encountered Sage 50 stop working error?

Above, we have talked about identifying this error. Taking this forward, let’s talk of some signs and symptoms that occur when you encounter this error. When you get these signs and symptoms, you can be assured that you indeed are facing the Sage 50 not working error. Following are some of the signs;

  1. When your Sage 50 software suddenly freezes while you are working on it, you can know that you have encountered the error.
  2. If your Windows Task Manager shows an unresponsive error message while you are working on Sage, it is a clear indication.
  3. Your Sage 50 not responding while installation is a clear message that it indeed is the case. In this case, a non-responsive message would appear on your computer screen.
  4. If while you are creating the data backup from the network drive, your Sage 50 software shows an unresponsive status, this is a clear hint that your Sage 50 stopped working.

Reasons that cause Sage 50 not working error?

There could be numerous reasons behind the Sage 50 not working error. When you know these reasons, the process of troubleshooting becomes easier. When you know the problem, it becomes easy to fix the issue. Some of the causes of Sage 50 not working error are listed below;

  1. One of the most significant causes of the Sage 50 not working error is enabling the Compatibility of Windows XP. When you enable the Windows XP compatibility, the Sage 50 fails to establish the connection with Windows and hence the problem occurs.
  2. Thereafter, the second reason could be that your computer RAM has no or little space to install the Sage 50 software.
  3. Running the program on a slow server or network could be another reason. When you do that, the Sage program might not work or respond improperly.
  4. Whenever you try to do two tasks simultaneously, this problem can occur. Suppose if you are taking backup from the network and running the program at the same time, then the Windows receives a hindered response from the programs and displays a “not responding” message on the computer screen, you can face this issue.
  5. One more reason could be that the anti-virus, anti-spyware or the user account control is interfering with the system.
  6.  Windows Update not being installed could cause the issue.
  7. Damaged data folder files or a damaged standard report file could cause the problem.
  8. A damaged Microsoft.net framework could also be behind this.
  9. An incorrect version of the program when installed on the workstation causes the issue.

Troubleshooting Methods that Help Fix Sage 50 Not Responding error

There are certain methods using which you can fix Sage 50 not working error. Some of these have been listed below;

Solution 1: Reboot the system and then start it again

This is the first and foremost troubleshooting step in the resolution of the Sage 50 not responding error. Try logging out of the system and then logging in back again, Restarting the system is considered to resolve the issues by itself.

Solution 2: Disable the compatibility Windows XP mode

Disabling the compatibility mode in Windows XP can prove to be effective in the resolution of this problem. To do this, you need to perform the following steps;

  1. Firstly, go to the Desktop and then click on the Sage 50 icon.
  2. Thereafter, in the menu, click on the Properties option.
  3. Furthermore, select the compatibility mode available in the Window.
  4. Tap on the option “Run this program in the Compatibility mode” and deselect it.
  5. Lastly, as you submit it, you would have disabled the compatibility windows XP mode.
Solution 3: Force the Sage 50 to open

Using the following steps, you should force open the Sage 50 software;

  1. Firstly, right-click on the Sage 50 program icon.
  2. Secondly, left-click on the Properties option.
  3. Thereafter, highlight and then copy the contents of the target line.
  4. Furthermore, open the Run option by pressing the Windows Key and R together on the keyboard.
  5. Paste the copied content from the target line into the Run box.
  6. Consequently, after the quotation marks, add the space and then type abc at the end. After this, verify that the program opens up.
Solution 4: Run the Sage 50 as an Administrator

Running the Sage 50 as an administrator solves the problem sometimes. To do this, you need to follow the below-given steps;

  1. Run the Sage 50 as an Administrator by right-clicking on the Sage 50 icon.
  2. Secondly, you need to ensure that the Sage 50 software is opening and/or installing update without any error.
  3. If the error still persists, you will have to move on to the next section.
  4. Next, shut down the Sage software and then right-click on it again.
  5. Furthermore, click on the Properties option.
  6. Thereafter, click on the Compatibility tab.
  7. From the given options, choose Run this program as an Administrator.
  8. Click on the OK option.
  9. Lastly, check again if the Sage is running without any error.
Solution 5: Save file on the computer drive and then reboot the system again

Follow the below-given steps to do this;

  1. Firstly, if you are facing a network error, then you would have to first save the file and take its backup and then copy and paste it in a drive.
  2. If the backup fails to download the file due to a slow network, then confirm its file size.
  3. After you have logged out of the computer system, then reboot the server to get the complete network.
  4. If the network is causing the problem then you need to reboot the router.
Solution 6: Initiate the Connection Service Management once again

Starting the connection service management helps to fix Sage 50 not working problem. This is a welcome step as it almost immediately resolves the problem. Following are the steps that can help resolve the issue;

  1. Firstly, go to the Desktop and then tap on the Windows button again.
  2. Secondly, on the search bar of the Start menu, you need to look for the MSC.
  3. MSC will immediately appear on your screen. Access the name column, look for the Sage 50 connection manager, and then tap it with a right-click.
  4. Lastly, choose the option restart from the dialog box.

Conclusion

Sage 50 crashes when it lacks the admin rights to perform certain tasks. Further, missing dependencies or a lack of system resources can also cause the accounting software to crash. The program stops responding if it cannot connect to the data file because of network issues.  Should you find that even after following these steps, you are unable to fix the problem, then you can directly contact us. We are available on chat, email as well as call. Our email address is info@accountingwhizz.com.

How to Change TurboTax Online User ID and Password?

If you are willing to change TurboTax password but not sure how to get the task accomplished, then here is a friendly post for you. TurboTax is an excellent tool for taxation that enables users to file their taxes smoothly. You can access a free version of the program for simple tax filing.

There are various instances when you may need to change your TurboTax password and keep your account secure. For instance, when you forget your old password or feel that your account is compromised, change your password immediately. Here, we will discuss some easy ways to change TurboTax user ID and password for you. Let’s start!

Need help with TurboTax password change? Dial  +1 855 706 0905 to get instant help. 

Instances When You May Need To Change Your TurboTax Password

There are many instances when you may need to change your current/lost password. Check the below-given list:

  • Where there is a security breach, you need to change your password immediately.
  • If you suspect an undesired intrusion into your account, change your password.
  • On discovering the malware or other phishing software.
  • When the account is logged into someone else’s device.
  • If you have forgotten your existing password, reset it as soon as possible.
  • It is wise to change your password on a regular basis to keep your account safe against people with nefarious intentions.

How Can I Change The Username On My TurboTax account?

If you are wondering how to change your user name on your TurboTax account, then following the below-given steps can help you with your quest. In the first place, you need to log into your TurboTax online account. Once done, perform the below-given steps with full attention:

  • Navigate to your Intuit Account and then log in to your account using the accurate credentials.
  • Next, you need to click on Intuit Account, located at the lower left corner of your system’s screen.
  • When on the Account Settings screen, click either Profile or Security, depending on which options you wish to change.
  • If you want to change your User ID, go to the Profile tab and hit the Edit option.
  • Thereafter, perform the on-screen instructions to proceed further.
  • These steps will help you to change your username on your TurboTax account.

Also Read: How to Fix TurboTax Error 190

What Is The Procedure To Change TurboTax Email Address?

While using the TurboTax account, if you want to change/update your email address, follow the below-given steps:

  • Sign into your Intuit account in the first place.
  • Once done, locate and click on the Sign in & security option.
  • Here, you need to select the Email address.
  • Thereafter, enter a new email address and select the Save option.

Once saved, your TurboTax email has changed successfully, and you can now use it with your account.

How To Change TurboTax Password?

If you are using an online account, it is wise to change your password on a regular basis. It keeps your account safe against multifaceted security risks. Sometimes, you have the option to change your password, whereas sometimes, you are forced to complete this task. Nevertheless, below are the steps you can follow for a TurboTax password change:

1: Change Old TurboTax

If you need to change your old TurboTax password, the below-given steps can help:

  • Log into your TurboTax account using the current login credentials.
  • Now select the Update option located next to the passcode section.
  • Here, you will need to enter your current password in the given box.
  • Next, choose a new password and re-enter the next box to confirm it.
  • Finally, click on the Save button to finish the task.

Your password has been changed now.

2: Reset Your TurboTax Password

If you forgot change TurboTax Password, then perform the below-given steps:

  • When on the TurboTax account page, click on having trouble logging in option.
  • Next, enter your email address and hit the Next button.
  • After that, you need to verify the phone number linked to your account.
  • You may now create a new password and save it after confirming.

The password reset process is completed successfully.

How To Receive Verification Code When Email Address Is Wrong?

If you no longer have access to your email account, then you can receive the verification code to your mobile number. Below is how you receive the confirmation code via mobile:

  • When you are asked if you want to receive the code via text message, select the Continue option.
  • While waiting for the code, don’t close your TurboTax window. It may take a few minutes to receive the code, so you need to wait patiently.
  • Once the code is received, enter it in the field “Enter 6 digit code” and avoid entering the code in the password field.
  • After that, you can simply click on the Verify button in the email, and it will direct you to the TurboTax verification page.
  • In the end, click the Continue option to sign into your account.

Important: When you request a new code, the old code will be rendered invalid. You have to enter the most recent code for your account verification.

Alternative Way To Confirm Your TurboTax Accountant

If you are unable to get the code, there is an alternative way to get the job done. Below are the steps:

  • Select the “Confirm my account in a different way” option when you are prompted to do so and then select the Continue button.
  • Next, enter information from the last year’s return. Also, make sure to enter the information of the primary taxpayer and click Continue again.
  • Now enter the TurboTax-generated security questions when you are asked. In case none of your answers apply, select the “None of the above” option.
  • After answering all the questions correctly, you will see the “Welcome Back!” screen.
  • Here, you need to enter your email address and phone number. It will make your account verification easy in the future.

After confirming your identity, you will be redirected to the TurboTax account, where you can use the application without any problem.

Things To Consider When Changing Your TurboTax Password

If you are willing to change your TurboTax password, you need to keep a few important considerations in your mind.

  • Avoid using the same password for multiple accounts. In such a case, if one account is compromised, all other online accounts will be at risk.
  • Avoid using your personal information in the password, such as your mobile number, father’s name, vehicle number, etc.
  • Also, don’t use your debit/credit card pin as your password.
  • Choose a strong password made by combining letters, numbers, and special characters.
  • Don’t reuse old passwords, as most platforms don’t accept them.
  • Avoid saving your password on public devices as they can put your account at a safety risk.

Final Words!

Now that you are here, I hope you have read this post on how to change TurboTax user ID and password. If you are having a kind of technical unease or need to speak to an expert, our TurboTax HelpDesk is always open for you. Explain your issues, and they will guide you with the best assistance.

FAQs

1: How do I update TurboTax account information?

If you want to update your TurboTax account info, such as email, phone number, password, or mailing address, follow the below-explained steps:

  • Sign into your Intuit account in the first place to start the procedure.
  • After that, select the “Sign in & security” option if you want to change your user ID, password, or email address.
  • If you want to update your name, address, DOB, or other information, select the “Personal info” option.

2: How to create a new TurboTax account? 

To create a new TurboTax account, you can follow a few simple steps that are explained below:

  • First of all, you need to make sure that your device is connected to a stable Internet connection.
  • After that, open your web browser and go to the TurboTax website.
  • Now click on the ‘create a new account’ option.
  • Follow the instructions given on your screen and provide the required information, such as your email address, user ID, phone number, and password.

3: Can’t sign into TurboTax account. What should I do? 

If you are unable to sign into your TurboTax account, you need to look for the multiple factors that can give rise to this error. For instance, when your Internet connection is not stable, or the browser has a heap of cookies and cache. To get rid of this error, you can uninstall and reinstall the TurboTax installation in the first place to make sure that the program is running optimally. If the error persists thereafter, clear the browser’s cookies and cache. If the error continues, you may also get professional assistance for the error resolution.

4: How to get help with your TurboTax account/password issues? 

If you want to change TurboTax user ID and password or need additional assistance related to any TurboTax issue, our professionals are ready to help you around the clock. You may use our chat or email services to get help or request a callback during the available hours.

How to Resolve QuickBooks Error H101

QuickBooks is software that can make your life super simple and too difficult within just a matter of time. It is a place for everyone to administer their accounts and finances. However, this software does face a lot of glitches at the same time. Here you can take care of your payrolls but might also need to take care of the company file error, such as QuickBooks Error H101.

Although it can get a bit difficult at times, this is exactly what we are here for. We proffer complete guides on QuickBooks errors and are experts who are also available for your assistance. Today, we have chosen to talk about QuickBooks Error H101. We are on a journey where you will encounter its symptoms, causes, and fixes that can help you in the long run.

QuickBooks Error H101

Error code H101 alert means the host computer needs another configuration. It usually appears when a user tries to change the application from single to multi-user mode. It is a member of the H series error family of QuickBooks. The other members of this family are H202, H303, H505, H606, and H707.

However, the issue is not too big; therefore, it does not really affect your company data files. But it is always advised that you make a backup of such documents before you go ahead with the various methods to overcome the problem.

Signs of QuickBooks Error H101

This error code shows its symptoms while operating the application as well as when you are working on your PC. Here are some symptoms of QuickBooks Error H101 to look out for:

  • The first and foremost sign is the alert window popping up on your screen.
  • When the page you try to open is expelled, the URL is still the same.
  • Also, if your computer screen shows a glitch and stops taking command from output devices, such as keyboard and mouse
  • Your PC shuts down as soon as the alert prompt window appears.
  • When the window you attempt to open is unavailable on the server

Reasons Behind QuickBooks Error H101

Let us take a look at the core reasons responsible for the QuickBooks problem now:

  • When the software is not able to read your IP address from the host system
  • In case the host settings of QuickBooks are not configured properly
  • Also, if you are working with a corrupt company file
  • An antivirus or firewall attack can lead to this error
  • Also, if the server is unable to communicate with the company file

Solutions For QuickBooks Error H101

Finally, that you have understood what irks QuickBooks Error H101here is how you can tame it.

Fix 1: Go Through QuickBooks Services Settings

Check if there is an issue with QuickBooks services settings.

QuickBooks Services Settings

  • On the home screen of your system, hit Windows+R to pull up the Run command window.
  • After that, jot in services.msc in the space and click on OK.
  • Once the Services tab is up, you now need to locate the QuickBooksDBXX file (XX is the software version).
  • Thereafter, in the following window, go to Startup Status and look at its current status. If it is Running, then leave it untouched; otherwise, hit the Start button.
  • Furthermore, see for the Startup Type and switch it to Automatic.
  • Moving forward, head to the Recovery window and run the First, Second, and Subsequent Failure by changing them to Restart.
  • To finish it off, hit the Apply button from the bottom right.
  • After that, remember to repeat the same steps with the QBFCMonitorService file.

Fix 2: Make a New Company File Folder

If the issue exists in the company file folder, then creating a new one might help you overcome QuickBooks error H101.

New Company File Folde

  • First of all, open your system, and head to the Start menu.
  • Thereafter, go to File Explorer and look for the company file folder from the search bar.
  • Once you have the folder on your screen, open it and cut the docs from there by hitting Ctrl+X.
  • After that, right-click on the same screen and go to New and then Folder.
  • Finally, paste the files that you have cut and rename the folder.
  • Try and run QuickBooks Desktop again.

Fix 3: Check Hosting on QuickBooks

In case neither of the above two solutions works, check the hosting settings in the application.

Check Hosting on QuickBooks

  • First of all, go to the homepage of QuickBooks Desktop on the workstations.
  • Next, from the menu bar, click on the File option and go through the scroll-down list.
  • After that, hit the Utilities option and see the hosting settings here.
  • If it is set to Multi-user mode, then change it to single-user mode.
  • Remember to make the changes in all the other computers connected to the same company file.
  • Also, make sure you do not make this change on your host PC.

Fix 4: Use QuickBooks File Doctor

In order to use QuickBooks file doctor, you first need to download and install QuickBooks Tool Hub.

Step 1: Get QuickBooks Tool Hub Running

  • Go to the official website of QuickBooks Tool Hub.
  • Thereafter, locate the Download button and hit that.
  • The downloading process can take a few minutes, depending on the speed of your internet connection.
  • After that, go to the Downloads folder in File Explorer, and you will find the same at the top.
  • Furthermore, double-click on the same, and a new prompt window will come before you.
  • Go through the steps to install the tool hub.
  • Also, say Yes to agree to the terms and conditions.
  • Finally, click on Run, and the application is all set to use.

Step 2: Run QuickBooks File Doctor

  • Firstly, select Company File Issues and open that tab.
  • Next, you will find the Run QuickBooks File Doctor button; hit that.
  • Subsequently, follow the instructions on your screen and let the scanning begin.
  • The fix tool will automatically fix the problems it finds.

Fix 5: Make Use of QuickBooks Database Server Manager

To resolve QuickBooks Error H101, run QuickBooks Database Server Manager if nothing else works.

  • Initially, to use Database Server Manager, you need QuickBooks Tool Hub in your system.
  • If you have it on your screen, then go to the Start menu and search for it. Otherwise, get it from QuickBooks Tool Hub’s official site.
  • After that, on this window, find the Network Issues window from the list on the left side.
  • Here, the QuickBooks Database Server Manager option will appear before you.
  • This will locate your company files automatically. In case it doesn’t, click on Browse and select Start Scan.
  • Thereafter, the tool will change the firewall permission settings for you.

Fix 6: Change Firewall Settings

Configure firewall settings in your system to try fixing the problem again.

Change Firewall Settings

  • Open the Run dialog window by pressing Windows+R or from the start menu on your system.
  • Put in Control Panel and hit OK to browse the tab.
  • Next, go to the System and Security tab and move to the subsequent window.
  • Thereafter, look for Windows Defender Firewall and click on Allow an app through Windows Firewall available as a subheading.
  • Lastly, add QuickBooks from the list of available options, and you are good to go.

Summing Up

QuickBooks users rely on this software on an everyday basis. However, this application does have its issues that can create a hindrance to your task. One such problem is QuickBooks Error H101. This code of the H series is a very common problem that multi-user mode users face. There can be ‘n; number of causes behind the same. It can happen due to misconfiguration, communication issues, firewall restrictions, company file folder problems, and more. In order to fix the same, there are a few troubleshoots that you can try by yourself. We have mentioned them in this blog for your reference.

If you need any more assistance or are troubled with any other QuickBooks Desktop problem, then you can connect with our QuickBooks experts. Follow the steps provided above and they will help you thoroughly in the right direction. If you feel stuck at any part of the blog, We are at your service over a call, live chat, as well as email. Send in your query, and we will reach out to you with the appropriate solution soon.

6 ways to Resolve QuickBooks Error 15243

Are you stuck with QuickBooks Error 15243 and want to learn the simplest steps to handle it? If this is the case, then you are on the correct page. The user might encounter QuickBooks error code 15243 while updating QuickBooks payroll. This error happens when QuickBooks File Copy stops working properly in QuickBooks due to any reason.

Whenever you encounter this error, a message will appear on your screen:

“Error 15243 – The update of payroll is not able to complete successfully. The QuickBooks FCS service is damaged.” 

Continue reading this entire blog to acquire more knowledge about the main causes behind Error 15243 and its troubleshooting steps.

Get Quick assistance in eliminating QuickBooks error 15243 from our experts by calling at @ +1 855 706 0905

What Promotes QuickBooks Error code 15243?

You may receive QuickBooks Error 15243 in QuickBooks because of the a few reasons that are explained in the below-given list:

  • QuickBooks Payroll doesn’t have the latest tax table update.
  • QuickBooks File Copy Service is not Responding properly.
  • Your Windows registry is corrupted.
  • Presence of Virus or Malware in your System.
  • The file Copy service is corrupted or damaged.
  • Your Payroll subscription is expired.

How to identify QuickBooks Error 15243?

Before going further with the techniques to troubleshoot QuickBooks Error Code 15243, let’s first understand the symptoms that help you identify the error.

  • An error alert will display on your screen.
  • The System freezes Frequently.
  • Windows is not working properly.
  • The System is not accepting your command.

Step-by-Step Solutions to Rectify QuickBooks Error 15243

After learning all the possible reasons and the symptoms of QuickBooks error 15243, it’s time to go for the troubleshooting ways.

1st Way: Review the Payroll Subscription

In case your Payroll subscription is expired, you may face QuickBooks Error Code 15243 in QuickBooks. So, we will advise you to check your Payroll subscription first before going further with any other fixes.

1. Launch the QuickBooks Application dashboard and hit My Payroll Service present in the Employees option.
2. Thereafter click on the Account and Billing Information.
3. Next, you have to Close the Maintenance Page available on your window.
4. Now QuickBooks software requires you to re-validate the payroll subscription.
5. Once the validation process is finished, payroll will update automatically.
6. After installing the updates, run the payroll again and verify if the QuickBooks error code 15243 is still persistent.

2nd Way: Configure QuickBooks File Copy Services

If the previous method doesn’t work for you, try to fix Error 15243 by repairing the File Copy Services, as damaged FCS is one of the major reasons behind this error.
1. Launch the Run window using the Windows+R key.
2. Now, in the Enter services.msc in the Run Window, and hit enter.
3. Next, double-click on Intuit QuickBooks FCS service.
4. Here you have to choose the manual startup type from the Intuit QuickBooks FCS Properties window.
5. Select Ok, and then launch the QuickBooks Payroll

3rd Way: Make Changes in the Internet Explorer Settings

The steps to follow for resolving error 15243 in QuickBooks by changing the Internet Explorer Settings are mentioned below;
1. Turn on your Desktop.
2. Launch Internet Explorer.
3. Now, you have to select the Gear icon and hit on the internet option.
4. Select the Security tab.
5. Then to proceed forward, select the Trusted Web Page options.
6. Now move to the Address bar and enter the Website URL.
7. Write Intuit.com along with *.quickbooks.com.
8. In case you are from Canada, enter *.quickbooks.ca & *.intuit.ca.
9. Now select the Close button, and hit Apply.
10. At last, click on Ok.

4th Way: Download the QuickBooks Desktop Updates Manually in your System

In case you are still stuck with issues related to installing payroll updates, then you can go with manual installation of the updates as a short-term solution.
1. Initiate the process by navigating to the QuickBooks Product Updates page.
2. Next, from the drop-down option, you have to choose your country, product,& version.
3. Now hit on the Get Updates tab.
4. Thereafter Save this file to some easily reachable folder.
5. To complete the QuickBooks Desktop Applications updates, run the Updates File and follow the prompt available on your screen.
6. Restating your Windows.
7. End the process by rerunning the payroll updates.

5th Way: Go for Full Malware Scan

Alternatively, you can also perform a full malware scan in your System to fix the error. At times, a user might face major problems due to the presence of malware in the System. This malware or virus can attack the files and folders present in your device and corrupt it completely. Thus, go for a proper malware scan and check if your issue is fixed now.

6th way: Shut down all Interrupting programs, if QuickBooks FCS service is corrupted

If none of the above-mentioned methods works for you, then close all the interrupting programs and check if the issue is fixed.
1. Shut down the QuickBooks Application.
2. Thereafter you have to right-click on the taskbar to select the Task Manager tab.
3. Next, You have to highlight the below-mentioned background process and hit the End task option for each process option.

  • QBW32.exe or QBW.exe
  • QBCFMonitorService.exe
  • qbupdate.exe
  • QBDBMgr.exe or QBDBMgrN.exe
  • QBMapi32.exe

4.  Go to the desktop screen and right–click on the QuickBooks software.
5. At last, choose the Run as Administrator tab.

Winding it Up!

As mentioned above, these are a few best solutions using which you can use to easily fix the QuickBooks Error Code 15243. However, if you still encounter any problems while resolving the error, then get in contact with our QuickBooks experts to get quick assistance. Our experts are available 24/7 all around the globe to listen to the user’s queries. Get in touch via email or live chat, and ask about all your problems.

5 Easy Steps to Fix QuickBooks Error Code 324

QuickBooks error 324 is an online banking error code that arises when the users are unable to access the bank accounts while login into their online net banking account. This error may prevent users from finding bank-related transactions on their QuickBooks account.

Through this article, you will learn a complete procedure about the possible causes due to why the error arises and the possible solutions you can carry out to resolve the error.

Why Does QuickBooks Error 324 Occurs?

Below, we have filtered some of the common reasons due to why a user may encounter QuickBooks error 324 while working on the software;

  • QuickBooks desktop installation files are damaged or missing from your device.
  • Malware infection has damaged the windows registry files on your PC.
  • If you have accidentally deleted any important file related to the QuickBooks software from your device.
  • Incorrect internet server settings or poor internet connection.
  • Incorrect login credentials of your online net-banking account can also lead to the occurrence of this error.

QuickBooks Error Code 324 or 106: Symptoms

  • The active window crashes automatically.
  • Facing issues in accessing the QuickBooks company file.
  • A pop-up display message on the PC screen reflects error code 324 in QuickBooks.

Troubleshooting Methods to Fix QuickBooks Error Code 324

Let’s take a look at the solutions that you can easily carry out step-by-step to resolve QuickBooks error code 324 on your workstation;

Solution 1. Delete Junk Files From PC

  • Run the windows run command on your device, and navigate to the “Cleanmgr” settings.
  • Thereon, a small window will be open on your screen.
  • Here, you have to check-mark all the categories/ folders in which you want to delete the junk files.
  • Click on the “OK” option to delete the junk files.

Solution 2. Fix Windows Registry Issues

  • Launch the windows run command, and type “Regedit” in the search bar.
  • Thereon, click on the “OK” option.
  • As the registry editor windows appear on your screen, you must select the related key with error code 324, which you want to take a backup of.
  • Now, launch the QuickBooks software, and click on the “File” menu option.
  • As the menu drop-down list appears on the screen, then you have to click on the “Export” option.
  • Choose the folder where you want to save the QuickBooks backup key, then provide a suitable name for the backup file.
  • As the export range box appears on your screen, click on the “Selected Branch” option and click on the “Save” option.
  • Here, you must save the file with a reg file extension.
  • At last, do a backup of the QuickBooks related registry entry.

Solution 3. Download New Windows Update

Sometimes, compatibility issues can affect the window’s performance badly. Old versions of operating systems may be incompatible with the latest version of software and applications.

That’s why we strongly suggest you always use the updated Windows version on your PC.

You can navigate through the windows update settings on your PC to download new updates. Update the PC’s window, then check whether the QuickBooks error code 324 has been terminated.

Solution 4. Reinstall the QuickBooks Desktop Application

Uninstalling and reinstalling the QuickBooks software on your device can help you fix to various issues.

Note: Before you begin this process, write down the product details and license key on a notepad to easily reinstall the QuickBooks desktop on your workstation.

  • Firstly, you have to move towards the control panel settings on your PC.
  • Move to the “Programs” section, and click on the QuickBooks application.
  • Now, click on the “Uninstall” option.
  • Thereon, you have to install the software again from the official website of Intuit.

Login to your QuickBooks account, and check whether the QuickBooks online banking error code 324 has been fixed. If not, then try solution #5.

Also Read: What’s New in QuickBooks Mac Plus 2023

Solution 5. Remove your Bank Account

By removing/ disconnecting your bank account, you can remove the link and can download the transactions that will take place in your account. Here are the steps that you can perform to disconnect the bank account;

  • Go to the “Transactions” option, and click on the “Banking” tab.
  • After that, move towards the “Bank Account” section, followed by a click on the “Edit” option.
  • Now, select the “Account” section option, and remove this account by clicking on the “Disconnect” option.
  • Thereon, save the applied changes.
  • Now, a confirmation window will appear on your screen that will ask you to confirm the request for deleting the link and download operations.

Once you are done with these steps, launch the QuickBooks software to verify if the QuickBooks banking error code 324 or 106 has been terminated.

Ending Note

In this article, we have covered the complete information about how to fix QuickBooks Error 324. You can execute the above-listed solutions to terminate the error. If the above-mentioned solutions do not work for you, or if you have any other query related to the topic, you can contact our QuickBooks experts via Phone at  +1 855 706 0905. Our team is available 24/7 around the clock to assist you with the best solution.

How to Fix TurboTax Error 190

TurboTax is an excellent software for tax filing; however, Any issues do occur in this program. TurboTax error 190 is one such issue that can crop up when a user attempts to open the file in TurboTax CD/Download.

Filing taxes is an imperative part of our lives. It is our due responsibility towards our country, which we need to fulfill. However, taxpayers who use TurboTax to file their returns may come across some issues at the Internal Revenue Service’s Free File website.

On getting TurboTax error code 190, you need to look for the possible reasons behind this issue and fix them by implementing the right solutions. Find detailed solutions to resolve TurboTax error 190 by navigating through this post until the end.

Facing issue TurboTax Error 190 and need instant help? Dial @ +1 855 706 0905 and talk to our experts to clarify all your doubts within no time.

USP Of TurboTax Error 190

It enables millions of taxpayers to file federal and state taxes without much paperwork. However, it has its own online error limitations, like error code 190. However, this is just a short-lived error that pops up on your screen. This appears on the screen when a user tries to open the organization file.

What is TurboTax Error 190?

It means that you are trying to open a 2018 tax file that comprises one or more state returns. However, the type of turbo tax you are using does not have the required state modules installed. In a scenario like this, you are required to start a mock return in order to download and install the state modules required.

People filing taxes often come across this error code off and on when they are using turbo tax software for a long. The only reason behind this error is the virus attack on your system or malware threats. Hence, one needs to troubleshoot the program. However, some errors are very trivial and can be rectified with simple troubleshooting. This kind of troubleshooting simply wants you to relaunch the TurboTax software and run Disk Cleanup to clear the cache.

Always remember that one can fix such kind of errors only if you are aware of the real cause.

Possible Reasons for TurboTax Error 190?

Before we discuss how to fix TurboTax error 190, it is crucial to look for the possible reasons behind the error. When you know the possible reasons behind the error code 190 in TurboTax, troubleshooting becomes easier. Below are some of the main reasons behind this error:

  • When you launch the Turbotax program on the system.
  • Another possible reason is the incorrect graphics drivers.
  • Also, when there is no compatibility between the TurboTax program and the running system program.
  • Compatibility issues between the system and program can also give birth to the TurboTax error 190.

These are some of the main reasons you can prevent (before the error occurs) or troubleshoot by implementing suitable steps.

Symptoms of Error 190 TurboTax

When error 190 occurs in your tax software, you can identify it with the below-given symptoms:

  • TurboTax error code 109 will show up on your screen all of a sudden.
  • An active TurboTax window will crash abruptly.
  • PC becomes annoyingly sluggish and stops responding.
  • The framework freezes or hangs every now and then.
  • You can’t launch the product on the framework.
  • Windows stop responding to the inputs provided by the mouse or keyboard.

If you see these symptoms on your screen, it means it is high time that you need to implement the solutions to get rid of error code 190.

Also Read: How to Change Email on TurboTax

How To Fix TurboTax Error 190?

Now that we know the possible reasons behind this error, implementing suitable solutions can help in the error resolution. Before getting started, you need to free up some space from your device.

To do so, you need to remove all the unnecessary files that are piled up, consuming additional memory space. Also, remove the cookies and cache from your system. By doing so, you can allow the program to run smoothly. Once done, perform the below-given solutions with the utmost care and attention:

1.TurboTax Software needs to be Relaunched

First things first, relaunch the TurboTax application to fix the problem. Kindly follow the below-mentioned steps for relaunching:

  • In the first place, hit the “Start a New Return” button.
  • Choose the “Taxes” tab of the report.
  • Download and save the report.
  • Shut down the TurboTax program.
  • Relaunch the software.
  • Check if the error is fixed by opening the file.

If the error persists, then move to the next solution and try the described steps.

2. Run Disk Clean Up

Make sure to free some space on your hard drive to clear the error from the software.

  • Prepare a backup of the files and keep space on your hard drive
  • Now clean the cache and restart your computer
  • Once the computer gets restarted, do a Disk Cleanup in order to clear space on your system.

The steps required to do the needful are mentioned below:-

1. Click on the right side of the disk.
2. Scroll down and click on Properties. A new window will appear on your system
3. Now select the Disk Cleanup option. The entire process may take some time its successful completion.

All these steps help you to successfully fill your tax returns. I would also like to share a few tips so that you can avoid e- file rejections. Let me tell you that the Internal Revenue Service can reject your e- filing due to various reasons. However, if you consider a few basic steps, you might be able to escape rejections.

All About E-file

Instead of mailing, E- file your returns as it has numerous benefits like receiving your refunds quickly.

1. SSN Taxpayer Mismatching

When you e-file, the IRS checks your name with your Social security number (SSN) on the form. They check whether it matches or not. Hence, you should always check for typo errors and avoid them. Also, one needs to ensure that if you are filing a joint return, then the SSN you report should be for the primary taxpayer.

Furthermore, mismatch also happens because of name changes due to marriage. Therefore in a situation like this, one needs to inform the Social Security Administration to get your SSN reassigned to your updated name. However, if you are unable to do that, just use your old name to avoid rejection.

2. Dependent Information Incorrect

At the time of claiming dependents on your tax form, it is mandatory that their full name matches the ssn, which is done by comparing the information to IRS master files. If it is not the same, your e- filing will get rejected.

Final Words!

These are a few tips that can work wonders to fix the TurboTax error 190. You can enhance the efficiency of your tax filing by following the above-mentioned steps and making the error resolution smooth sailing. However,  If you ever see TurboTax error 190 on your system, you can follow this simple guide to fix the problem and file the tax.

Frequently Asked Question

Q1. What Are The Benefits of Using TurboTax application? 

A. TurboTax is a very efficient tax filing and management application. You can import your information from the last year’s tax return and save time and effort in tax filing. Besides, you can also snap a picture of your W-2 or 1099-NEC, and it will arrange your information in the right places.

Q2. What are the other ways through which you can connect with the TurboTax professionals?

A. The TurboTax professionals can get in contact with you through several means. On their official website, you can get in contact with them via their toll-free hotline and chat. They have social media as well. On social media, the professionals are available on Twitter, Facebook, Instagram and LinkedIn. There professional team, will respond to your queries ASAP.

Q.3 What to do if I get stuck performing TurboTax Troubleshooting?

A. When you are feeling that you are stuck following the troubleshooting methods, simply visit their official website where you can contact them through the ways mentioned in the question number 2.

Q4. Do TurboTax experts charge for the error assistance?

A. Yes you will be charged for the assistance you get from the team of professionals that are expert in tackling TurboTax errors. They have various plans to assist you with the error issue arising in the system. Debit Card and Credit Cards are accepted as a payment methods.

Q5. How Can I Prevent TurboTax error 190 from taking place?

A. Prevention is better than cure, and you can prevent error code 190 in TurboTax by keeping your memory free and not piling it up with lots of unnecessary files and data. Besides, checking up on viruses or malware infections regularly can also help you in keeping the error code at bay.

Q6. What Is The Error Message Related To TurboTax Error 190? 

A. When the error occurs, it gives a warning message on your screen, which reads:

“The tax return you are attempting to load contains one or more state tax forms that are not installed on this machine. Please install state(s): to continue.”

The error message is an indication that it is time to perform the troubleshooting for the existing error code.

Q.7 What to do if no solution can fix the error 190 in TurboTax? 

A. If none of the above-explained solutions can bring luck to the troubleshooting of the error, you still have the option to connect with a TurboTax and explain your issues. They will respond to your queries based on the error description.

DIY Solutions to Rectify QuickBooks Error 108

QuickBooks Error 108 is one of the most annoying and frustrating errors, which occurs due to banking problems or technical glitches. When a user is trying to check their online Baking in the QuickBooks Online or QuickBooks Self Employed version, then this error appears. So that’s why it is important for you to acquire knowledge about fixes of Error 108 for every version. Read this blog to know more.

Want a quick solution for QuickBooks Error Code 108? Dial @ +1 855 706 0905 and get connected with a professional to grab the best assistance.

QuickBooks Error Code 108: Description

QuickBooks Error 108 arises mainly due to server issues from your Bank’s end. When it happens, your Bank stops acknowledging your Account Credentials. The Bank’s Website or the credit card company will start messaging you different emails related to:
1. The special offers from the Banks end.
2. Modification in the Financial Institution’s Website.
3. Information regarding maintenance of the Website.
4. Introduction of some New Service Terms.

What are the Root Causes of QuickBooks Error 108?

Let’s take a look at different causes that promotes QuickBooks Error code 108:

  • You are not logged in to your Bank Account in a proper way.
  • Presence of Pop-Up Blockers in your System.
  • You have provided an incorrect credential during login.
  • Presence of Unread messages or notifications from your Banks
  • Bank Server problems.
  • If you have deleted the downloaded transaction, this can also result in QuickBooks Error 108
  • Poor Internet Connection can also create issues for you.
  • Your System has more than one QuickBooks application installed in your system.

How to identify QuickBooks Banking Error 108?

If you are still wondering how to find out the QuickBooks Error code 108 in QuickBooks, you have to check its main symptoms, which are explained below:

  • An error alert will display on your Screen
  • You won’t be able to access your QuickBooks account.
  • Your System starts working sluggishly.
  • QuickBooks stops responding to your command.
  • Your QuickBooks App crashes sometimes.

Apt Methods to Root out QuickBooks Error 108

Now that you have acquired complete knowledge of all the important aspects of error 108 let’s learn and follow a few tried and tested solutions to troubleshoot it.

First Method: Look for all the Notification from your Bank’s Side

There are certain instances when your Financial Institution has sent you some important notification that needs a quick response, but you missed it. So it is a must to review the notification section for any latest updates and to do so, you can follow the given steps:

1. Initially, Sign in to your Credit card or Bank’s Website.
2. Thereafter, review all the notification from the Bank that needs a Quick Response.
3. Now, delete all the notifications that seem unimportant to you.
4. Next, Sign out from the Online banking account.
5. Launch QuickBooks Online, and Sign in there.
6. Now Hit on the Banking option present on the left side of the Screen.
7. From the banking tab, Select the Update option.

Also Read: QuickBooks Desktop 2023 System Requirements

Second Method: Turn Off the Pop- up Blocker

In case you are not able to receive any notification from your Bank, you may have to disable the pop-up blocker present in your Browser.

1. Launch your Browser, then go to the Settings option.
2. Now, look for the installed Extension available in the system.
3. Review and find if your system has any Pop-up Blockers installed.
4. If you find any, Turn it off.
5. After that, Go to the settings of the Antivirus available in your system, and search for the pop-up feature.
6. Again, disable it if you find one.
7. Now, try to download your banking transactions using QuickBooks Online.

Third Method: Modify your Financial Institution Connection in QuickBooks

This method is mandatory for those who have made any kind of changes in their online banking login information recently and forgot to update it in QuickBooks Online. If you do not update it, QuickBooks will lose the connection with your bank account and stop fetching account details.

1. Open QuickBooks online and click on the Banking tab.
2. Thereafter you have to go to your bank accounts and hit the Pencil icon present next to your Account Name.
3. Now, select the Edit Sign-in Info option.
4. At last, update the new id and password of your online banking.

Fourth Method: Run the System File Checker Tool in your System

To fix QuickBooks Error 108, you can also try to use the System File Checker Tool; this will rectify the issue efficiently.

1. Enter cmd in the Start menu or in the Run dialog box.
2. Don’t hit the enter button. Instead, press the Ctrl+Shift key, and they enter.
3. A new permission dialog box will appear on your Screen; select Yes.
4. Now, a black window will appear on your Screen; enter SFC/scannow there.
5. You will reach the System File Checker to commence scanning; from there, you have to follow the on-screen instruction to complete the process.

Fifth Method: Organize Windows Updates

1. Click on the Start button, then enter updates in the search box.
2. A new window update dialog box will appear on your Screen.
3. Here, you have to search if any new update is available; if yes, then install it, and check if the error is resolved now.

Ending Note!

Here we have arrived at the end of this blog and hope that the mentioned solutions can help you in fixing QuickBooks Error 108. For any additional help, contact us via the Live chat option or email us your Query.

How to Fix QuickBooks Error 1303?

Are you stuck with QuickBooks Error 1303 and want to learn the easiest way to tackle it? Go through this Blog to learn more about it.
QuickBooks Error Code 1303 is an installation error, which happens when the installer doesn’t have appropriate permission to use the path to the directory. Whenever you encounter this error, you will be presented with the following error message stating:

“Error 1303: Installer has insufficient privileges to access this directory. C:\…\Intuit”.

Continue reading this entire article to Acquire more knowledge about the main causes behind Error 1303 in QuickBooks. Moreover, we have also mentioned all the ways to troubleshoot the issue.

Not able to Install QuickBooks due to QuickBooks Error 1303? Dial @+1 855 706 0905 to get immediate help from professionals.

What Triggers QuickBooks Error Code 1303?

There are not many reasons that lead to QuickBooks Error 1303, but a few very basic ones. The user can face this error if there is some Misconfiguration in the Settings for Windows File sharing. Apart from this, the error can also emerge due to the given reasons:

  • System doesn’t have Enough Space in the drive.
  • Technical error in QuickBooks Installation process.
  • If the System doesn’t have enough control to use the path to the directory.

What are the Signs of QuickBooks Error 1303?

If you are still wondering how to determine the QuickBooks Error code 1303 in QuickBooks, you have to check its root symptoms, which are explained below:

  •  You are not able to Install QuickBooks
  • Your Operating System is freezing.
  • Installation of other programs or applications may stop automatically.
  • Your Desktop stops accepting your command.
  • The Windows start behaving sluggish.
  • An error message will appear on your screen stating QuickBooks Error 1303.

Also Read: How to Fix QuickBooks Error 103

Verified Solutions to rectify QuickBooks Error 1303

Now that you are fully aware of all the important aspects of error 1303, let’s learn and follow a few tried and tested solutions to troubleshoot it.

First Solution: Get the QuickBooks Tools Hub installed in your System

QuickBooks Tools Hub is made to fix all the common QuickBooks installation errors caused due to damaged Microsoft components. By installing Tools Hub, you can easily eliminate the error code 1303 instantly. Once you are done with the installation process, run the tool for your System and resolve the error.
Note: To utilize Tools Hub, you first have to close the QuickBooks software.

  1. Download the QuickBooks Tools Hub from Intuit’s official website.
  2. Thereafter, save the file in your System.
  3. Now, Once the download process is complete, launch the file.
  4. Next, you have to click on the I am having problems installing QuickBooks, and proceed further by hitting Ok.
  5. Now, wait for some time; the diagnostic tool will verify and review the issue, then try to rectify it.
Second Solution: Fix the QuickBooks error 1303 Manually

In case you tried resolving the QuickBooks error code 1303 using QuickBooks Tools Hub, and it did not work for you, then try to do the same manually.

Stage 1: Make Changes in the Permission of the Required Folders

One of the major reasons behind error code 1303 is insufficient permission for the groups of Windows. With the help of this method, you will give permission to SYSTEM and Everyone group to utilize the directory on Windows.

  1. Initiate the process by Pressing the Windows+R keys to open the Run box.
  2. Now, in the required box, Provide the path as C:\ProgramData\COMMON FILES\.
  3. Click on Ok, and a new window will open in front of you that shows folder content.
  4. In that Window hit on the Organize option.
  5. Thereafter, select Properties.
  6. From there, you have to go to the Security Option.
  7. Now, select the Advanced tab, and hit on the Edit option.
  8. Next, scroll down to check the Permission entry list and select the System User option.
  9. Choose the Checkbox for the Full Control row present in the Allow column.
  10. After that, hit Ok.
  11. Now, repeat the same process for Everyone’s Groups as well.
  12. Verify the checkbox that says, “Replace all existing inheritable permissions on all descendants with inheritable permissions from this object. “
  13. Now, Click on the Ok button.
  14. At the end, Install QuickBooks Desktop.
Stage 2: Disable the Simple File Sharing
  1. Open the Run window by pressing Windows + R.
  2. Thereafter, you have to copy & paste RunDll32.exe shell32.dll,Options_RunDLL 0.
  3. Now, Hit Enter.
  4. Open the view tab and navigate to the Advanced Settings list.
  5. Review and remove the Use simple file sharing checkbox.
  6. At last, click on Ok, and go further with the QuickBooks Desktop installation.
Third Solution: Run the Utility Tool

Running utility may fix QuickBooks Error 1303 in your System, so let’s look at the steps to do it:

  1. At the beginning of the process, you have to click on the link: permissionsfix.bat.
  2. Thereafter, Save that on your Desktop.
  3. Open the DOS window by double-clicking the file, then enter Y when the prompt appears on your screen. This will modify the permission of the required folder to default.
  4. Next, you will be prompted to “are you sure you want to continue? (Y/N)”.
    Note: “y” must be entered in lowercase to ignore any kind of obstacle.
  5. Now, press any key to exit the DOS window.
  6. At last, insert QuickBooks CD and install it again.

Bottom Line!

You can instantly rectify the QuickBooks Error Code1303 by performing the above-described methods. However, if you in any additional help from professionals, you can mail us your Queries at  +1 855 706 0905 or use the live chat option as well.

3 Easy Methods to Fix QuickBooks Error 1706

QuickBooks error 1706 is a point of sale error that indicates that there is an issue with the downloading and installation of QuickBooks Point of Sale (POS). This error mostly arises when the user tries to attempt the installation from a removable media, and it appears with a pop-up display message as;

“Error: 1706, No valid source could be found while opening the point of sale.”

If you are also facing the QuickBooks error 1706, then this article can be greatly helpful for you. In this write-up, we are going to discuss in depth the list of solutions that you can execute step-by-step to get the error resolved.

“Get immediate help from experts in eliminating error code 1706 in QuickBooks by placing a call at+1 855 706 0905.”

Possible Reasons Behind QuickBooks Error 1706

Some of the common factors/ reasons due to why the user may encounter the QuickBooks error 1706 while working on the software are as follows;

  • If you have installed the incompatible or beta version of the Microsoft .Net Framework 1.1 on your device.
  • QuickBooks desktop accounting software is not installed properly on your device.
  • If the QuickBooks company’s files is damaged or corrupted.
  • If you have setup too many applications that automatically starts during the windows start-up procedure, then it can eventually lead to QuickBooks error 1706 on your device.
  • The PC’s windows registry files are damaged or corrupted.
  • If you have installed the Point of Sale software from the damaged or corrupted external drive.

How to Fix QuickBooks Error 1706?

Let’s take a look towards some of the tried and tested solutions that you can easily carry out step-by-step to fix QuickBooks error 1706;

Solution 1. Download the New Updates of QuickBooks Desktop Point of Sale

Given below are the steps that you can easily carry out to download the new updates of QuickBooks point of sale software on your device;

  • First of all, users have to move towards the “Downloads and Update” web page drop down menu list on your device.
  • After that, as the product drop down menu appears on the screen, then you have to select the “QuickBooks Point of Sale” option.
  • Moving ahead, you have to select the edition and the version of the product which you are using.
  • Next, click on the “Search” tab option, and then click on the “Get the Latest Updates” option.
  • Once you are done with the above steps, then you have save that file on your device, and then update the QuickBooks POS software on your device.
  • At last, perform a deep restart of your device.

Once you are done with the above-listed steps, then verify if the QuickBooks error code 1706 has been resolved or not. In case, if you are still facing the error, then try the next solution.

Solution 2. Re-install QuickBooks Desktop Point of Sale Software

The next solution that we suggest you to follow to resolve QuickBooks error code 1706 is re-installing the QuickBooks desktop point of sale software on your device. In order to do that, here are the steps that you can carry out;

Note: If you have installed the incorrect version of software on your device, then you have to re-install the software to use it smoothly. After installation, users won’t be able to modify the installation type.

  • First of all, you have to download the latest version of QuickBooks point of sale on your device.
  • Thereon, double click on the “POS Executable File” and if prompted, then overwrite the existing extracted files.
  • Next, you have to select the “All Positive” options from the installation wizard.
  • Moving ahead, provide the license and product number of your QuickBooks account. You have to provide these details without any use of spaces and dashes.
  • Once you are done with the above steps, then you have to select the mode in which you wants to install and use the QuickBooks point of sale on your device.
  • In case, if you wants to use the QuickBooks POS on a stand alone system, then you have to select the “Single User” option.
  • Whereas, if you want to use the POS software on more than 2 PC’s, then you can choose Multi user mode.
  • You have to carefully choose the system type server and the version of POS software, that you wants to installed on your workstation.
  • At last, once you are done with the above-listed steps, then you have perform a reboot of your device, and then activate the QuickBooks POS account on your device.
Solution 3. Run the System File Checker Tool on your Device

In order to use the system file checker tool on your workstation, given below are the steps that you can carry out to do so;

  • First of all, you have to move towards the windows start menu on your device.
  • After that, you have to type “Command prompt” in the search bar.
  • Now, as the search list appears on the screen, then you have to do a right click on the “Command Prompt” option, and select the “Run as Admin” option.
  • If prompted, then you have to provide the login credentials of your admin account.
  • In a scenario, if your PC is working with the windows 11, 10, 8.1, or 8 operating system, then you have to use the DISM tool before using the system file checker tool.
  • Moving ahead, type “SFC/Scannow” in the command prompt window followed by pressing the enter button.
  • With that effect, the system file checker tool will start the scanning and repairing process of corrupted system files on your device.

Ending Note

We hope that the above listed information has helped you in terminating QuickBooks error 1706. In a scenario, if you are still encountering the QuickBooks error 1706, or if you faced any challenge while carrying out the above-listed steps, then you can get in touch with our team via Phone at +1 855 706 0905. Our accounting experts are available 24*7 at the help desk to attend your query, and deliver the best possible solution.

A Guide to Deal With QuickBooks Desktop TLG File Issue

QuickBooks Transaction Log File (.TLG) keeps a record of all the database server activities related to the company’s file, such as all the reads, edits, inserts, and deletes. It acts as one of the QuickBooks file types that are created when the user tries to open a particular company in a new location.

If your company data file loses a connection with the TLG file, then a new file will be created on your device. Although, if any user faces a QuickBooks TLG file issue on your device, it can disrupt the user from working on the software smoothly. If you are also facing QuickBooks Desktop TLG file issues and looking for some tested solutions, this blog is important for you.

Possible Causes Behind QuickBooks Desktop TLG File Issue

Let’s take an overview of the possible reasons due to why a user may encounter QuickBooks TLG file error;

  • Damaged or corrupted QBWUSER.INI file.
  • Corrupted windows program files can also lead to errors.
  • An outdated version of PC’s windows.
  • You need to include a QuickBooks data file from your device.
  • When the QuickBooks file name exceeds the normal length of the file.
  • If you are using the wrong version of the QuickBooks software, then it can lead to QuickBooks Desktop TLG file issues.

Which Errors are Caused by TLG File Errors?

An error/ issue with the QuickBooks transaction log file can lead to various technical issues on your QuickBooks desktop software. Some of the common errors that arise due to the TLG file errors are as follows;

  • QuickBooks error code 6190, 816: QuickBooks fails to open the company’s file
  • QuickBooks error 6190, 82: QuickBooks fails to open the file on the hosting workstation.
  • QuickBooks is unable to run the QuickBooks server manager on your device.

Whenever this similar error arises, the only solution left to the users is to repair the TLG file or delete it. Remember, deleting this file will not lead to any loss of your important data file. Although, data needed to restore an old backup file may get missing.

Precautions Before Fixing QuickBooks TLG File Issue

Before you directly begin with the process of deleting the TLG file on your device, it’s important to understand some of the important points that you must ensure before you delete the TLG file;

  • Make sure that there is no issue with the windows program files.
  • The QuickBooks desktop application is properly installed on your device and is not corrupted.
  • You are using the latest version of the QuickBooks desktop application.
  • The company file will be hosted only on a single workstation.

How to Resolve QuickBooks TLG File Error?

The only solution users can execute to resolve the QuickBooks TLG file issue is deleting it. As this file is created automatically, therefore, deleting the file will not harm your data.

So, given below are the steps that you can carry out to delete QuickBooks Transaction Log File (TLG) file on your device;

  • First, you must navigate to the location where the QuickBooks company files are saved.
  • Thereon, search for the file ending with the extension as “.TLG.”
  • After that, you have to delete this file.
  • Moving ahead, provide a new name to the QuickBooks file by changing the file name in that particular file directory.
  • At last, you have to rename the file, and a new TLG file will be formed automatically.

Rename QuickBooks TLG File

Another solution that you can carry out to fix the QuickBooks Desktop TLG file issue is renaming the TLG issue. Here are the steps that you can perform to rename the Transaction Log File on your device;

  • First, open the QuickBooks company folder on your device.
  • Thereon, search there for the QuickBooks Transaction Log File, and do a right click on it.
  • After that, a pop-up window appears on the screen, then click on the “Rename” option.
  • Now, you must add “.TLG” at the end of the file extension.
  • With that effect, the file’s new name will end at “.TLG.old.”

Once you are done with the above steps, verify whether the QuickBooks desktop TLG issues have been terminated.

To Conclude

As shown above, we have tried our best to enlist the numerous solutions that you can easily carry out to fix QuickBooks desktop TLG file issues. If you have any queries related to the topic, you can contact our team via Phone at +1 855 706 0905. Our QuickBooks experts are available 24*7 at the help desk to attend to your query and assist you with the best feasible solution.

How Can I Resolve QuickBooks Error 1334? Proven Solutions

QuickBooks error 1334 can take place due to a missing or damaged QuickBooks software installation file. Moreover, damaged .NET Framework can also promote this error during the QuickBooks installation. Some essential Microsoft components, such as MSXML, C++, and .NET Framework are required for the smooth installation of the QuickBooks application.

When they get damaged, you may see the QuickBooks error code 1334 on your screen. Multiple other factors can also give rise to this error. Finding and fixing them is the only way to get rid of the error. Reading this post until the end will help you gather the required information for the error resolution. Let’s find out.

Not sure how to fix QuickBooks error 1334? Get in touch with us using our helpline number +1 855 706 0905.

Instances When You May See QuickBooks Installation Error 1334

There are several instances when you may notice an error message on your screen having error code 1334:

  • While starting or shutting down Windows.
  • During the installation of QuickBooks Desktop on your device.
  • When QuickBooks is running on your device.

What Does QuickBooks Desktop Error 1334 Mean?

When installing the QuickBooks application, you may see any of the following error message on your screen with the text:

“Error 1334. Error writing to file [file name]. Verify that you have access to that directory.”

“Error 1334. The file cannot be installed. Insert the QuickBooks CD and retry.”

The error message appears all of a sudden during the installation and stops you from proceeding any further with the process. Some other anomalous behavior of the Windows or QuickBooks application can also be seen when the error takes place.

Major Causes Behind QuickBooks Error 1334

Some of the main reasons behind the error code 1334 in QuickBooks are stated in the below-given list:

  • Attacks from the detrimental programs, such as a virus or malware.
  • Corruption in the QuickBooks Desktop installation or Windows files.
  • Accidental or unintentional deletion of a QuickBooks related file.
  • Damage or corruption in the QuickBooks Desktop software.
  • Partially installed program or a damaged installation of the program can also promote error 1334 in QuickBooks.
  • A recent QuickBooks-related change has corrupted windows registry.

Symptoms of QuickBooks Error Code 1334

QuickBooks error code 1334 can take place due to a myriad of the possible reasons as they are mentioned in the below-listed pointers:

  • Trouble with the QuickBooks installation procedure.
  • Occurrence of the QuickBooks error message 1334.
  • Computer hangs or freezes periodically when the error occurs.
  • Abnormal behavior of the QuickBooks application or your Windows device.
  • An active Window crashes in no time when the error takes place.

Effective Solutions To Fix QuickBooks Error 1334

Now that much has been discussed about the error, let’s follow the solutions that can keep the error message at bay.

Solution 1: Perform The Clean Installation of QuickBooks To Repair It

An incomplete/partial installation of the QuickBooks is one of the primary reasons behind the QuickBooks error 1334. You can eliminate the error by following the below-given steps:

  • To clean install QuickBooks Desktop, you need to uninstall and reinstall the Windows. It will remove the unsaved data from the system’s hard drive. This way, you can make a fresh start of your system.
  • Performing a clean install for Windows also clears out all the junk and undesired log files piled up on your computer over the time due to web surfing and other usage.

Try reinstalling QuickBooks and check if the QuickBooks 1334 Error is fixed or not. If it continues, try the next procedure.

Solution 2: Check The QuickBooks Company File Extension

In this procedure, you need to make sure that the QuickBooks company file has .QBW extension. If not, correct it:

  • When on Windows File Explorer, navigate to C: \Users \Public \Documents \Intuit\ QuickBooks.
  • Now, check if the company file has .QBW extension.
  • If the file name has a different extension, right-click on it and select Rename.
  • Change the correct extension to .QBW and check if it can fix QuickBooks error 1334.
Solution 3: Repair Windows .NET Framework

Windows .NET Framework is an essential Windows component required in the installation of QuickBooks software. If damaged, you need to repair or reinstall it for the error resolution. In such a case, you can run QuickBooks Install Diagnstic Tool to find and fix the installation issue.

  • Download the QuickBooks Tool Hub from the Intuit’s official website and install it by following the on-screen instructions.
  • Next, open the Tool Hub and select Installation Issues.
  • The Tool Hub will now enable you to run the QuickBooks Install Diagnostic Tool.
  • Wait for this utility to detect and repair the persisting issue.

Check if the error is resolved or not.

Solution 4: Repair The Registry Files To Fix QuickBooks Error 1334

Corruption in the registry file is also a potential reason behind the arrival of the QuickBooks error code 1334. The registry database has the crucial machine and program related information. Therefore, damaged Windows registry files need to get resolved; best with the help of a professional’s assistance.

Final Words!

QuickBooks error 1334 can take place due to various possible factors. This post highlights them all and explains the relevant solutions to eliminate them. For further assistance, you may connect with our experienced professionals. They will guide you with the one-on-one assistance for instant error resolution.

An Informative Guide to Download and Install Sage 50 Canada 2023 Edition

The Sage 50 Canada 2023 Edition has recently developed more advanced features to make the accounting process much more convenient. You can also enhance your accounting experience with upgraded and robust security accounting features.

However, if you are hunting for a detailed blog to download and install Sage 50 Canada 2023, you are in the right spot. This post contains all the essential facts required to install the Sage 50 Canada 2023 edition installed on your device effortlessly.

Wondering how to download and install Sage 50 Canada 2023 Edition? Call us at +1 855 706 0905 and talk to our experts to acquire best possible assistance. 

Basic System Requirements Required to Install Sage 50 Canada 2023 Edition

Before proceeding further with the installation process, one must verify that their system must fulfill the basic system requirements. This is so that you can run the Sage 50 software smoothly on your operating system. To get a deep insight into the system specifications, go through the pointers listed below.

1. Verify that the users must have Windows 7 SP1 or the newly launched operating system version.
2. Moreover, check that you must have the Intel Core i5 or AMD Ryzen 3 2200 G or the higher version.
3. The space required for installing the Sage 50 software is 8 GB.
4. Additionally, you must have a high-speed and good internet connection.
5. Apart from this, you require 10 GB of free hard disk space.
6. Lastly, ensure that the screen resolution is 1024 X 768 pixels or higher.

Also Read: Sage 50 Not Responding

Stepwise Instructions to Download and Install Sage 50 Canada 2023 Edition

1. Initially, you must download the newly launched version of Sage 50 Canada 2023 Edition on your device.
2. Once the downloading process is over, run the extracted file from the download folder.
3. Next, you must pick a suitable location to save the sage 50 Canada 2023 Edition file.
4. After setting up the location, proceed further by hitting the Next button.
5. You must thoroughly review the terms and conditions mentioned in the License Agreement.
6. Once you have gone through all the guidelines, give your consent by selecting the “I Agree” checkbox. Later on, opt for the highlighted Install button.

For instance, if the user doesn’t give their consent to the terms and conditions, click the “Not Now” option. Consequently, it will take you back to the window.

1. Subsequently, the installation process is accomplished after clicking the Install button.
2. Furthermore, opt for the Finish option to end the installation process.
3. Finally, you can now run the Sage 50 Canada 2023 Edition on your workstation to accomplish your accounting tasks.

What should be done to Activate Sage 50 Canadian 2023 Edition?

Once you have downloaded and installed the Sage 50 Canadian 2023 Edition, you can activate it. By activating the application, you will get timely updates of the application. These updates include payroll tax service information, customer help options, and other benefits.

Go through the instructions written below to activate the Sage 50 Canada 2023 Edition.

1. In the initial stage, you must go to the Sage Help menu and then opt for the Sage 50 Activation.
2. Afterwards, choose the highlighted “Activate Online Now” option.
3. If you are accessing Sage for the first time, you must add the details in the form before activating the application.

Proper Instructions to Install Sage 50 Canadian 2023 On a Server

Here are the simple instructions to easily install Sage 50 Canadian 2023 on a server.

1. In the first stage, download, install, and then register your Sage 50 Desktop 2023 software.
2. Now, you have to choose a suitable server and operating system from the list of options available.
3. After this, try to connect with your server and install the software.
4. Furthermore, you must do the necessary configuration of the software.
5. At last, you must begin accessing the Sage 50 Canadian 2023 on a server

Latest Features You Can Access With Sage 50 Canadian 2023

In this blog section, we are discussing the latest features that are added in the Sage 50 Canadian 2023. Have a look at these features closely.

1. Latest Localization Features:-

Sage 50 software launches plenty of localization features consisting of automatic detection of countries, and help for French and Spanish translations. Moreover, it also allows you to customize their menus within the application to show their specific territory.

2. Enhanced Reporting and Analysis Tools:-

Recently, the new editions of Sage 50 Canadian 2023 are new reporting and analysis tools (RAT). With the help of RAT, you can prepare customized reports using different data sources and presentations format. Moreover, it consists of powerful filters to access the data easily. Lastly, it combines with other Sage applications, including Accounts Payable and receivables management.

3. Utilize Automated Workflows for Streamlining Business Processes:-

Sage 50 Canada 2023 Edition provides the Automated Workflows feature to manage your business tasks easily. For example: a business can set up an automated billing process so that users can bill the customers easily monthly as per the past spending trends. Thus, it helps in saving your precious time for the business administrators. Moreover, it also reduces the number of errors made while processing customer payments.

Drawing To a Conclusion!!

Here we assure you that this post has provided you with all the relevant facts required to download and install Sage 50 Canada 2023 Edition. However, if you need additional help, use the live chat facility to connect with our highly-trained experts. They will guide you with the proper instructions to resolve your problem within the shortest time.

A Perfect Guide On QuickBooks Desktop 2023 System Requirements

QuickBooks Desktop 2023 version is now available in the market with upgraded and robust security features to handle your business accounting tasks. With the new update, you can gain access to a multitude of new features. Thus, it will help enhance your accounting experience. However, to get the details regarding the QuickBooks Desktop 2023 system requirements and its features, continue reading this post.

Want to get additional information regarding QuickBooks Desktop 2023? If that’s so, contact us at +1 855 706 0905 and get your query fixed under expert’s supervision. 

Know More About QuickBooks Desktop 2023 System Requirements

System requirements are the basic specifications to run the software smoothly on your operating system. Therefore, it is beneficial to meet the basic system requirements. Take a look at the pointers given below to better understand them; check them out.

1. Operating Systems:-

According to the latest updates, Microsoft will not provide security updates or support for Windows 8.1 PC after Jan 10, 2023. In short, the QuickBooks Desktop 2023 doesn’t support Windows 8.1 and can’t be installed.

It only supports the following operating systems; read them carefully.
1. Windows 11 and Windows 10 of 64-bit editions.
2. Moreover, it also supports Windows Server 2022, 2019, and 2016 for the Standard and Essentials edition.
3. Whereas it also works best on Windows Server 2012 R2 and Windows Server 2012 for Standard and Essentials Edition.

2. Database Servers

• It also works on the Windows Server 2022, 2019, 2016, for the Standard and Essentials edition.
• Moreover, it works best with the Windows Server 2012 R2 and 2012 for the Standard and Essentials edition.

3. Web-Browsers Requirements

To install the QuickBooks Desktop 2023, you must have a stable internet connection and Google Chrome.

4. Hardware and Operating System Requirements

Below we have discussed the hardware and the operating system for QuickBooks Desktop 2023.

Processor:-
◦ You must ensure that your system must have a processor of 2.4 GHz minimum.

  • RAM:-
    ◦ 16 GB of RAM is advised to run the application easily. However, it is also sufficient if you have 8 GB of RAM.
  • Moreover, depending on the number of users, the following server RAM must be enough.
  1. 1-5 Users:- 8 GB
  2. 10 Users:- 12 GB
  3. 15 Users:- 16 GB
  4. 20 + Users:- 20 + GB

• Space on your Hard Disk:- 
• Verify that a minimum of 2.5 GB of disk space is required. Moreover, 60 MB is required for Microsoft .NET 4.8 Runtime and the installation files to install the additional software.
• Also, the additional requirements for Intuit Data Protect in QuickBooks Connected Services:
◦ It has been suggested that your system must have a minimum of 4 GB of RAM.
◦ The largest file size is set back up to + 100 MB, or the space must be 100 MB or double the restore size.

Windows:-

  1. It works best with the North American version of Windows.
  2. Moreover, ensure that the Regional Settings are set to English.
  3. Proper Admin rights is required for the server computer while hosting in multi-user mode.

• Optical Drive:-
◦ The user must have a 4X DVD-ROM drive for installing the physical CD.

• Screen Resolution:-
◦ Verify that the display is optimized for 1280 X 1024 resolution. Also, it can be higher with up to 2 extended monitors.
◦ Moreover, it is best optimized for Default DPI Settings for a given computing device.

5. Anti-Malware and Antivirus Software Required:-

Following are the anti-malware and antivirus software that works best with QuickBooks Desktop 2023, Premier 2023, and Enterprise 23.0. Only you have to make some necessary changes in the programs’ settings to get outstanding QuickBooks performance.

Antivirus Software:- 
1. Mcafee
2. Avast
3. Bitdefender
4. Norton
5. Kaspersky
6. Trend Micro Security
7. Panda Dome
8. Avira
9. Symantec
10. Sophos
11. F-Secure

Anti-Malware Software
1. Bitdefender
2. AVG
3. Spybot
4. Emsisoft
5. Webroot
6. ZoneAlarm
7. F-Secure
8. Kaspersky
9. Malwarebytes

Apart from these, verify that QuickBooks Desktop 2023 must have internet security protocol TLS 1.2 for connected services.

Details About the QuickBooks Desktop 2023 Pricing

As per the recent guidelines announced by Intuit, prices will change depending on the different versions of QBDT. To know more details about the QuickBooks Desktop 2023 price, look at the points below.

1. QuickBooks Desktop Pro Plus and QuickBooks Desktop Pro Mac are $549.
2. Whereas, the pricing for QuickBooks Desktop Premier Plus is $799.
3. Moreover, the price of QuickBooks Desktop Enterprise 23.0 will not be changed.
4. Apart from this, the price for QuickBooks 2023 ProAdvisor would be $799.

Additional Features in QuickBooks Desktop 2023

QuickBooks Desktop 2023 has recently launched numerous features to streamline your day-to-day accounting tasks. Moreover, to get in-depth knowledge about this accounting application, look at the below-listed points.

Track Vehicle Mileage:-

The users can utilize the QuickBooks mobile application to monitor the miles they have driven for the business. After this, you can import and then approve the same within the QuickBooks Desktop. Moreover, it also enables you to monitor your trips and vehicle details. This is so that you have accurate information regarding the essential mileage deductions during the tax time.

Cash Flow Hub:-

Using the cash flow hub feature, you can take your business to the next level. This feature provides you with complete information about the cash status presently in the organization.

Payment Links:-

Moreover, it also provides a feature payment link. Using it you can quickly collect payments for the items that don’t need any invoices.

Wrapping It Up!!

We hope that you find this post worth reading and beneficial. Moreover, we assure you that you have all the relevant details necessary for QuickBooks Desktop 2023 System Requirements. However, if you still have any query, you can reach out to our experts through live chat, and they will give all answers to your questions within no time.